Setup Guide for Agents
This guide summarizes the basic knowledge that agents need in order to work in Yalo Sales Desk.
Logging in for the first time
Once your manager or supervisor has created your user account, you will receive a link with instructions for your first login.
Upon your first successful attempt to log in, you must define your new password.
Keep in mind that this password is specific to your account and you must never share it with anyone.
Getting to know Sales Desk
The main view of Sales Desk always has the conversation list in the left side of the screen, while the rest of the view varies according to the context.
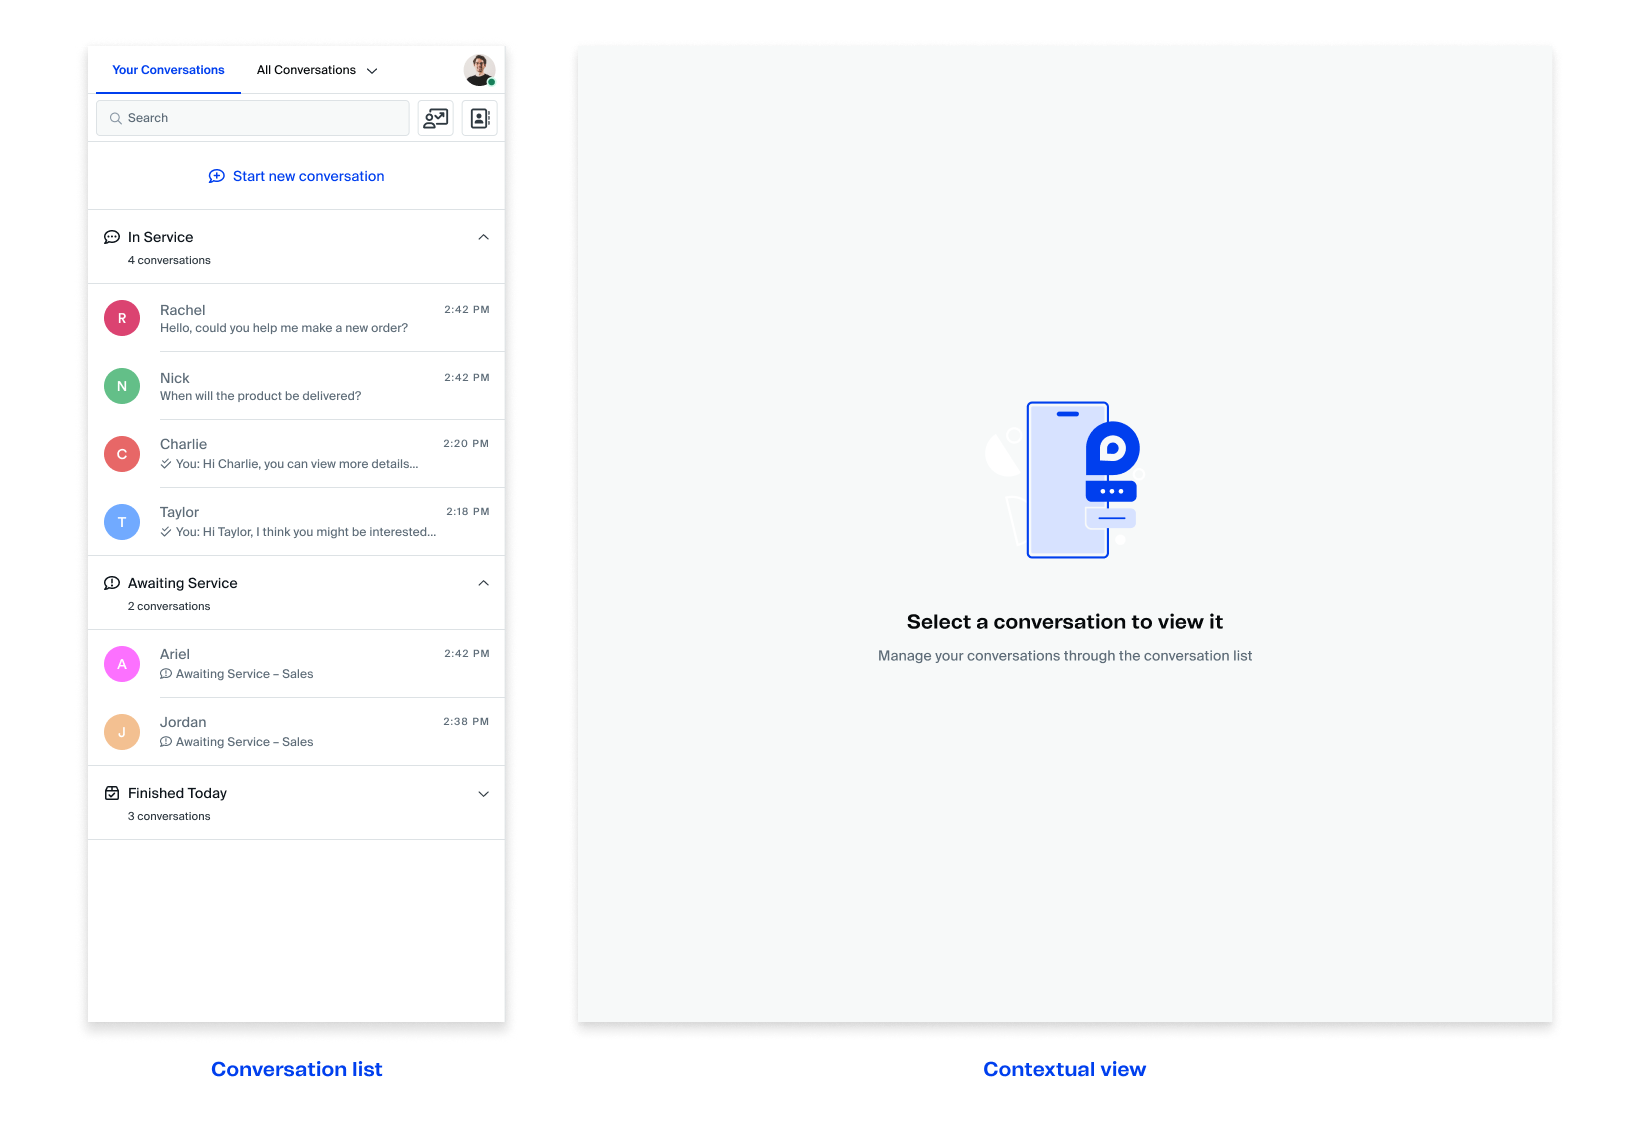
Viewing the conversation list
Conversations will show up in the conversation list. You can click a conversation to open it.
The sections of the list also show the current state of the conversations, and depending on your organization's settings there may be different groups of conversations:
- In Service: conversations you're currently servicing.
- Awaiting Service: conversations that are awaiting service.
- On hold: conversations manually put on hold (i.e., when an agent needs to wait for an answer from a colleague or an update from a third party).
- Finished today: conversations that have been finished since the day started.
You can also switch between displaying Your conversations and All conversations through the tabs.
- Your conversations shows only conversations you're currently servicing, conversations you can pick up, conversations you've put on hold, and conversations you've closed.
- All conversations show all conversations you have permission to view, regardless of state.
Starting to serve a contact
When you open a queued conversation, you can read the messages that the customer had previously exchanged with the Flow assistant.
If your company uses Manual Selection distribution, in order to pick up the conversation and begin serving the contact:
Send any type of message using the message bar.
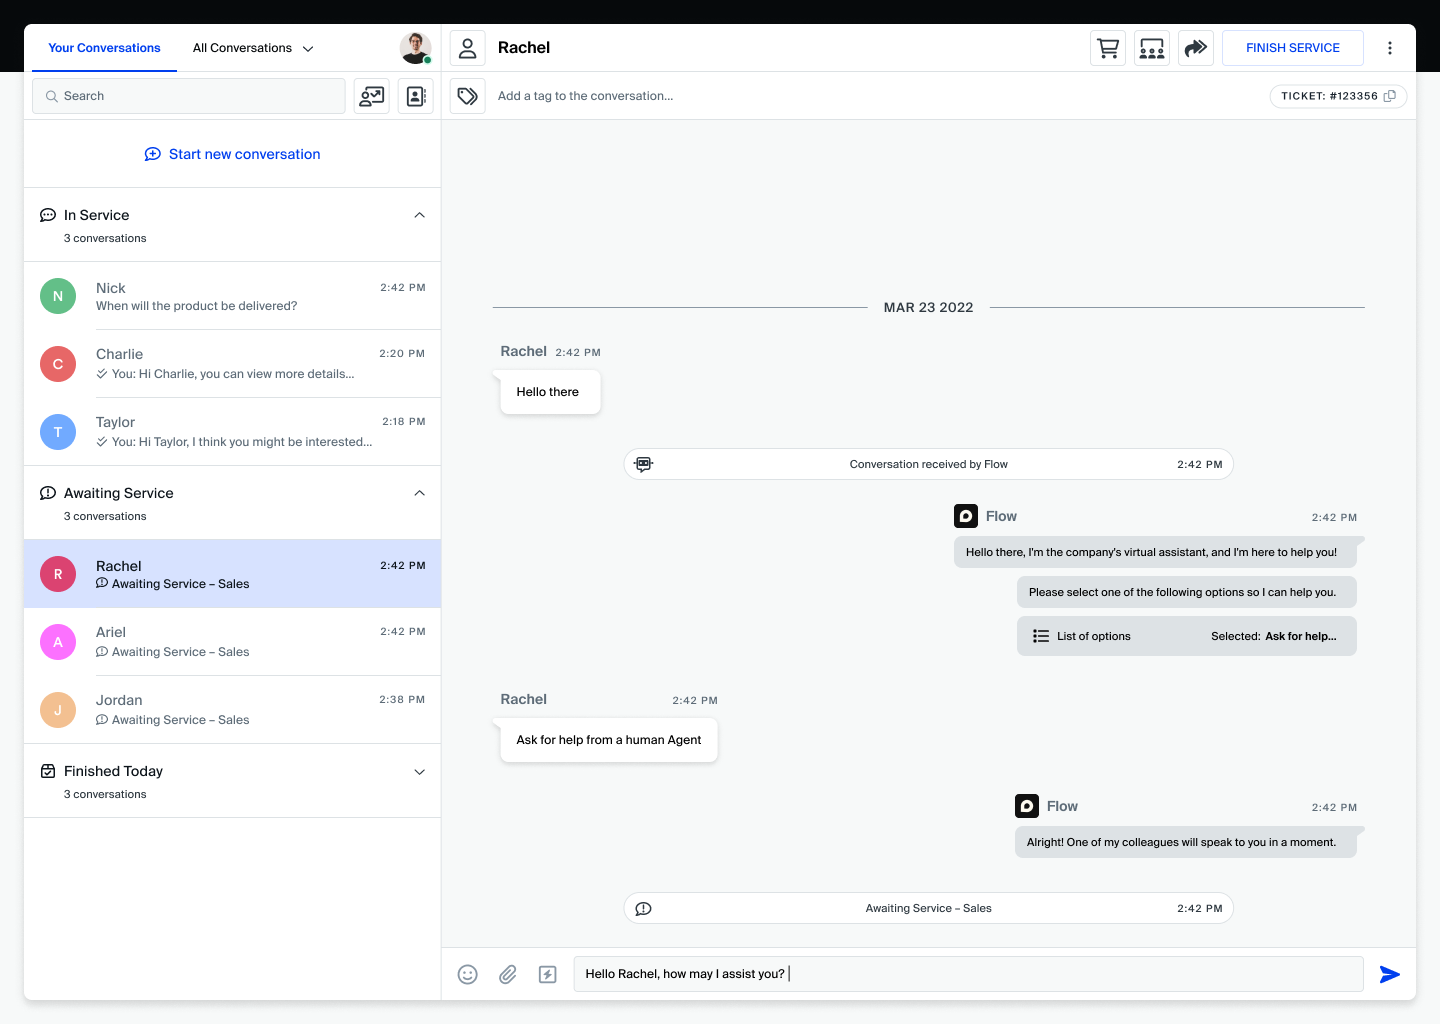
Once you send a message, the conversation automatically moves to your In Service conversations list.
It also disappears from your colleagues' Awaiting Service conversations. This prevents multiple agents from attempting to assist the same contact.
Using quick messages
You can also use preset messages created by your managers or supervisors to quickly send to your contacts. They can also be used to start service.
To send a quick message while in a conversation:
- Click the quick messages icon next to the message input to open the menu.
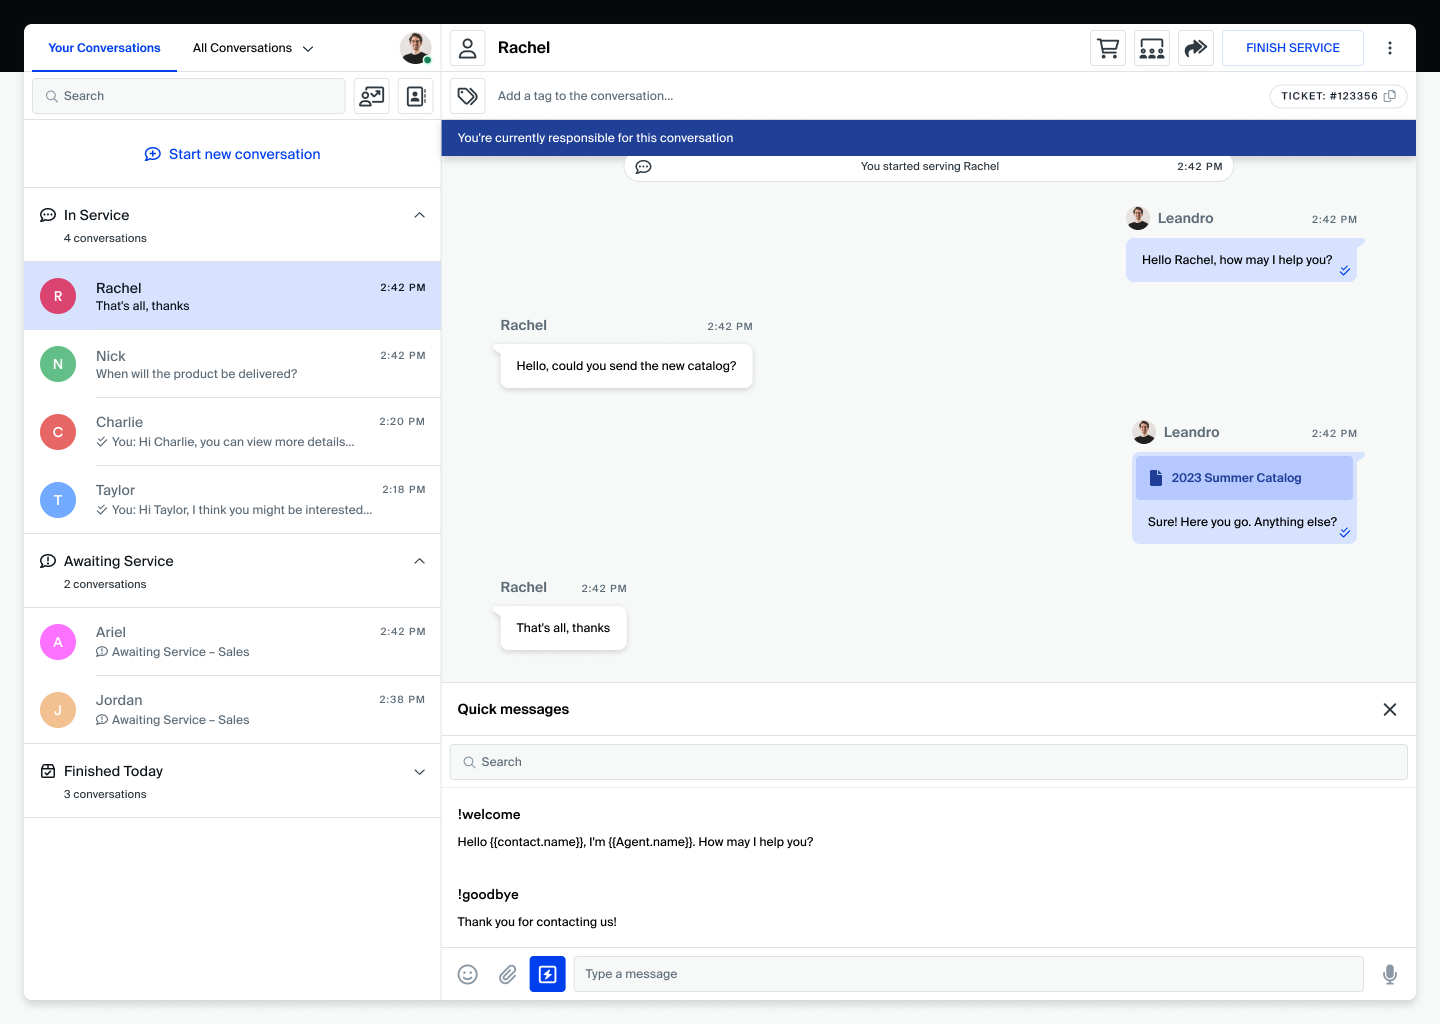
- Select the message you would like to send.
- Press Enter to send the message.
You can also send a quick message by using its shortcut:
- Type !, and the list of shortcuts will appear above the message bar.
- To filter the options shown on the list, type anything after the first "!".
- Once you've completed typing a shortcut, press the Enter key to send its corresponding canned response.
Sending audio messages
On Yalo Sales Desk, you can receive and send audio messages to contacts you are currently serving.
To send an audio message:
- Click the Microphone button inside the message bar.
- Record your message. When you're done, click the Confirm button to send it.
- Your audio message appears on the message feed alongside other messages.
Sending images, video and other attachments
On Yalo Sales Desk, you can receive and send any type of document, including images and videos, to contacts you are currently serving.
To send a document:
- Click the Attach Document button inside the message bar.
- Browse your storage device, then select and confirm the file you wish to send to your contact.
- Your document appears on the message feed alongside other messages.
Viewing a contact's information
On Yalo Sales Desk, all information about a contact is stored inside the Contact details drawer.
It appears on the right side of the screen when viewing a conversation.
If it's closed:
When viewing a conversation, click the Contact details icon in the conversation header.
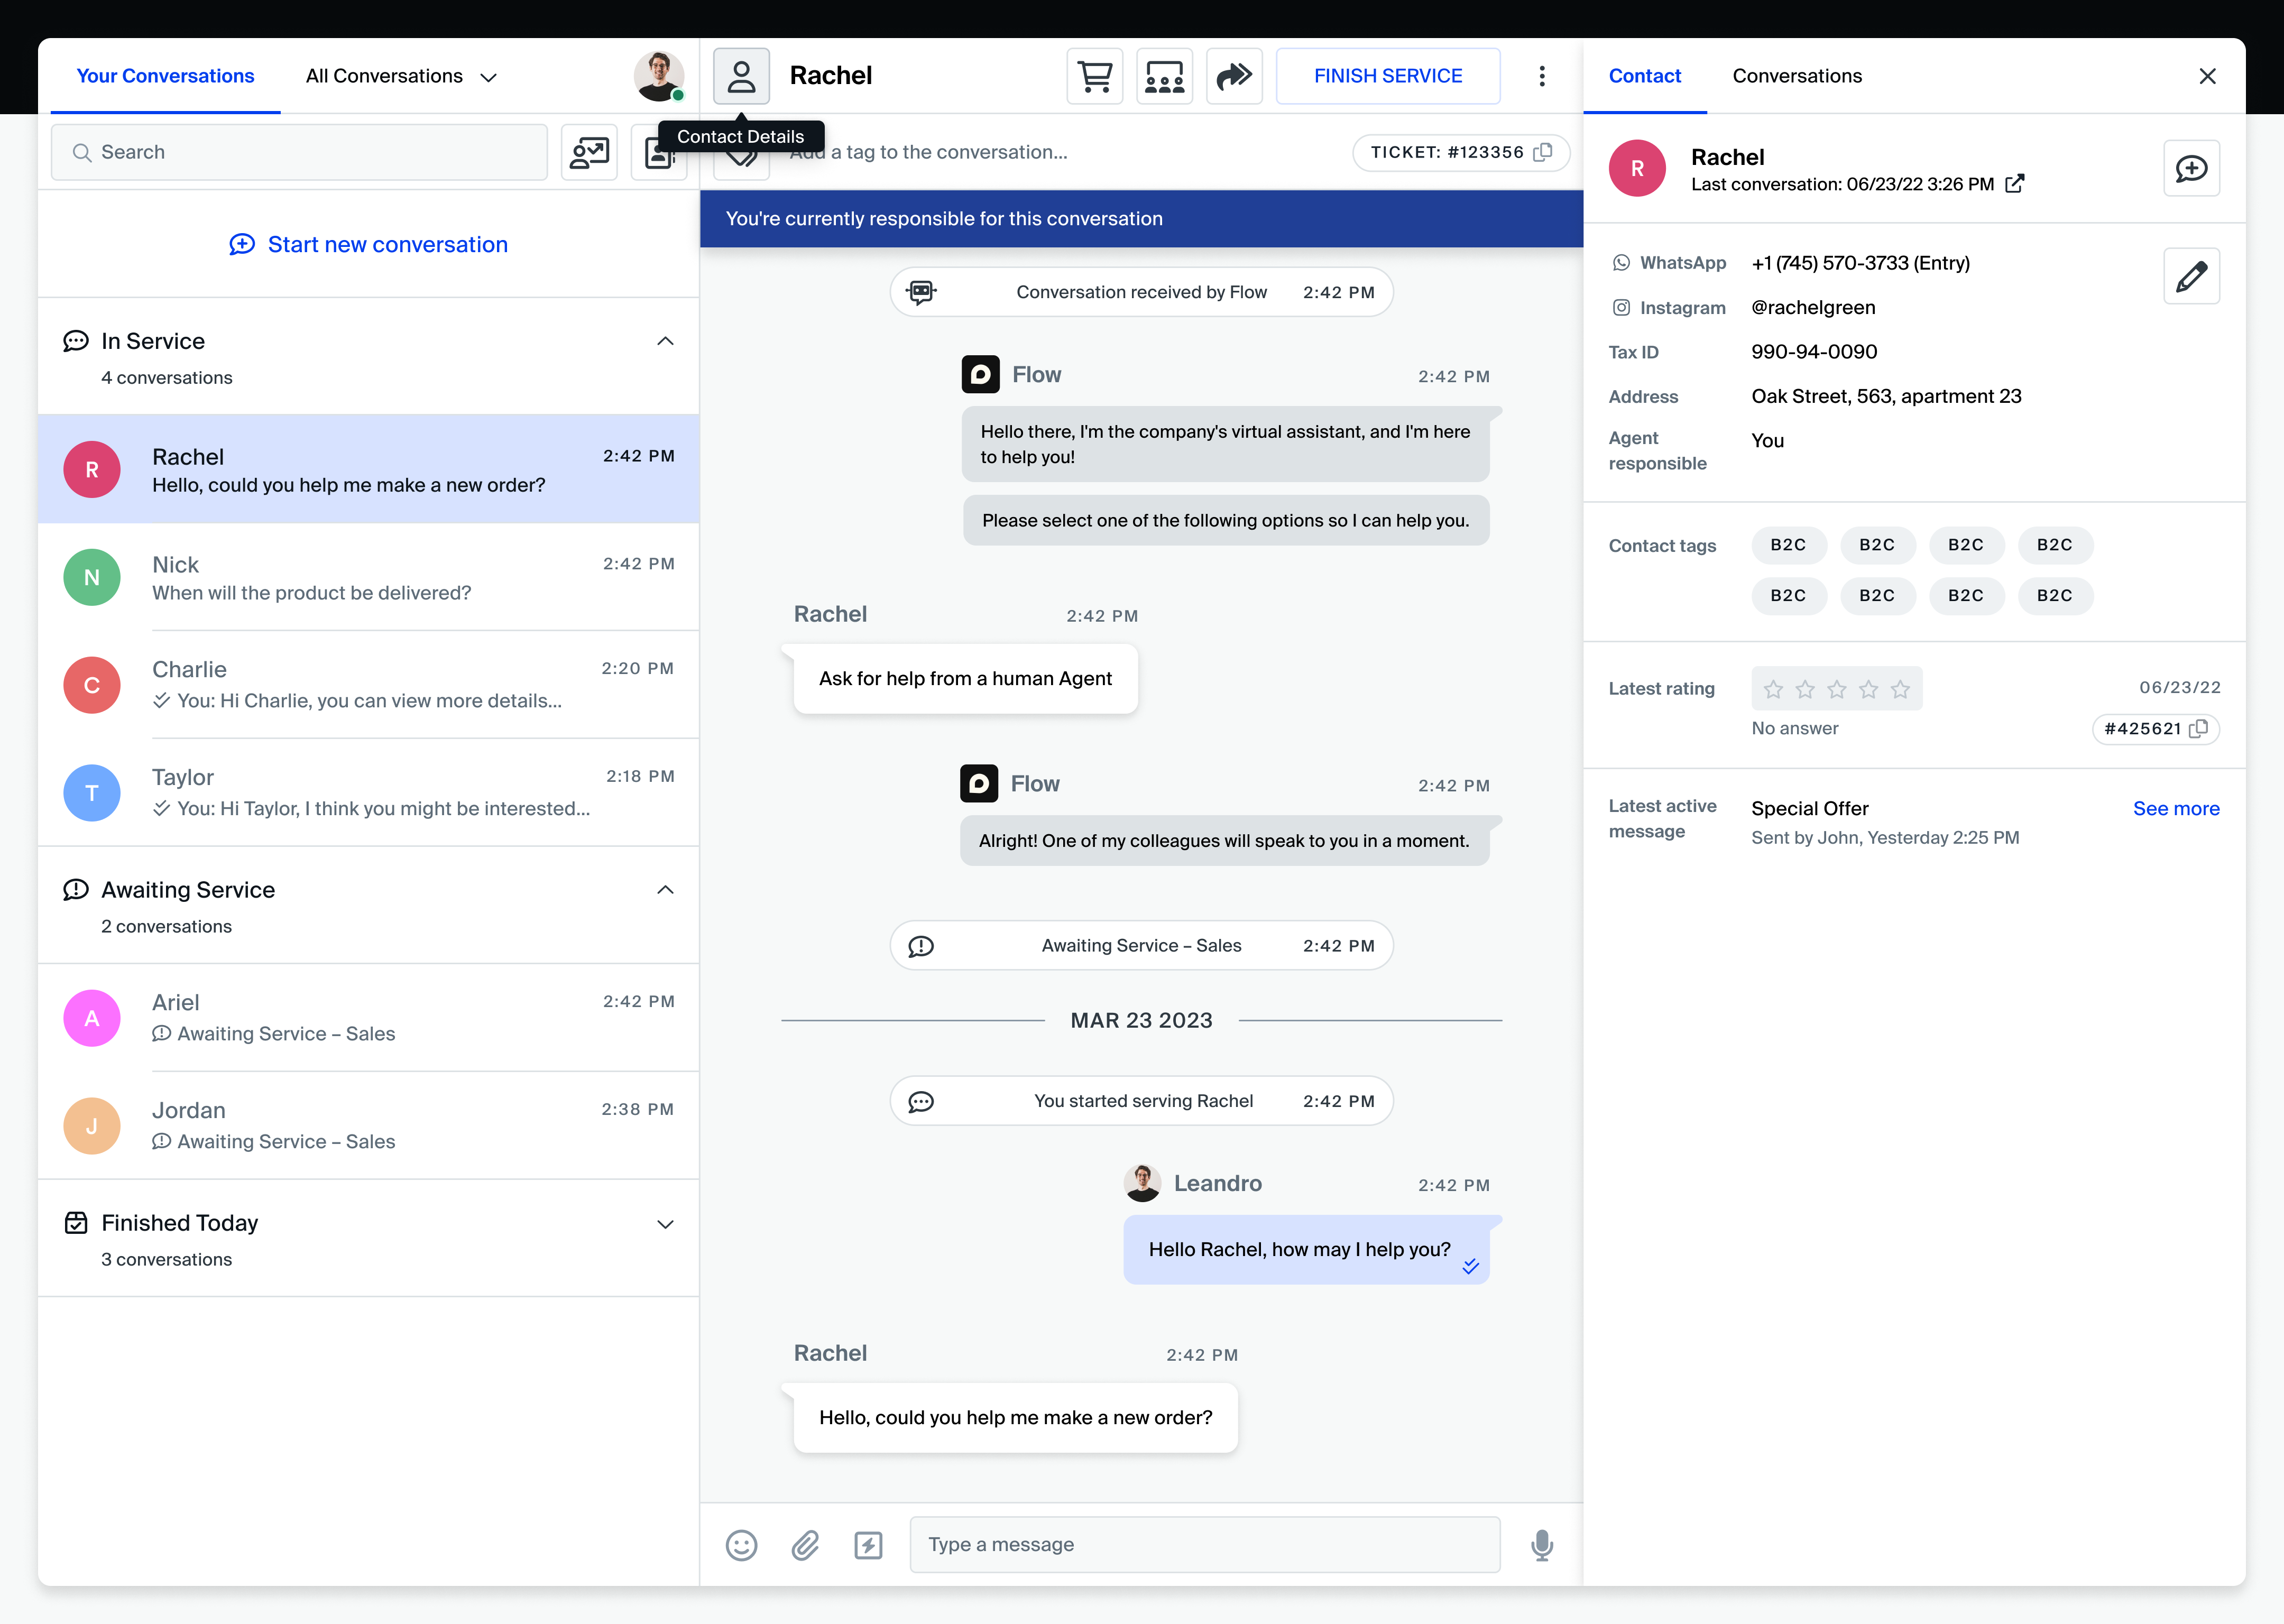
By default, there are a few basic fields for contact information:
- Contact name
- Document option
- Document number
- Contact tags
Additional custom fields may appear depending on your organization's setup.
Editing a contact's details
While serving a contact, you may need to change some of their details.
To do this:
- Click the Edit information button at the top right of the contact details drawer.
- Change the details as you need.
- Click Save changes to confirm.
Viewing a contact's conversation history
Inside the contact information drawer, you can also view any past conversations involving the contact.
Whenever a new conversation happens, it is also stored inside the contact's conversation history.
To access a contact's conversation history:
Select the Conversations tab inside the Contact information drawer.
Click a conversation in the list to open it.

Searching conversation history
To search conversations in a contact's conversation history:
- Type the keywords you wish to look up into the search field, and the corresponding results will appear.
- Select a conversation to open it. Then, you can also search for messages sent inside the conversation.
Searching inside the conversation
To search for messages inside a specific conversation:
- Click the More options button at the top right of the conversation header.
- Select the Search this conversation option.
- Type the keywords you wish to look up into the search field, and the corresponding results will appear.
Discussing a conversation with other agents
On Yalo Sales Desk, it is possible to open internal discussions inside conversations. Contacts can't read messages sent inside these discussions.
To access a discussion inside a conversation:
Click the Internal discussion button.
Conversations with ongoing discussions are marked by the discussion icon on the conversation list.
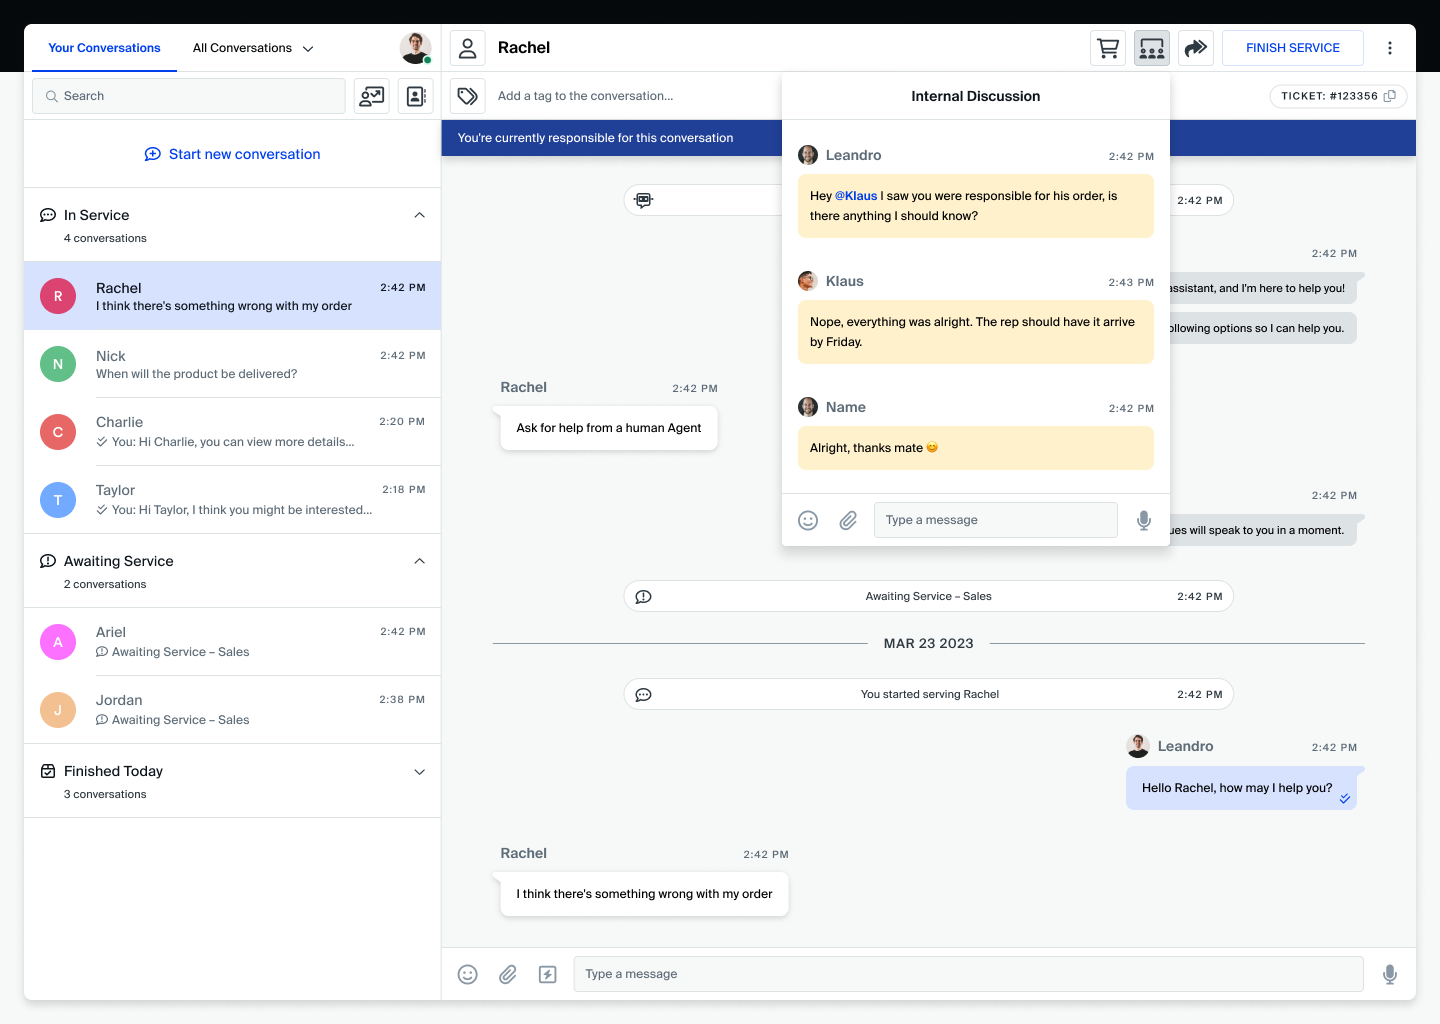
Use the message bar inside the discussion menu to send messages that only other agents can see.
You can also tag specific agents to send them a notification and grab their attention towards your discussion.
To tag an agent:
Type @ inside the message bar, followed by an agent's name or username, then type your message and send it.
When you tag another agent on a discussion, they will receive a notification, and a button to quickly access the discussion will also appear over their chat list.
Transferring a chat
When you need another team or agent to handle a service, you can transfer the chat to them.
To transfer a chat:
- Click the Transfer button on the chat header.
- Select an agent or team to transfer the chat. If there are no online agents in the team you've selected, you'll be prompted to confirm before you continue.
![]()
- Optionally, make any changes to chat tags and add a comment to tell other agents why you're transferring the chat.
- Click Transfer to confirm.
Adding tags
When viewing a chat, its tags appear at the header, right below the contact's name. Tags are labels your team can create for you to categorize chats. To add tags to a chat:
Click the button next to the chat tag list. Inside the chat tag menu, tags currently added to the chat have a marked checkbox next to them.
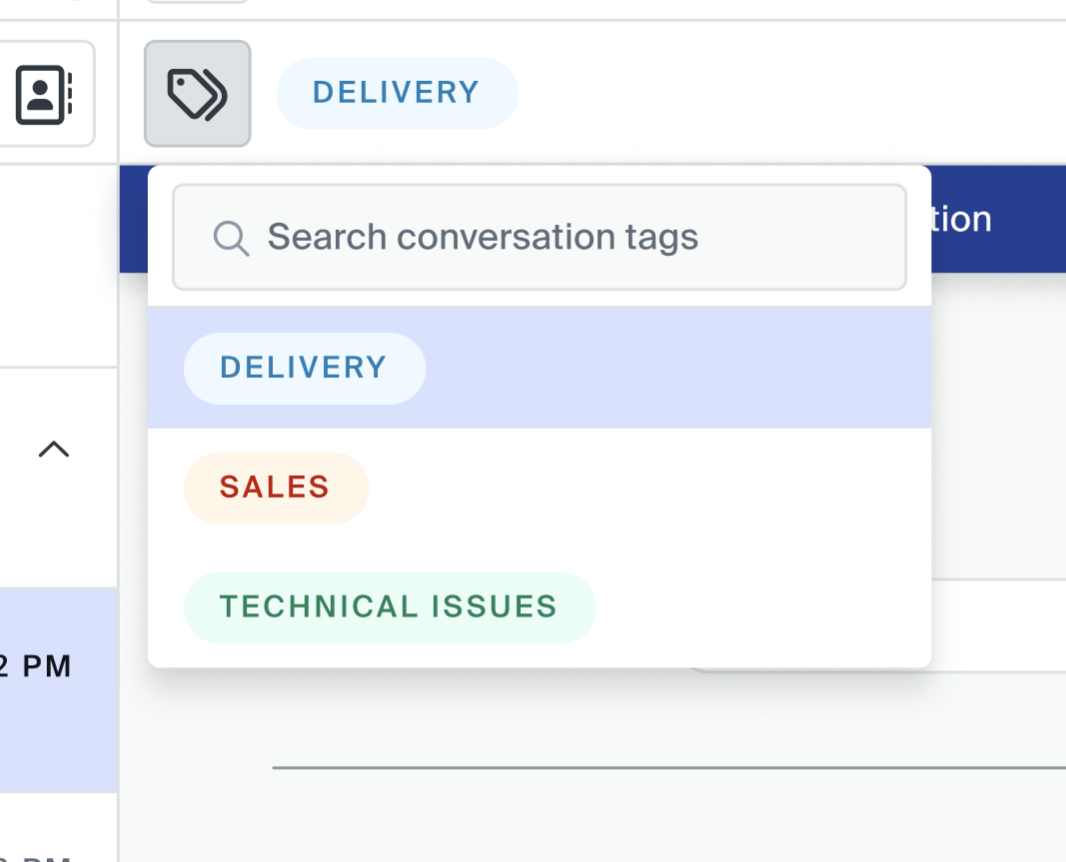
Click the unmarked checkbox next to a tag to add it.
Or, if you wish to remove a tag from the chat:
Click the marked checkbox next to it.
Finishing a conversation
When you're done serving a contact and they're satisfied, you may finish the service. To do this:
- Click Finish Service.
- You may verify that the conversation tags are correct and add a comment to inform other users about how the service went, then click Finish to confirm.
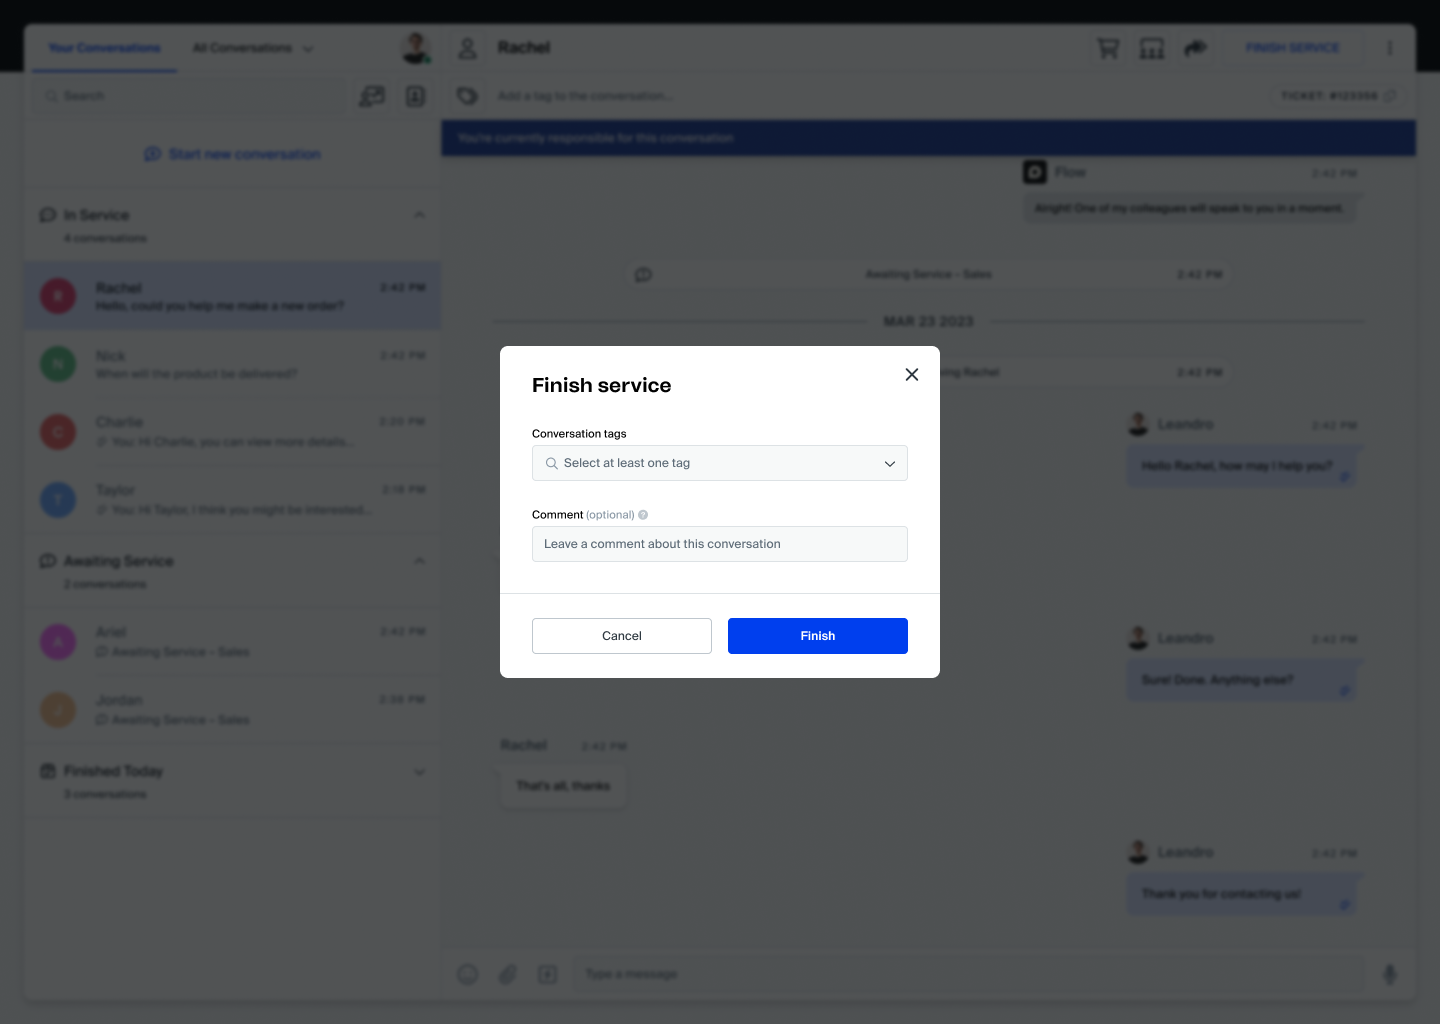
- Finished chats appear in the Finished Today section of the chat list.
Finished chats remain under "Finished Today" until the end of the day they've been finished, and can also be accessed through the contact's conversation history, in the contact details drawer.
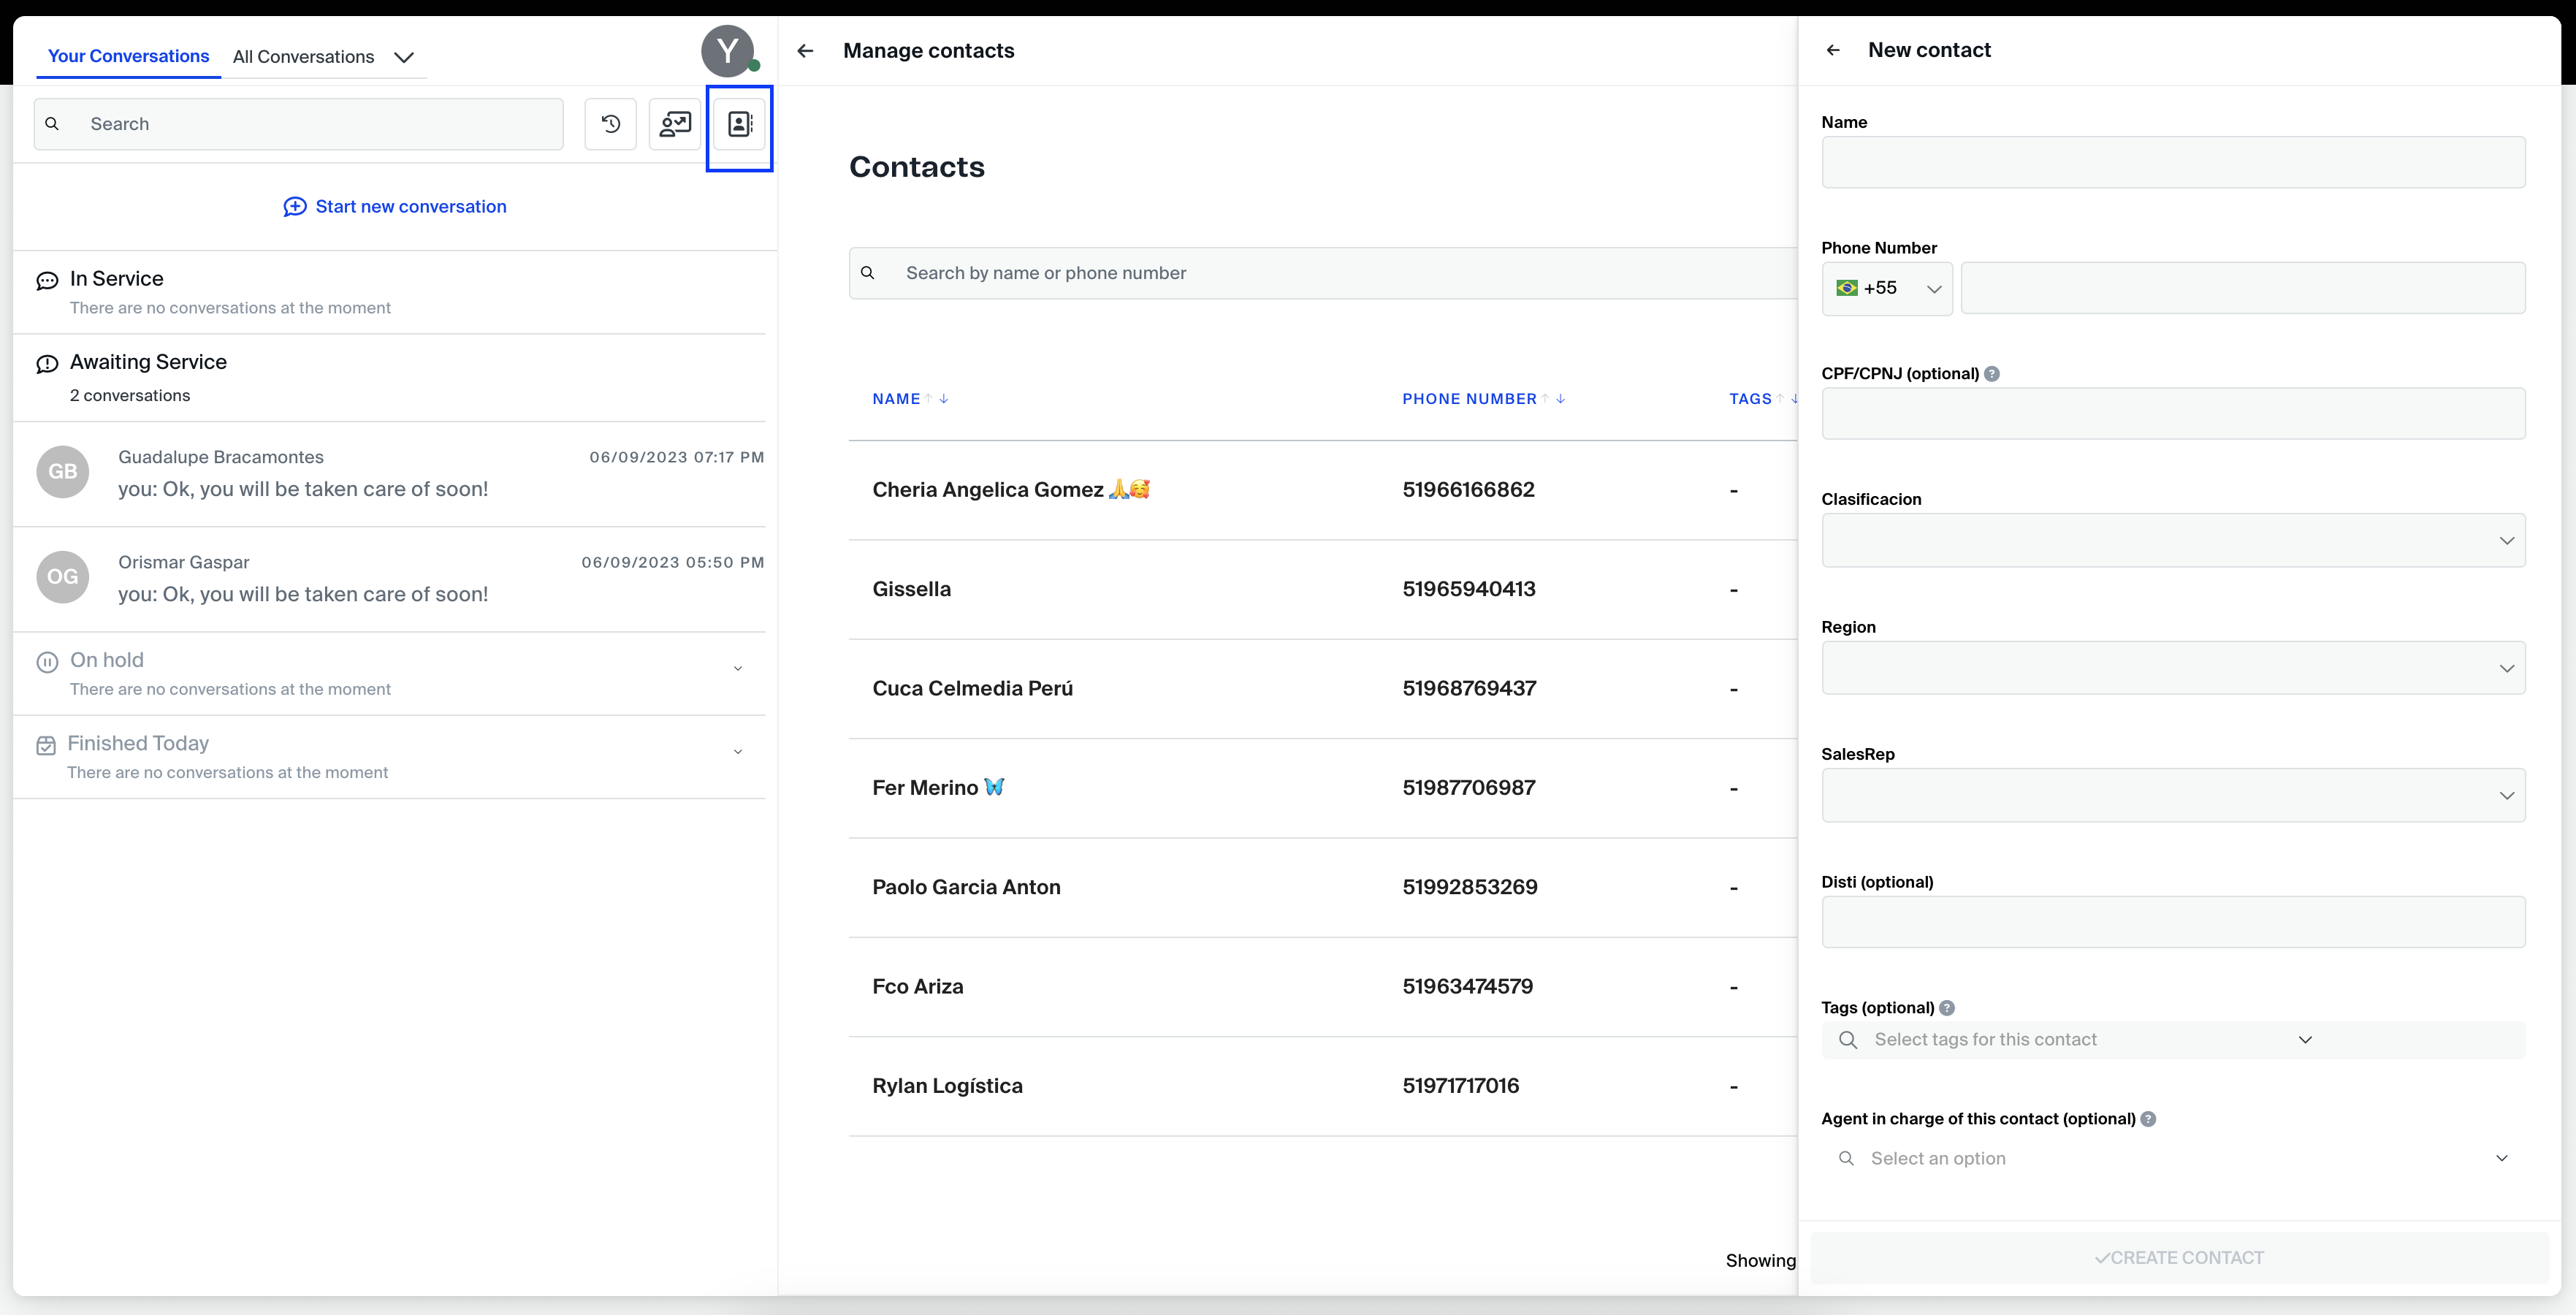
Managing contacts
All contacts you interact with through Sales Desk appear in the Contact Manager. Through the Contact Manager, you can view and chance any contact's details, register a new contact and start new chats.
To access the Contact Manager:
Click the Contact Manager button.
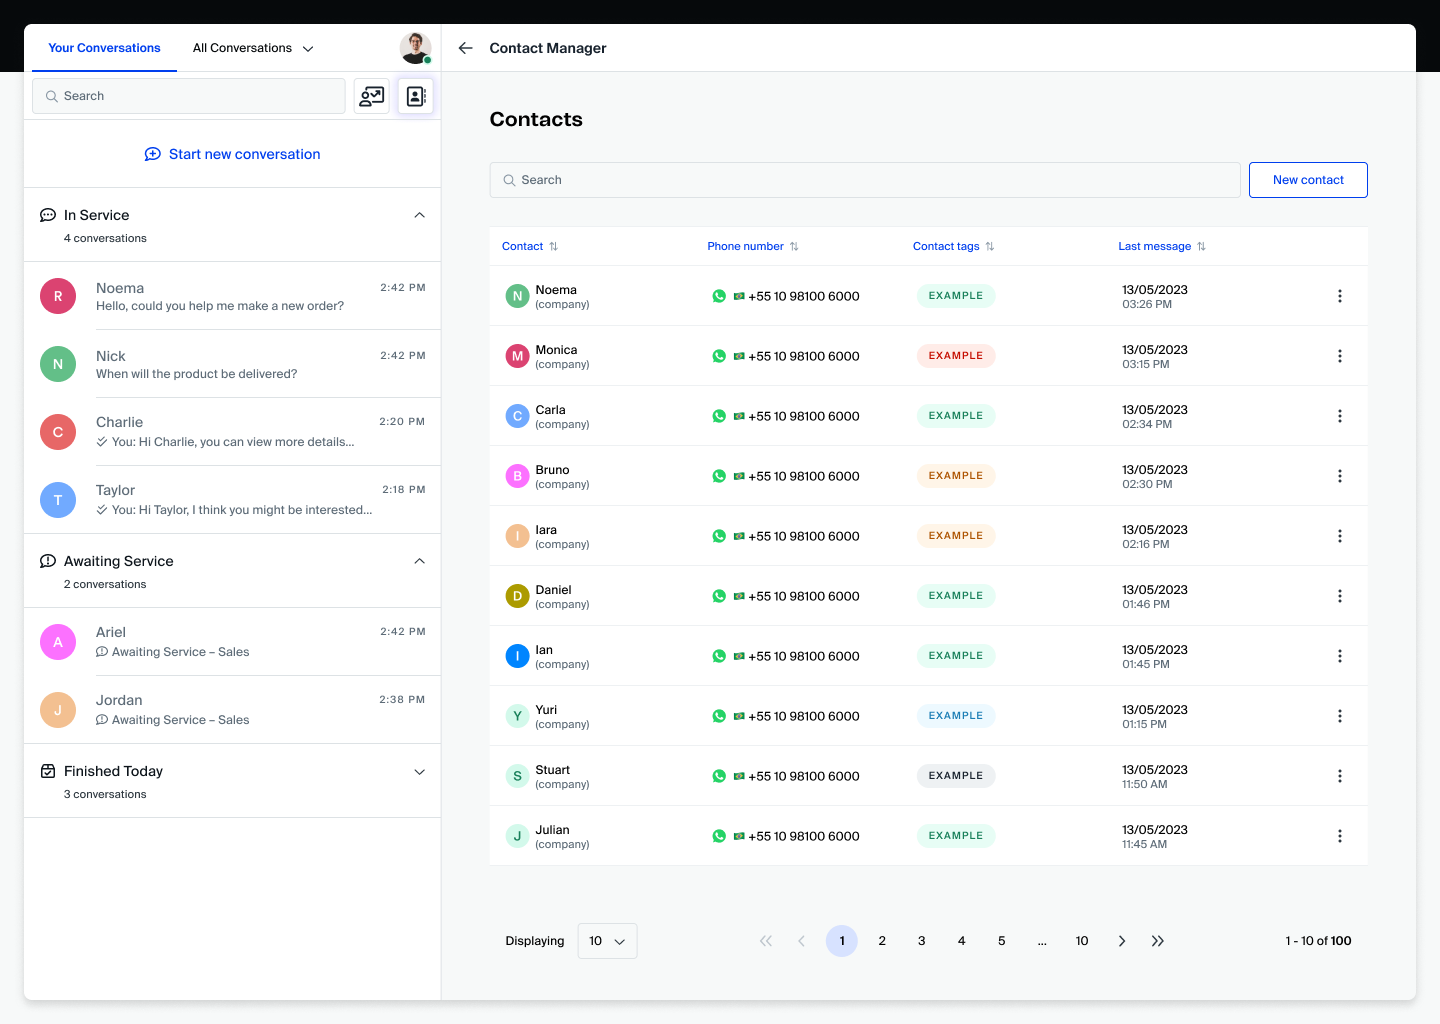
Registering a new contact
To add a new contact:
- Inside the Contact Manager, click New contact.
- Fill in the details accordingly.
- Click Save to confirm.
That's all you need to know to get started with Yalo Sales Desk!
Updated 6 months ago