Commerce Manager User Guide
User guide
This is the user guide to understanding how the Commerce Manager works and how to do several actions inside of it.
The Commerce Manager is inside of main menu Yalo platform.

Storefronts
To see the main storefront list navigate to the main menu of Yalo’s platform, at the main page you will see a list of available storefronts for the account you have selected. You will be able to see the flow name, the phone number, and the language for the specific storefront also you will be able to see the current status of the storefront
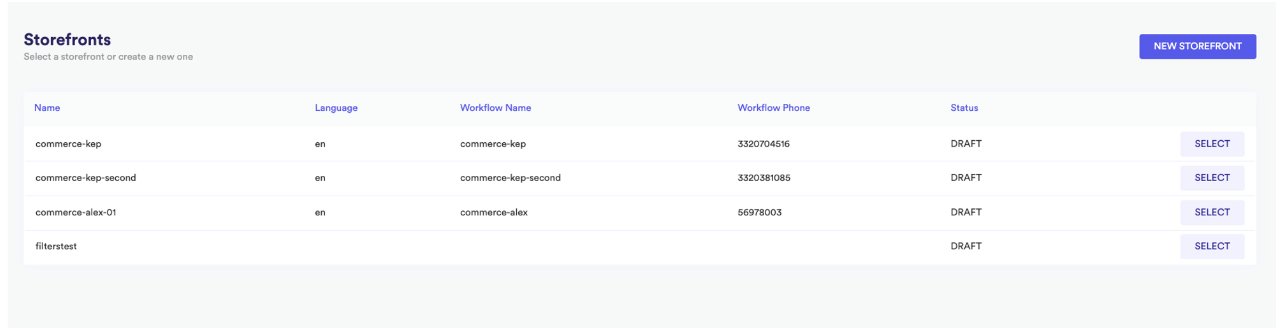
Storefront’s list.
⚠️ If you change of accounts this page will be refreshed with the current storefronts list of the new accountCreate new storefront
In order to create a new storefront, you should click on the NEW STOREFRONT button located in the top-right corner, then fill the form with Storefront’s name and owner’s email (by default this is pre-filled with the currently authenticated user, but you could use another email instead).
Finally, click on the CREATE STOREFRONT button and you will be redirected to the Settings page (see update existing storefront section for more details):
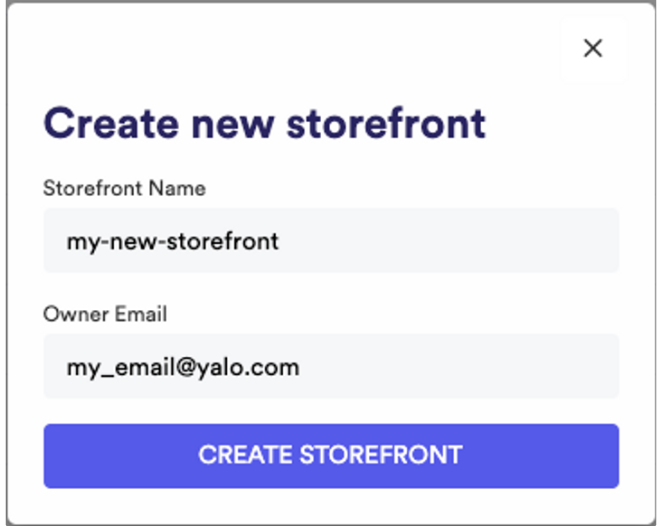
Modal to create a new storefront.
Field Validations for a new storefront:
- Name: it should be in
slug-format - Email: it should be a valid email address
Update existing storefront
Let’s suppose you have an existing storefront (or just create a new one as shown above), and you would like to start managing it, so you could make click on the SELECT button and navigate to the storefront’s settings.
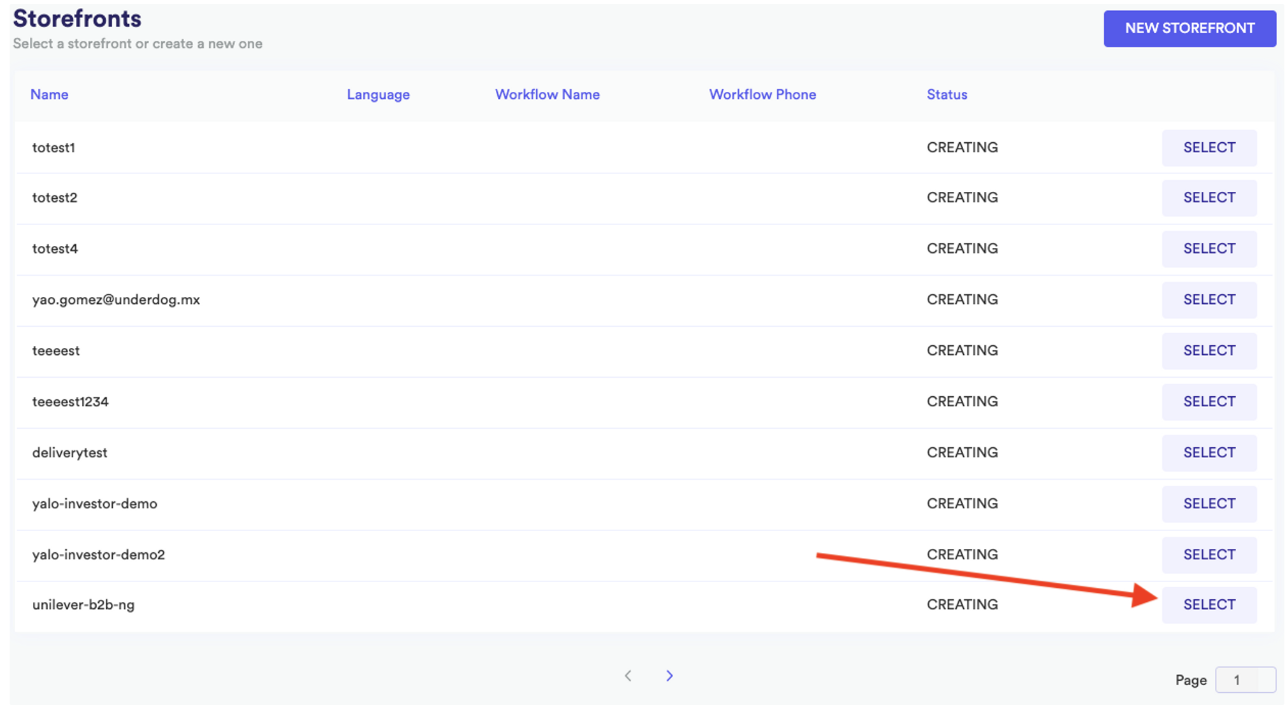
Storefront’s list with the select button to navigate to settings.
Settings
Once you are on the Settings page, you will see something similar to this with the information related to the selected storefront:
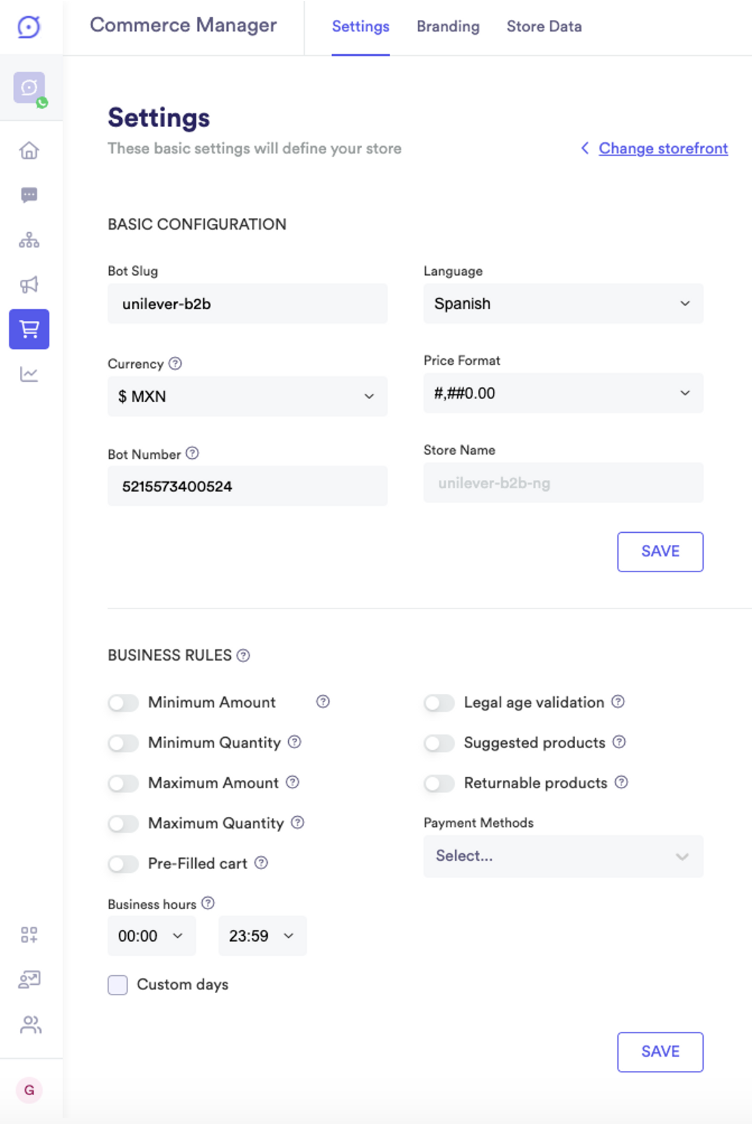
Settings page for a given storefront.
💡 If you want to go back to the storefront’s list make click on the `Change storefront` button.Basic configuration
This section allows you to modify the following settings: Bot Slug, Language, Currency, Price Format, and Bot Number. The Store Name field is read-only.
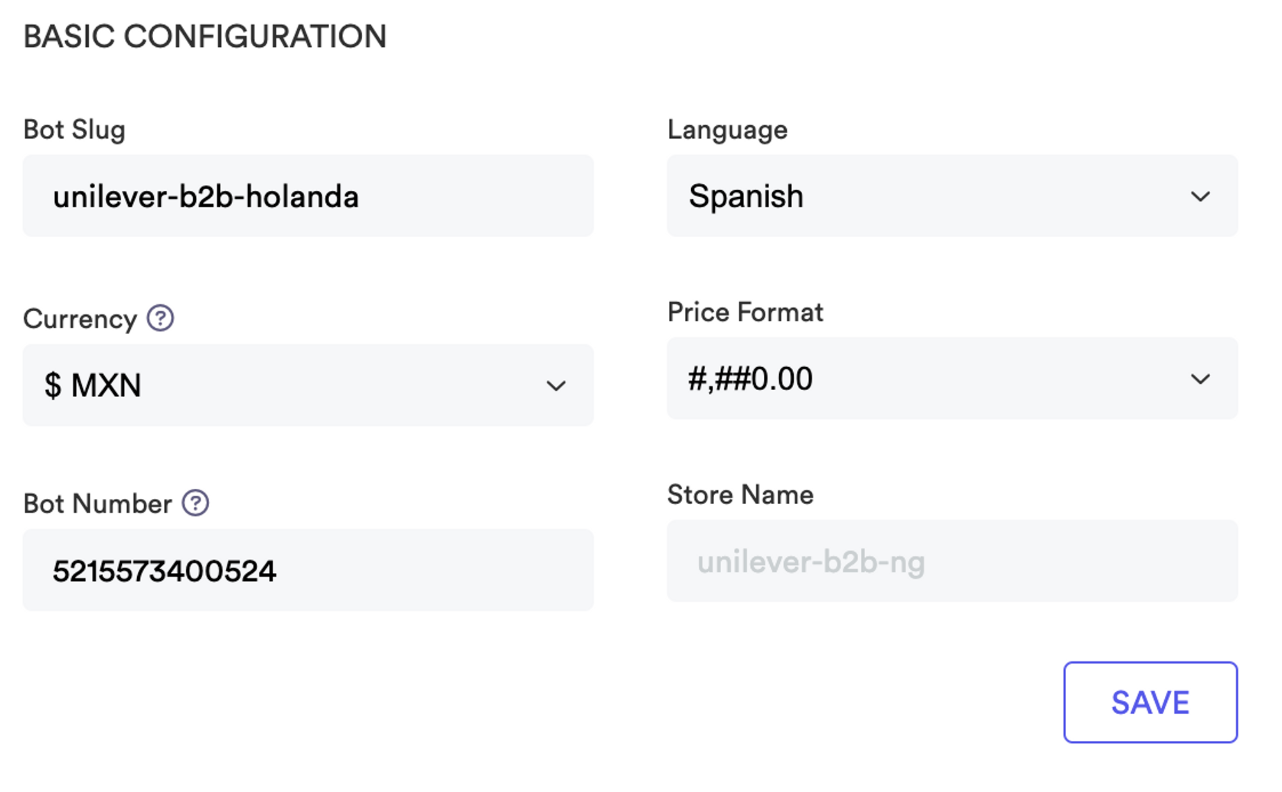
Form to change the storefront’s basic configuration.
Once you are done with your changes just make click on the SAVE button to persist your data, then you should see a confirmation message like the following:

Basic configuration confirmation message.
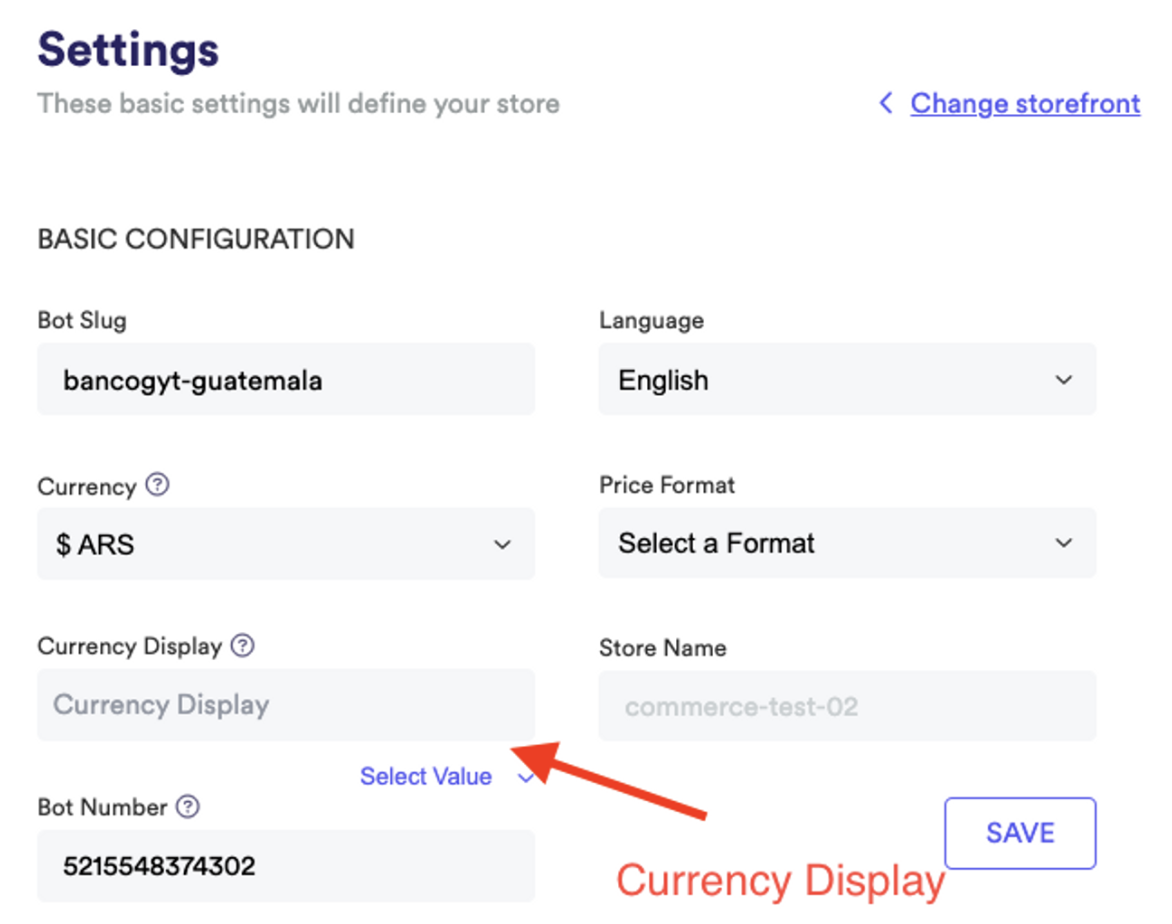
Currency Display
This section will allow you to choose how the prices will be show inside you store e.g $100MXN/$200/300MXN
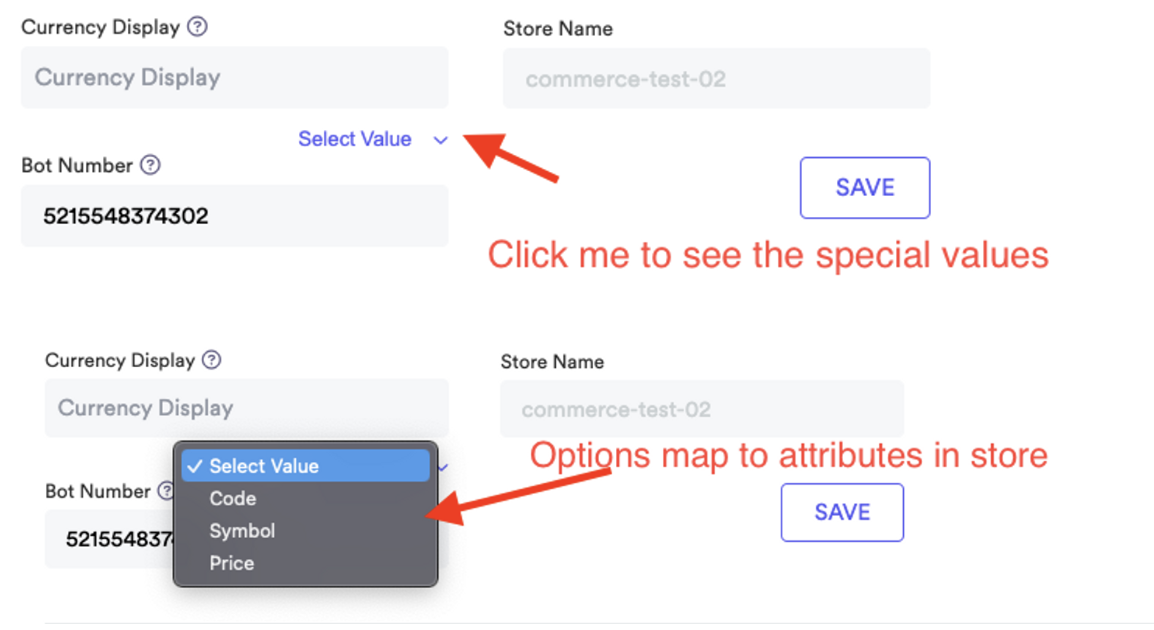
You can put any string that you want and also if you click on the Select Value selector you will see a set of options already map into specific values from the store
If you select one of this options they will be render in the currency display input with a red color in the background and with curly brackets {{}}
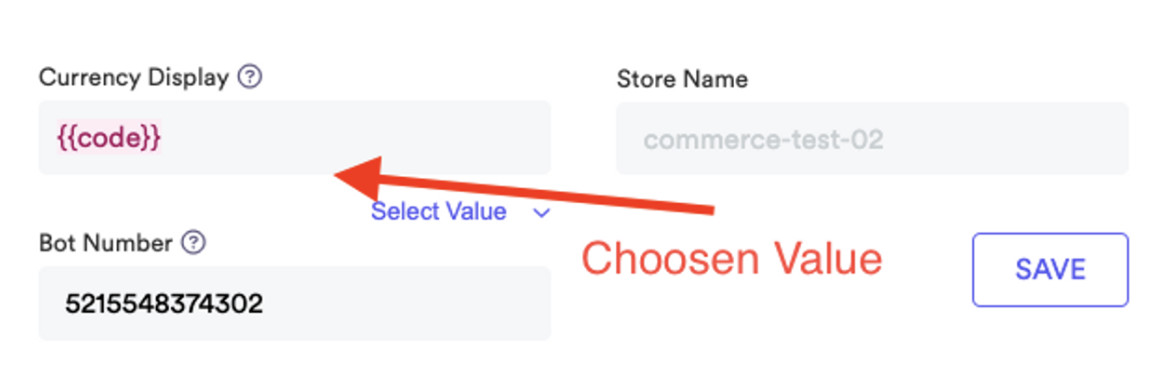
Once you are happy with you input your can click on the save button and usual
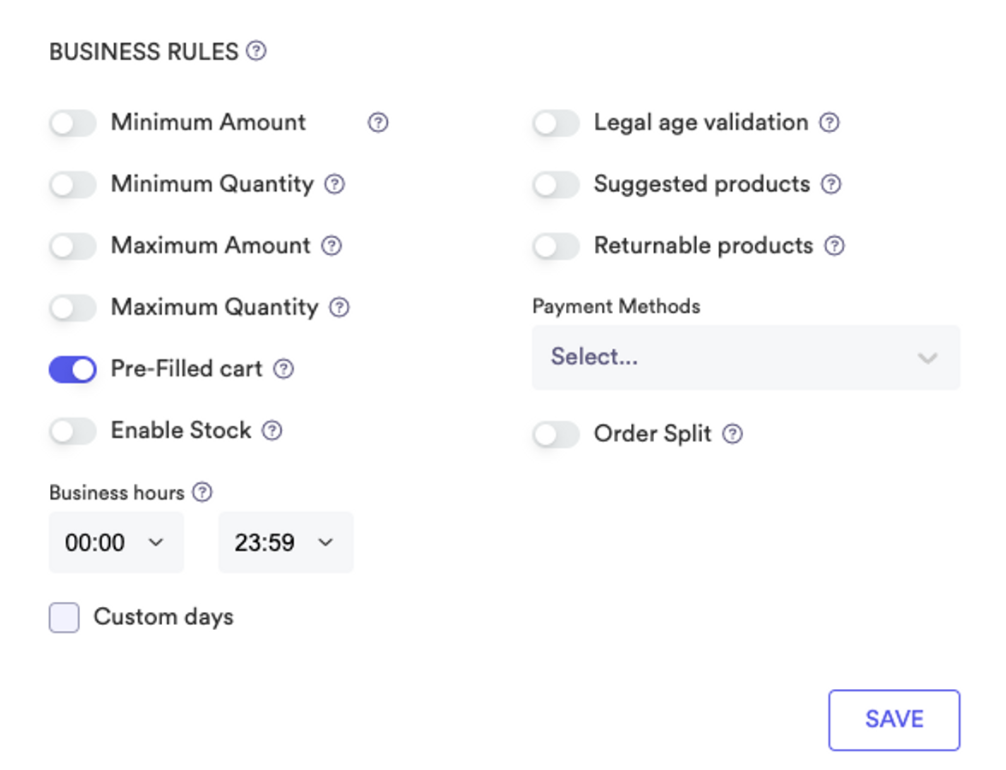
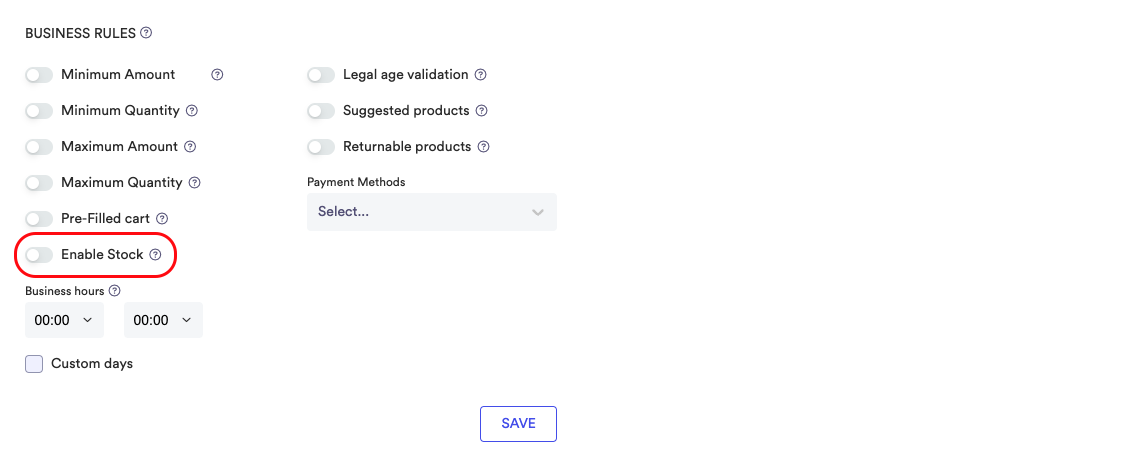
Business rules
This section allows you to modify the following settings: Minimum Amount, Minimum Quantity, Maximum Quantity, Maximum Quantity, Pre-Filled Cart, Legal age validation, Suggested Products, Product Stock, Returnable Products, Payment methods (credit, credit card, and cash), Business hours, Order Split and select custom days for business hours.
Once you are done with your changes just make click on the SAVE button to persist your data, then you should see a confirmation message like the following:
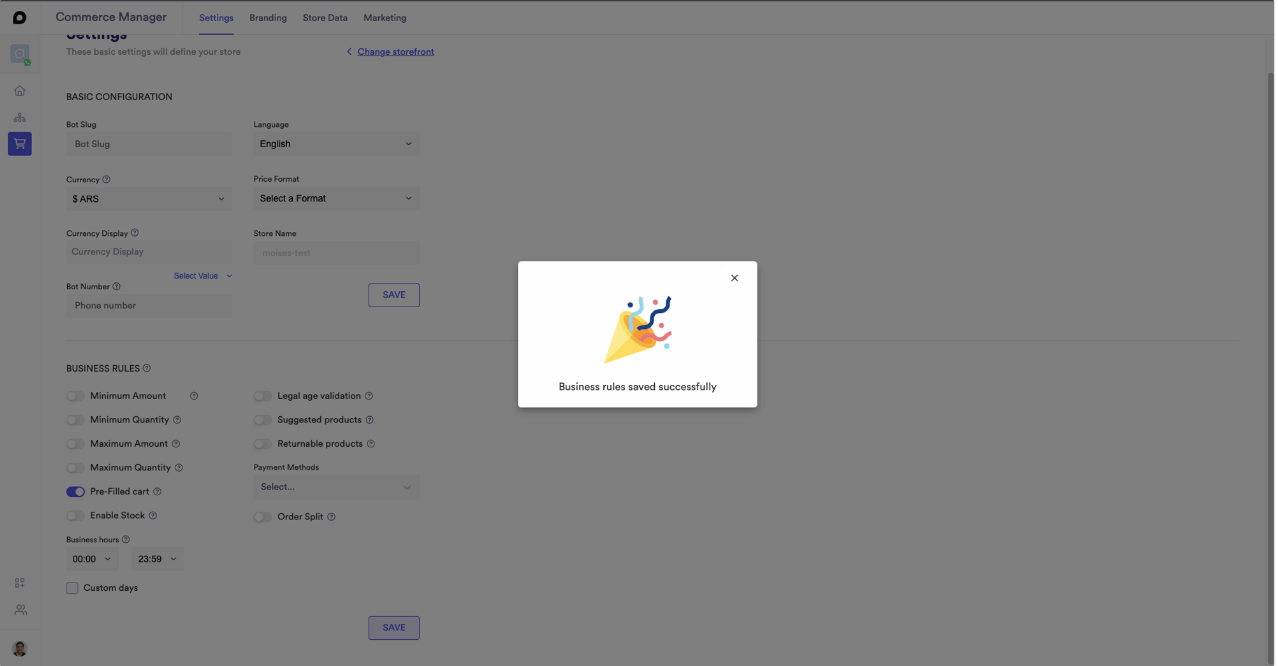
Business rules confirmation message.
💡 You can always go back and update the settings as you need.Order Split
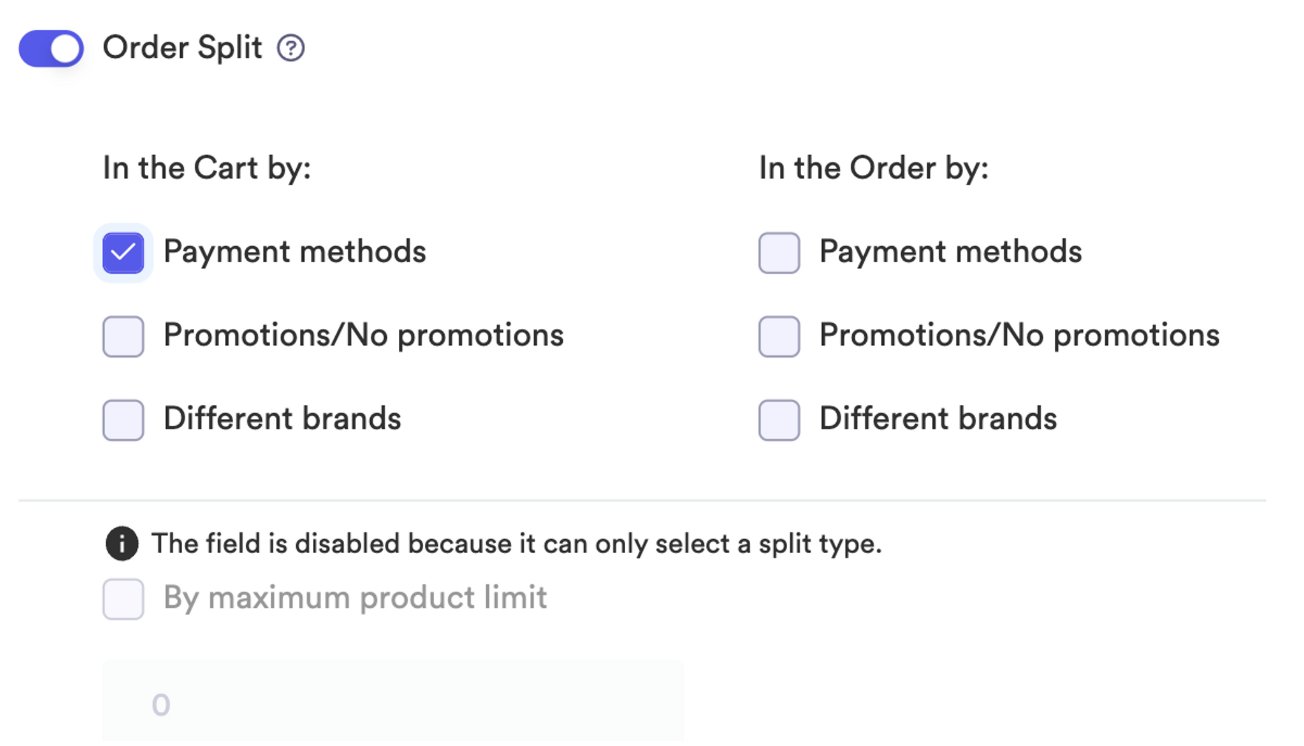
To configure Order Split you need to click on the order split switch

Once you enable it you will see the following options
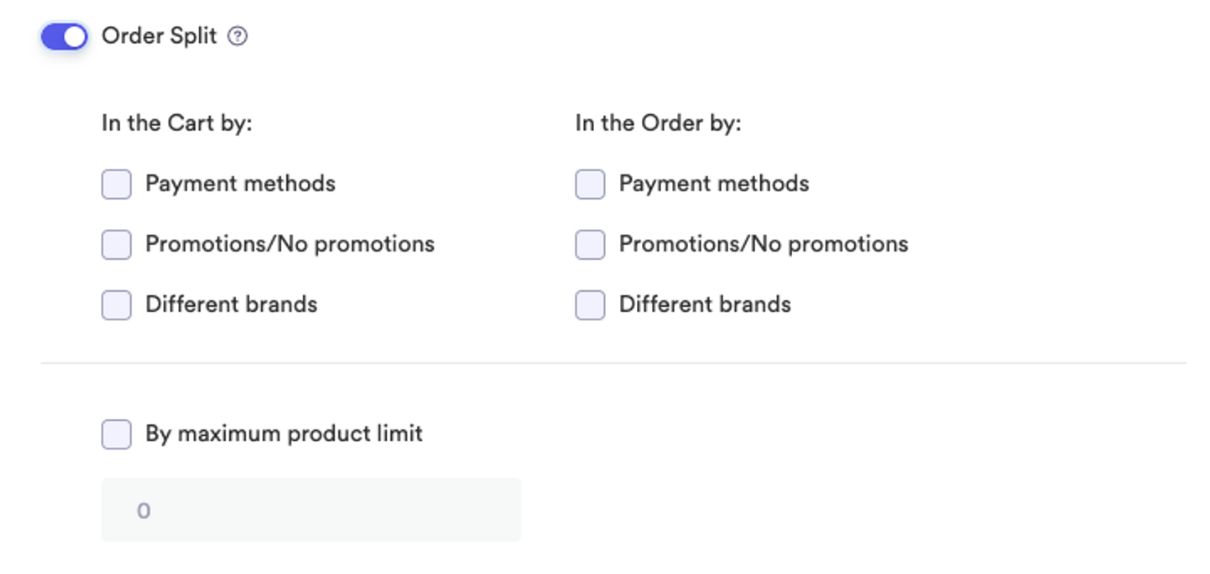
The first six options are called groupers and are either by cart or by order
How groupers work
There are two kinds of groupers
- By Cart
- This is mainly a visual feature, is doesn’t impact any aspect of the app except for the visual of the cart
- By Order
- This is separation serves for stores that has different process for orders depending on the group
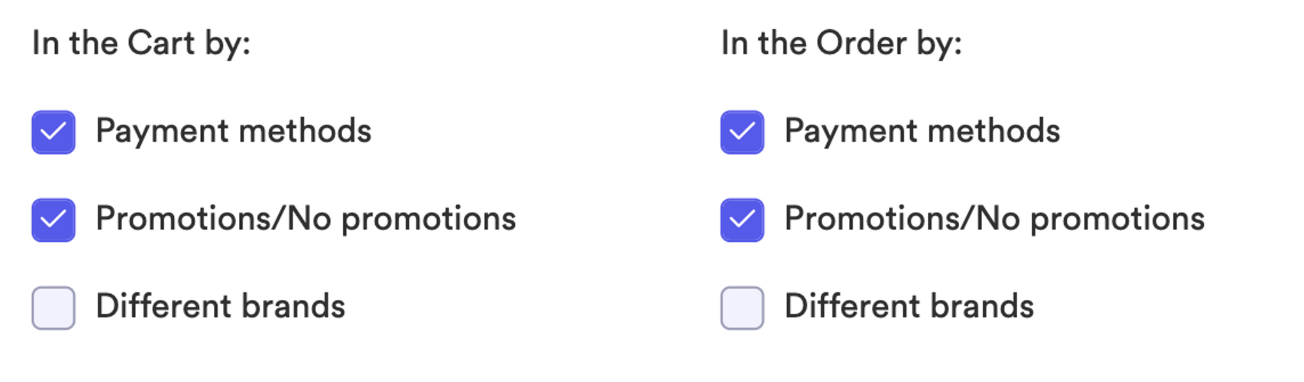
This two groupers has 3 different options
- Payment
- This means that the cart/order will be group by the payment method (e.g credit, cash, credit card)
- Promotions
- This means that all the items that has a promotion will be group together
- Brands
- This means that items will be group depending on the brand they belong to (e.g coca cola, pepsi, barcel)
The following option is the splitter

How splitters work
The splitter works internally in the orders, is not visible by the user. So in example if you set this options with a value of 10 and the store receive an order of 15 items, the order will be divided into 2, 1 containing 10 elements and the other the remaining 5
⚠️ Note: This scenario will be deactivated if you select groupersExample of how it will look when either option is disable
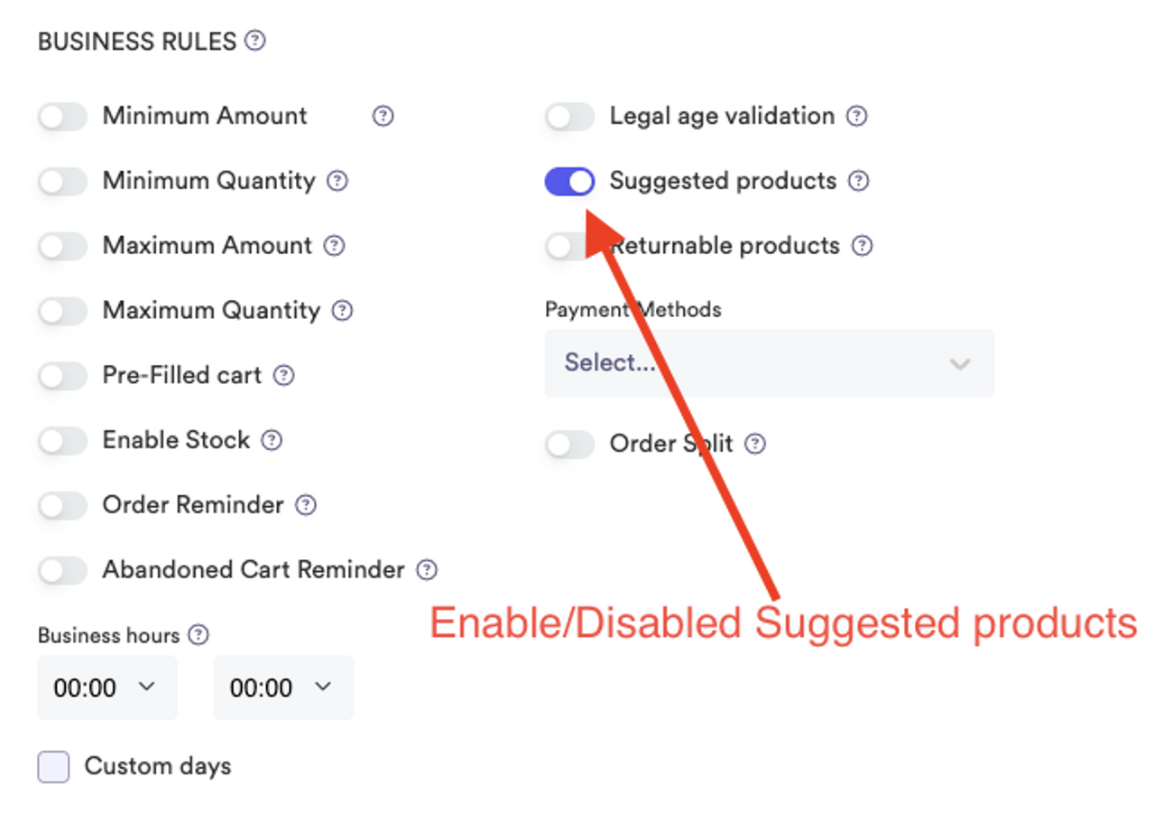
Suggested products
This feature its divided in two main concepts, recommended products and frequently bought together. Both are served by machine learning endpoints, both are going to be activated at the same time when enabling suggested products feature, but working independently to each one.
- Recommended products is based on show products to customers on home pages or detail product views, by listing products that he has bought in the past.
- Frequently bought together is based on show products to the customers at the end of the process on cinnamon, when the user already has filled his cart, cinnamon will show a list of products related to items that are already in the shopping cart.
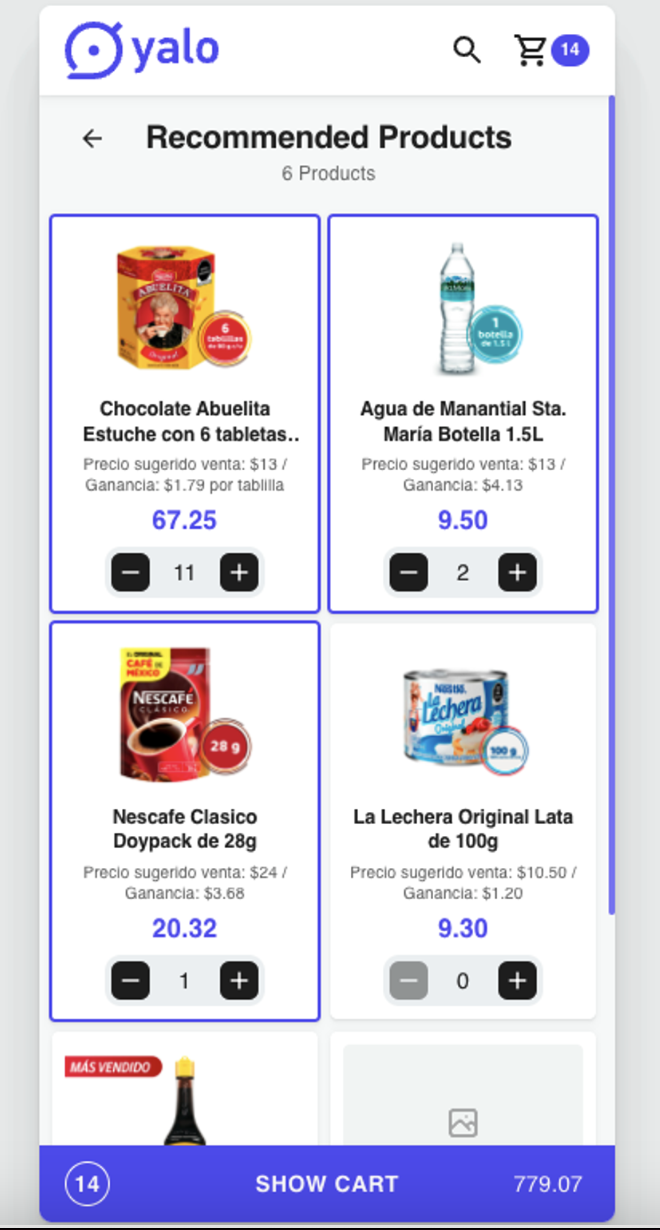
recommended products are listed on home page as a list with a direct link to a page with all the recommendations
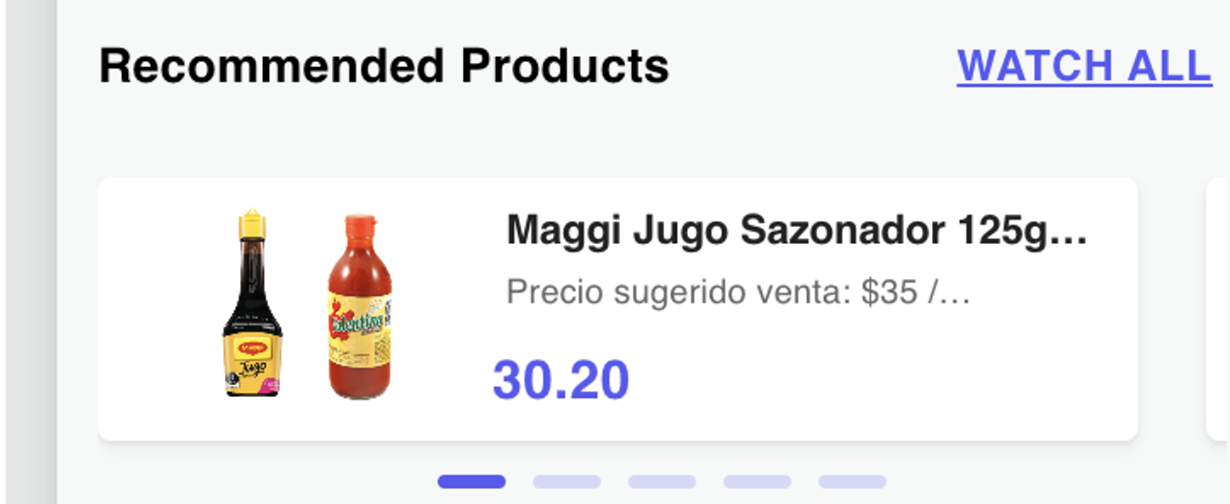
once you click on watch all you‘ll be redirected to recommended products page
Unsaved changes alert
Let’s suppose you’re customizing your storefront’s settings, and for any reason, you forget to save the changes before leaving the page you will see an alert to let you decide between “leave and discard the changes” (cancel button) and “leave and save the changes” (ok button).
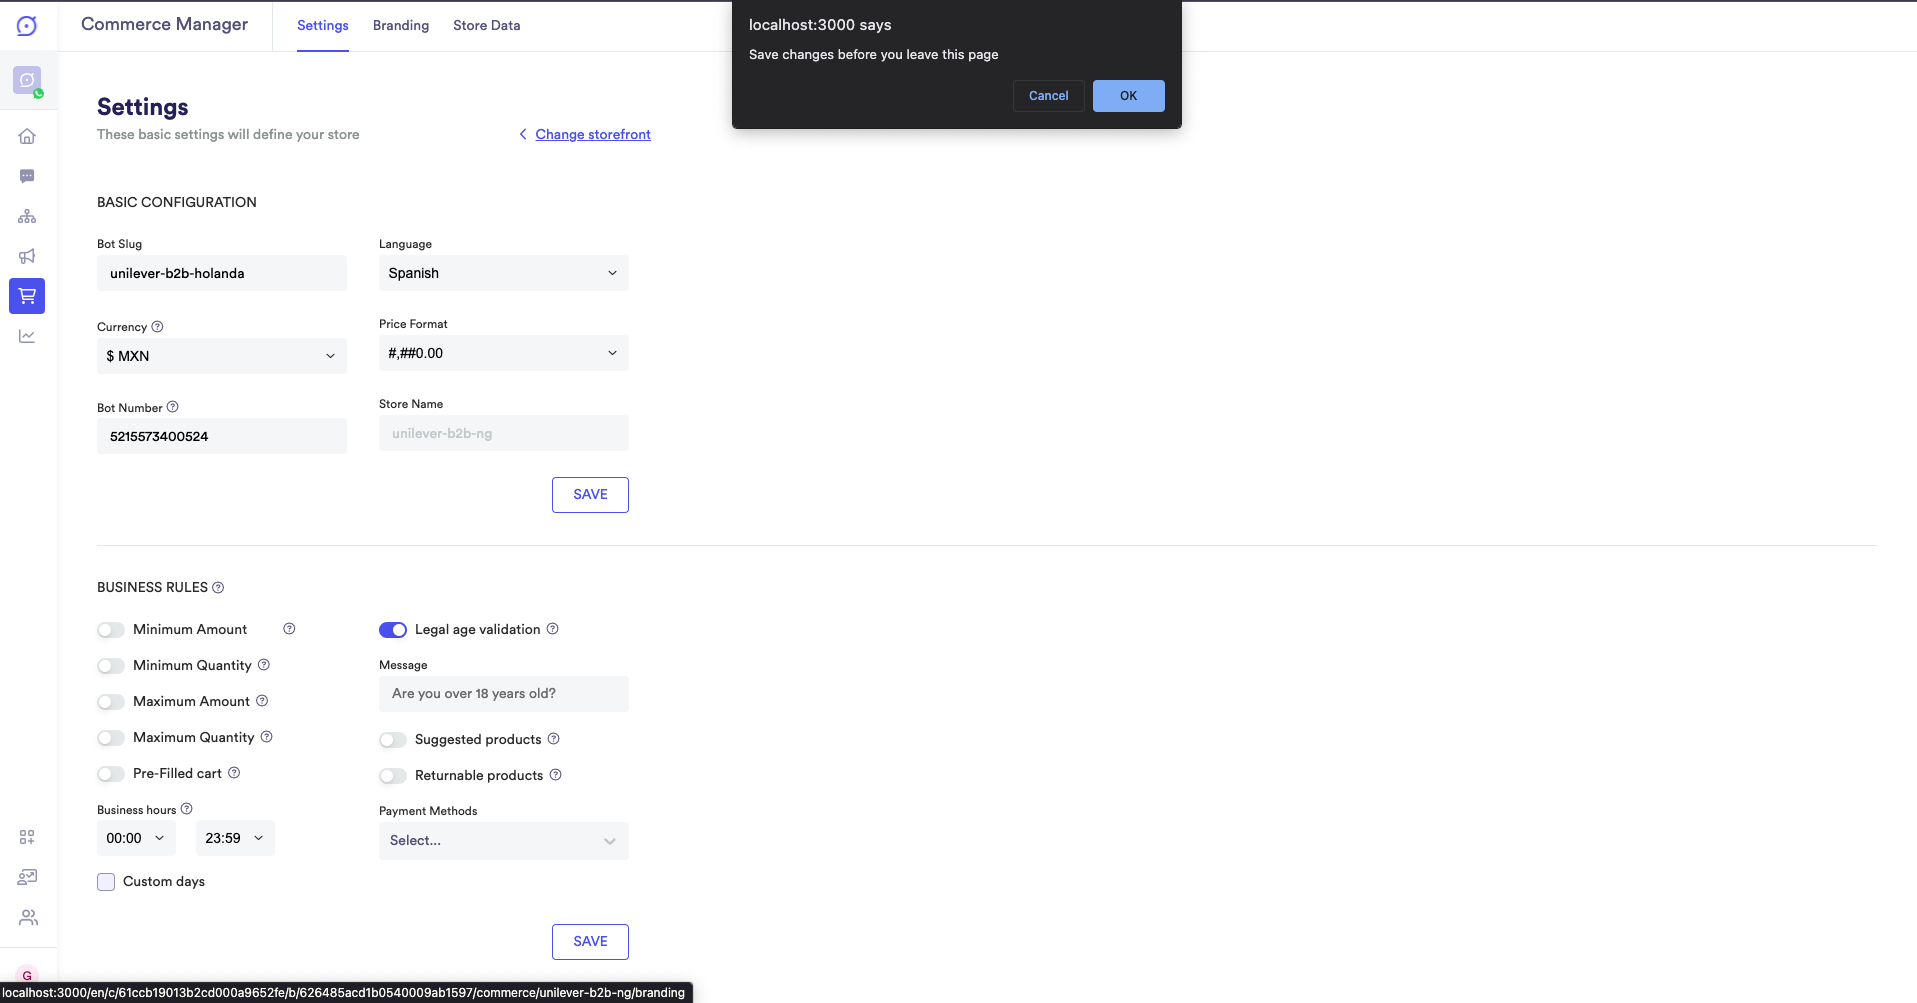
Alert to warn the user about losing changes.
Branding
As you can see in the top menu there is an option to go to the Branding section. Once you are on the Branding page you will see something similar to this with the information related to the selected storefront:
Branding page for a given storefront.
Logo
In order to change the logo, you need to upload a new file as shown below:
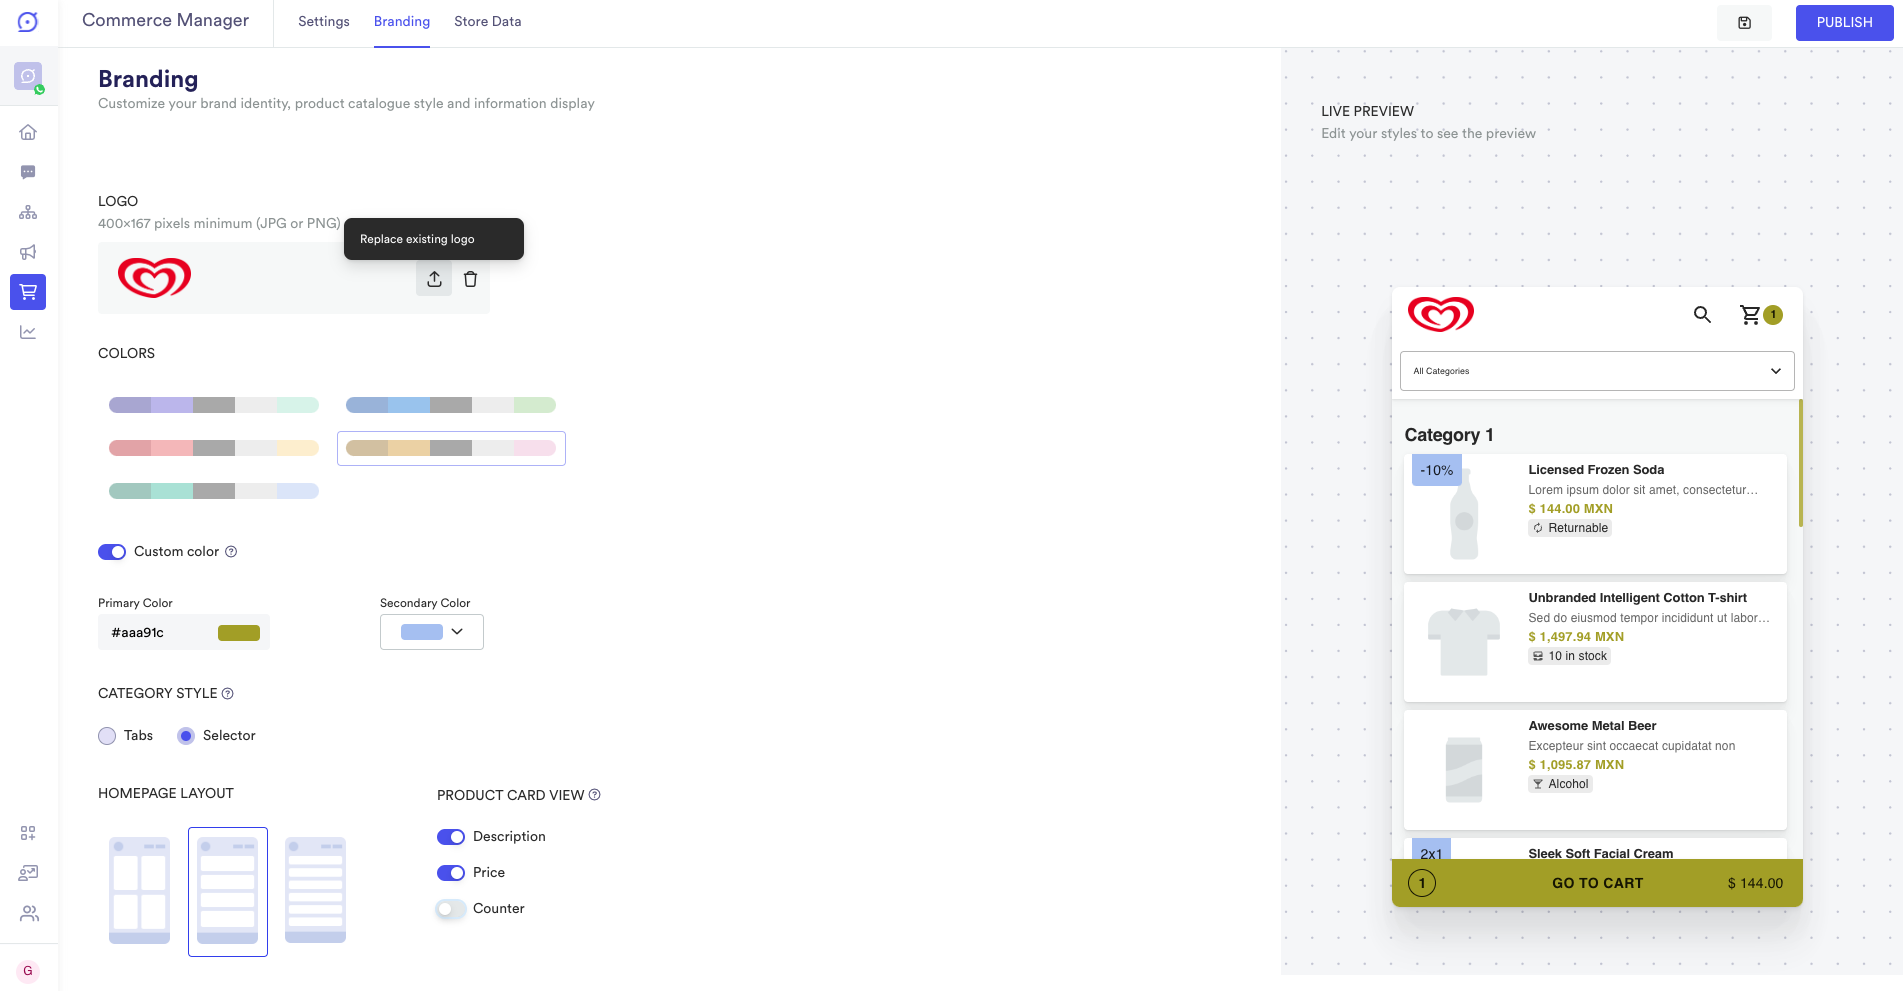
Replace the logo.
Once you clicked on the replace logo button, then you just need to select a new image from your file system.
Using Yalo’s logo.
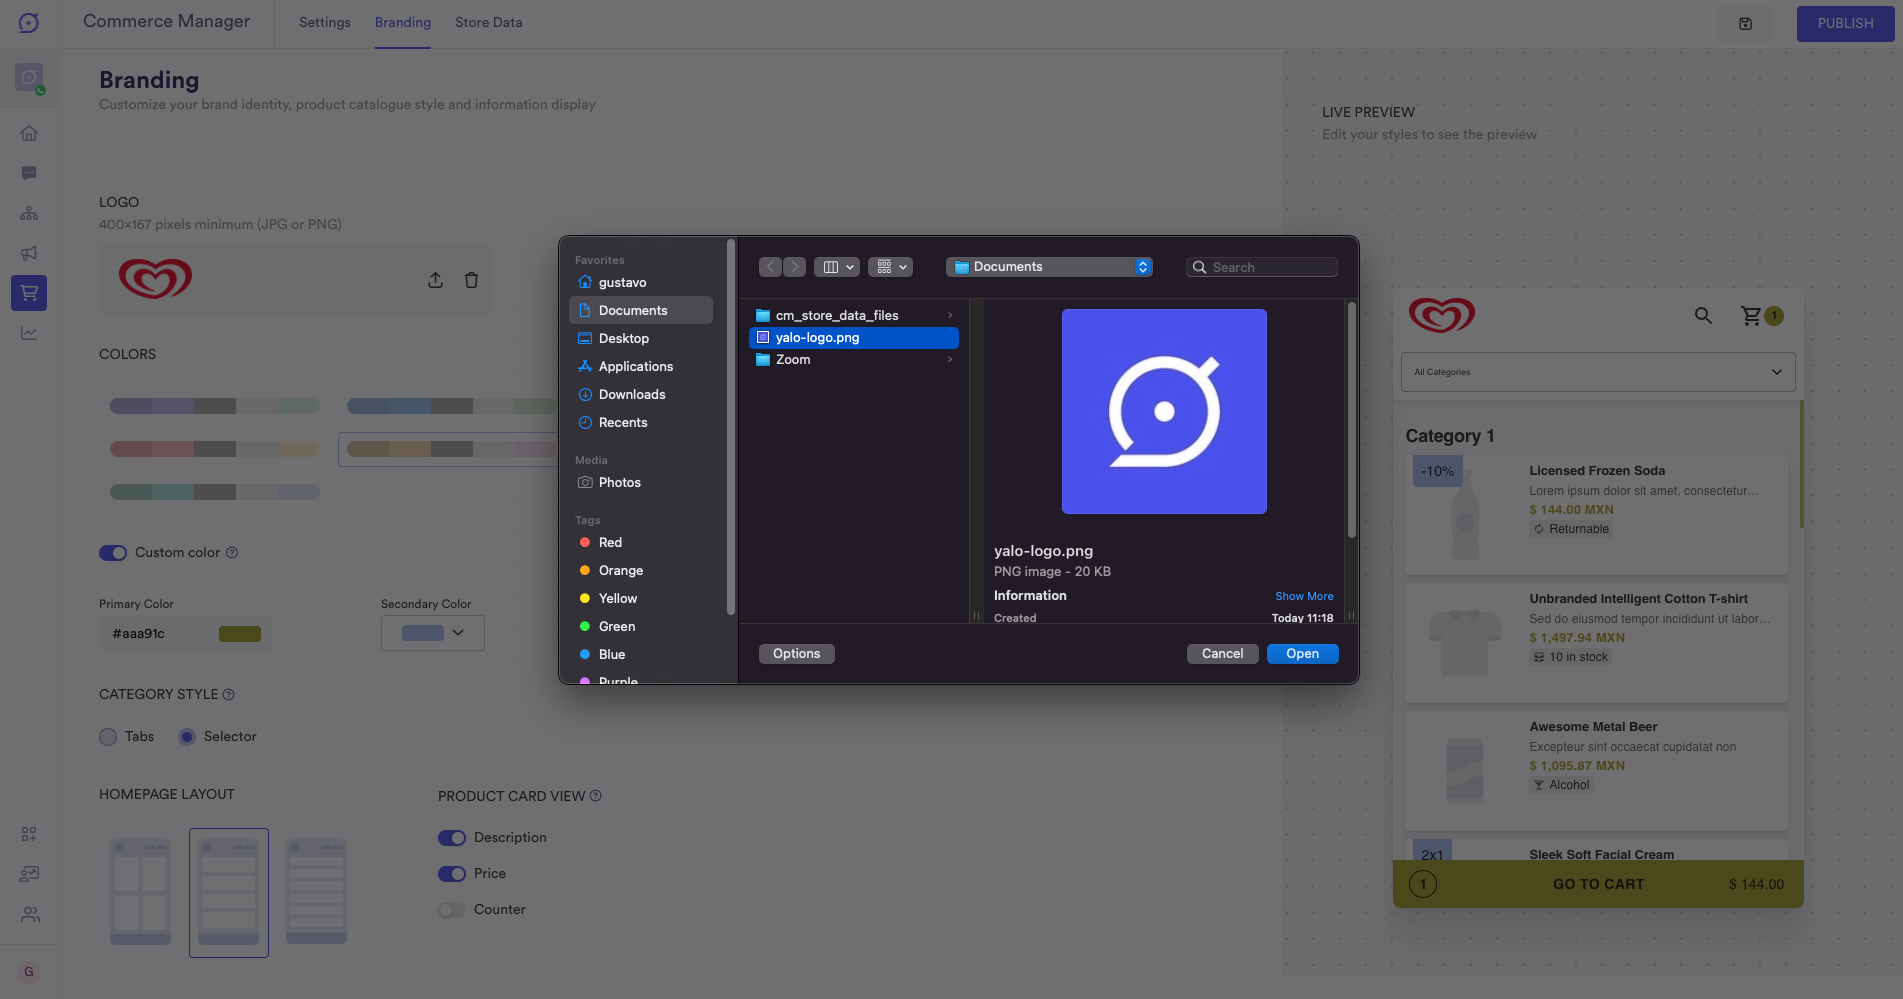
This is how it’s going to look once the logo is uploaded.
Logo uploaded and shown in the live preview.
💡 The valid file extensions are png, jpg, jpeg, and SVG. Even though, the size is not validated at this moment this would change in the future.Colors
In the branding section, you can customize your storefront’s colors in two different ways, the first one is by selecting primary and secondary colors from the picker color, and the second one is by selecting a predefined color palette.
Custom color picker
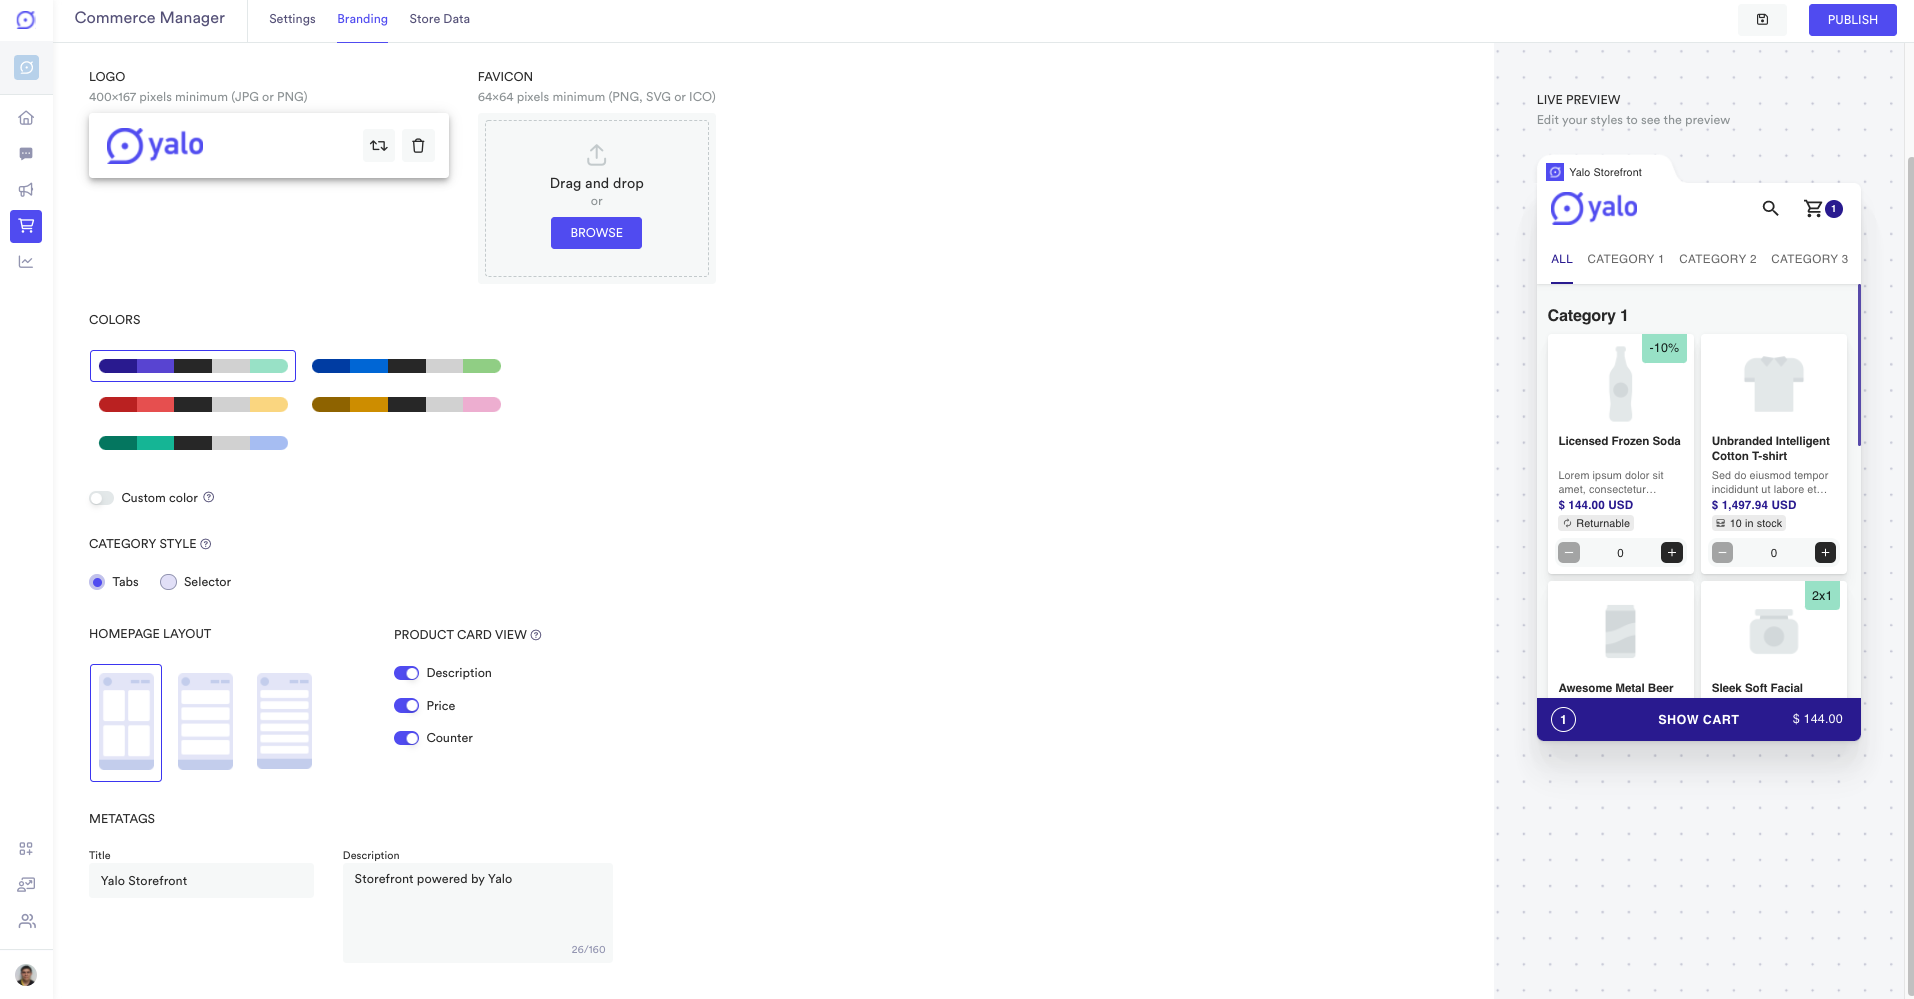
The first way of customizing your branding’s colors is by selecting primary and secondary colors as shown in the picture below.
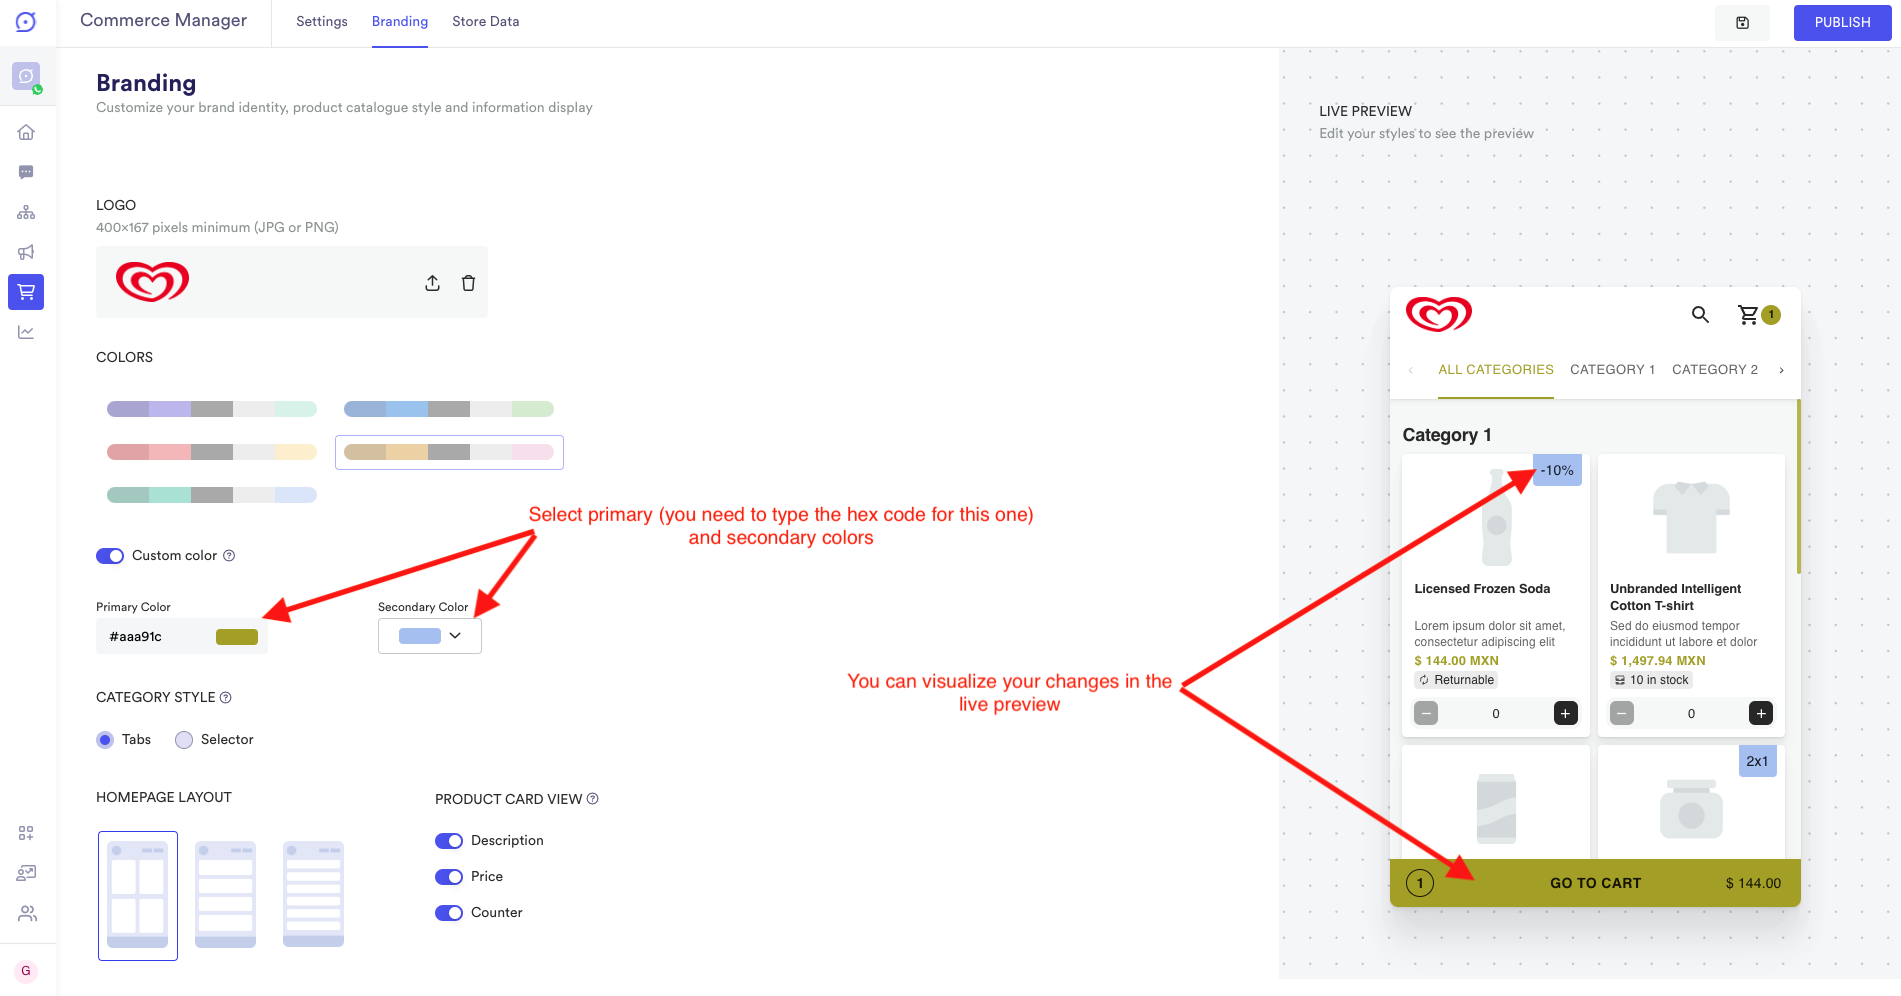
Customize your branding’s colors.
Selected a predefined color palette
The second way of customizing your branding’s colors is by disabling the custom color switch and choosing a predefined color palette, remember you can always see that changes being applied in the live preview section.
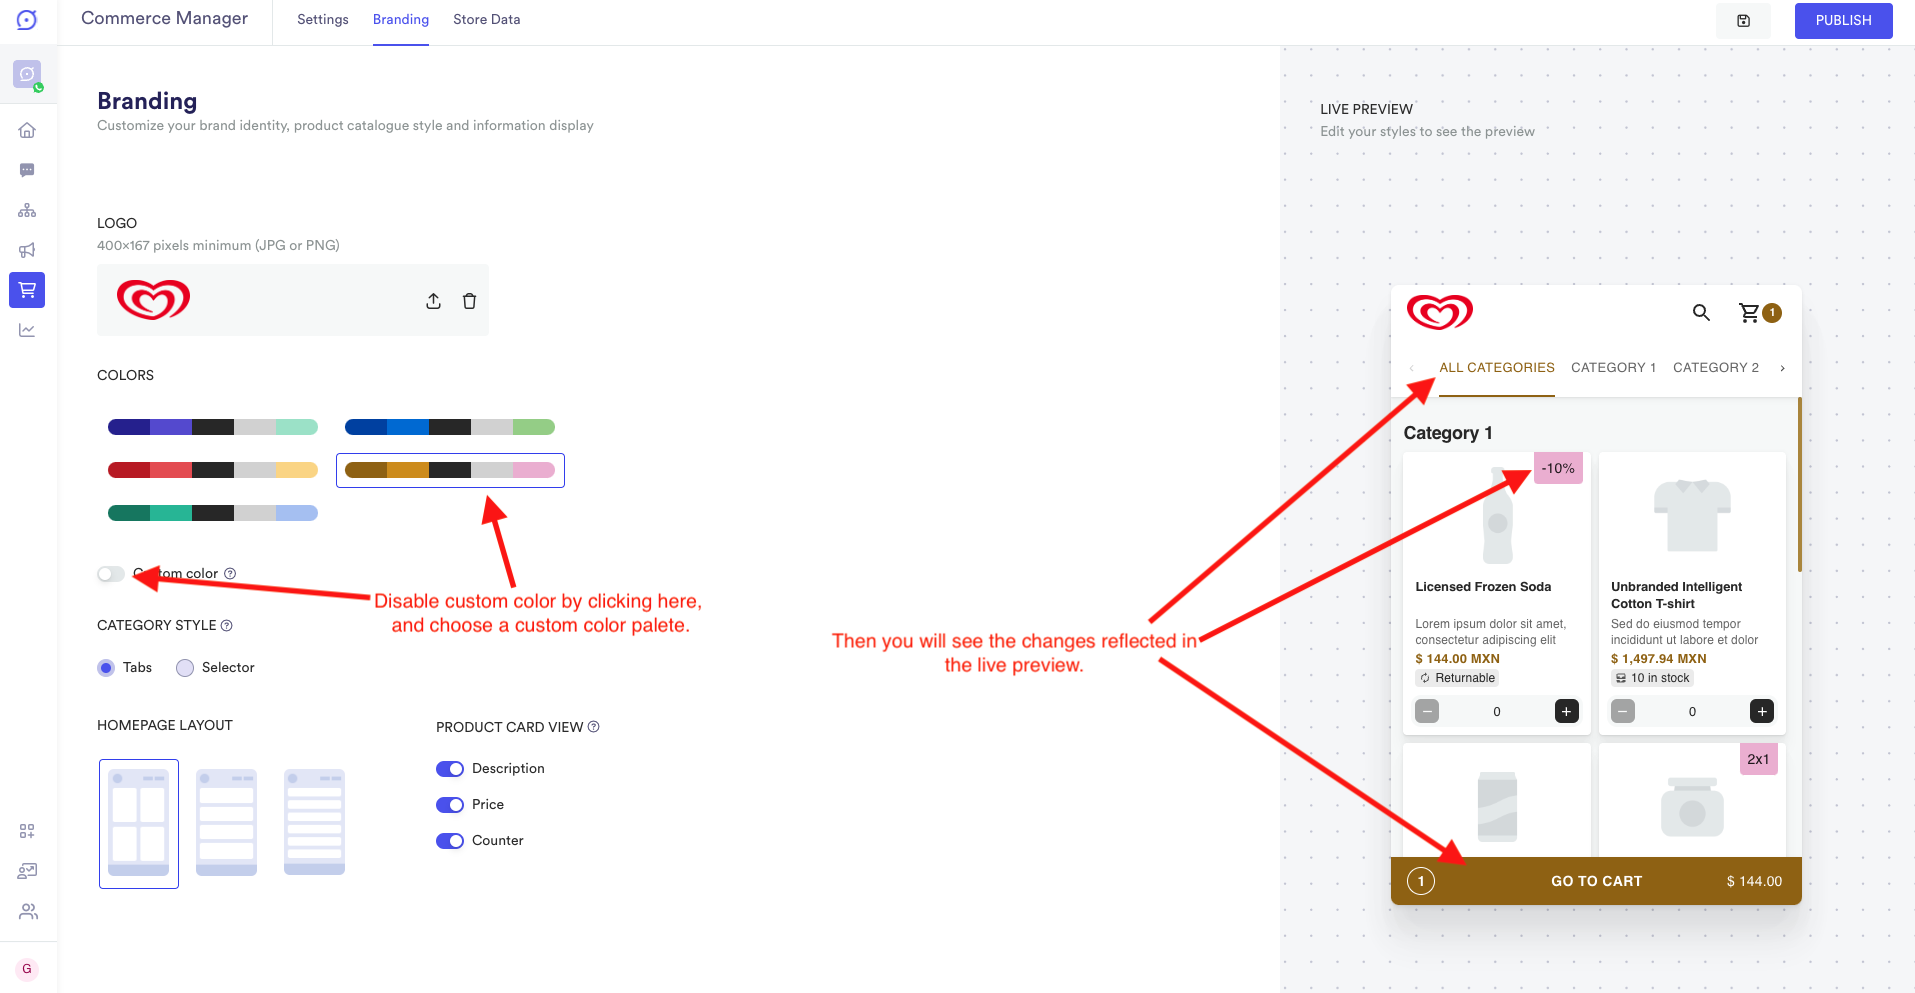
Customize your branding’s colors.
Layout
If you would like to change the default layout and category style you can do it as shown below.
Changing category style
For this section, you can choose between the “Tabs” and “Selector” category styles.
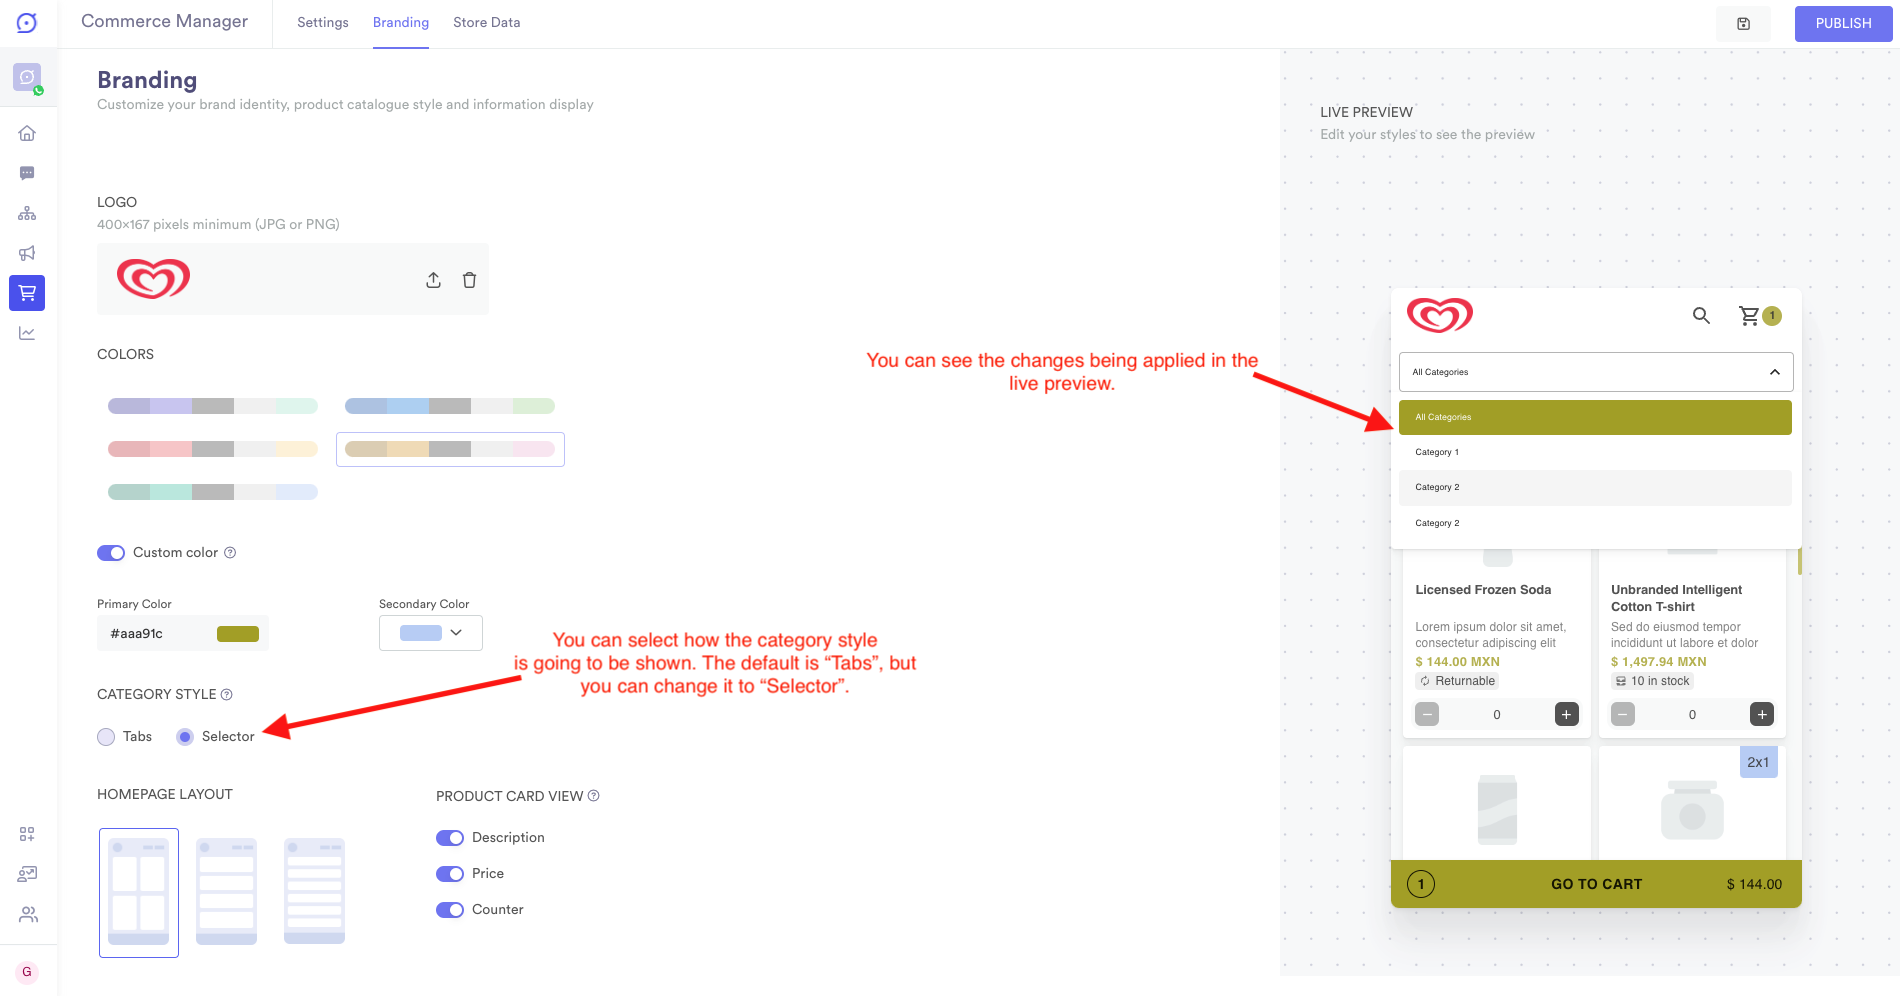
Category style in Selector format.
Use Categories View
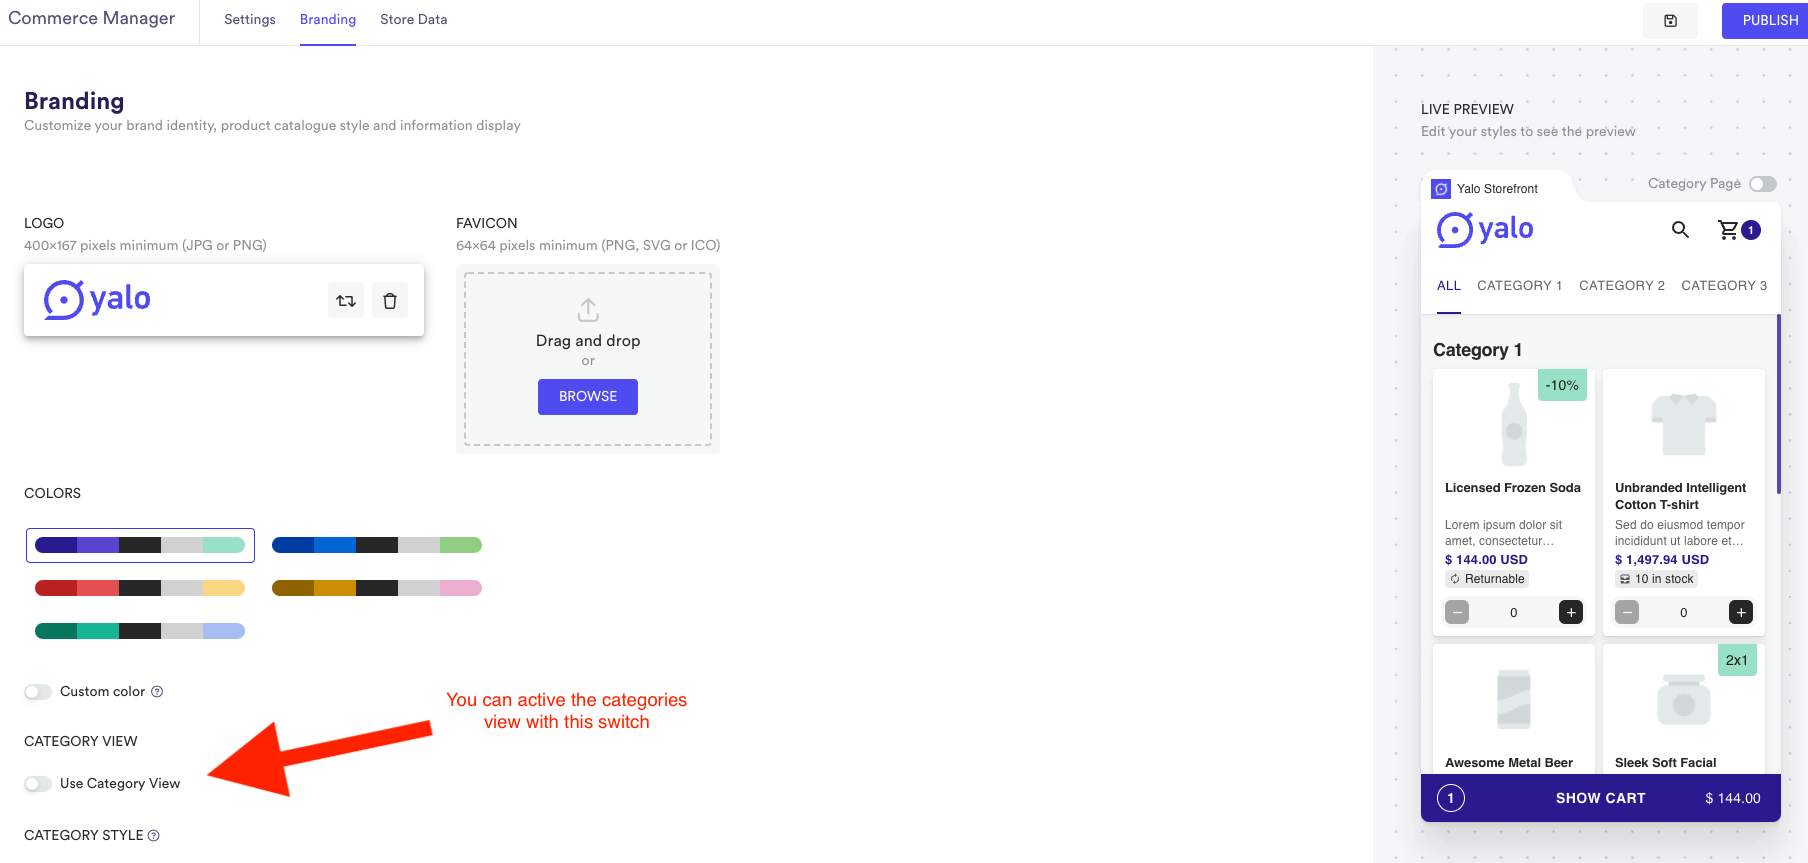
For this section you can choose which will be the main page the default product list or a list of all the categories that the store contains
Categories view switch
You can activate the categories view by clicking on the switch
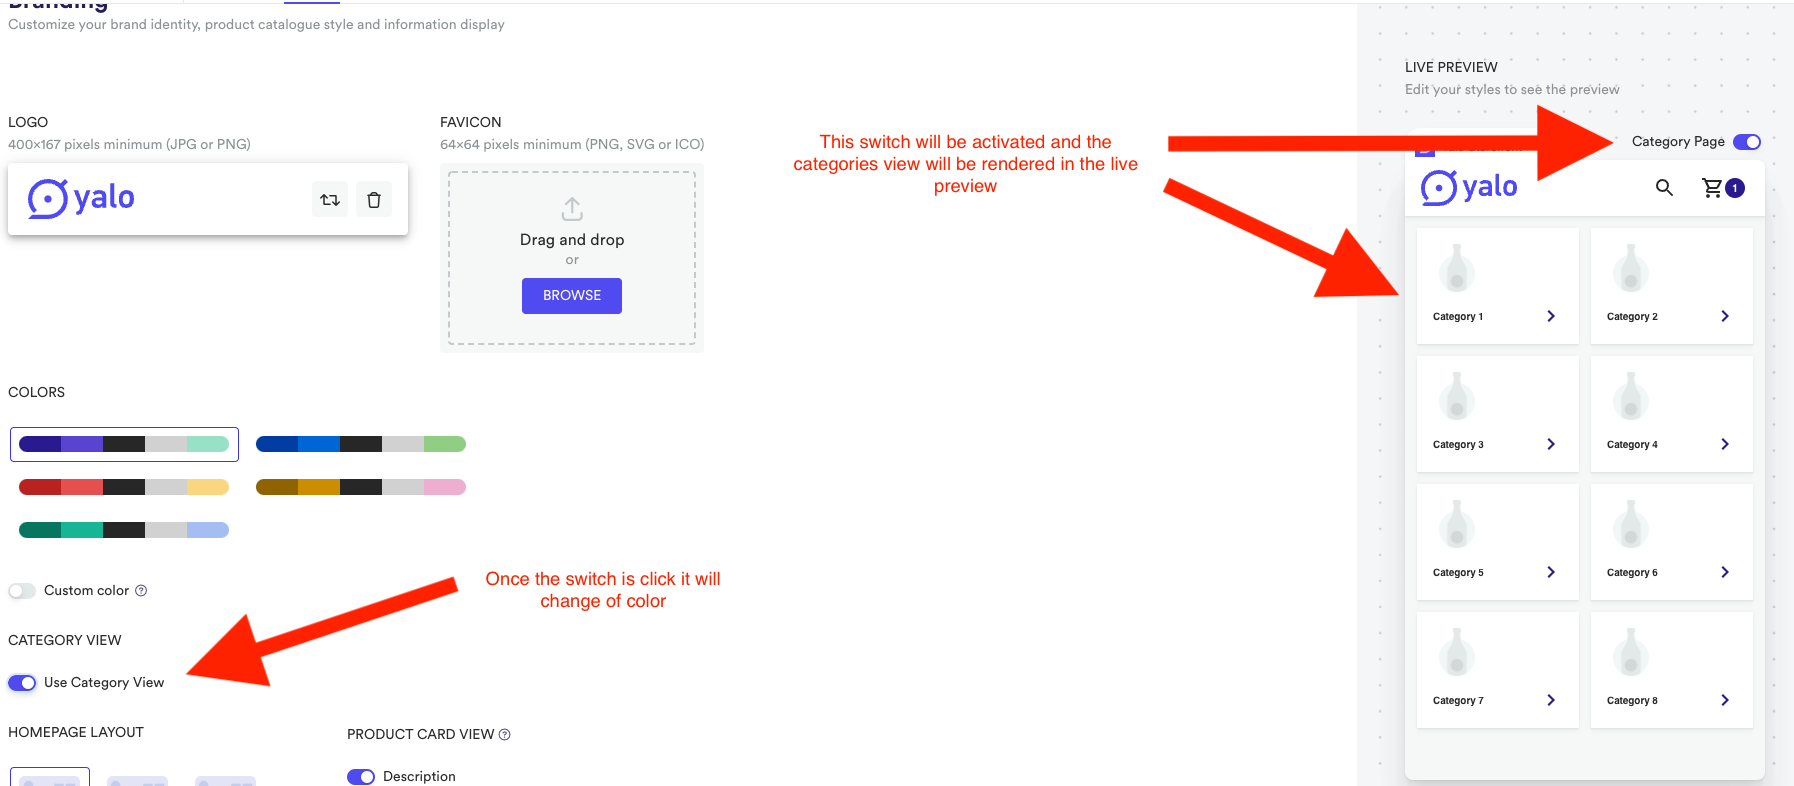
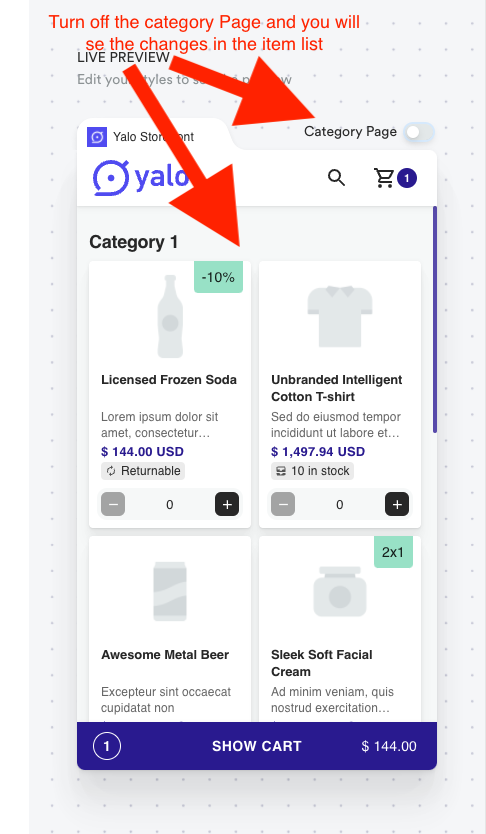
Live preview update
If you turn off the Category Page switch you will see the item list page that will be render once you click a category
Changing homepage layout
For this section, you can choose between three different homepage layouts, and toggle the description, price, and counter.
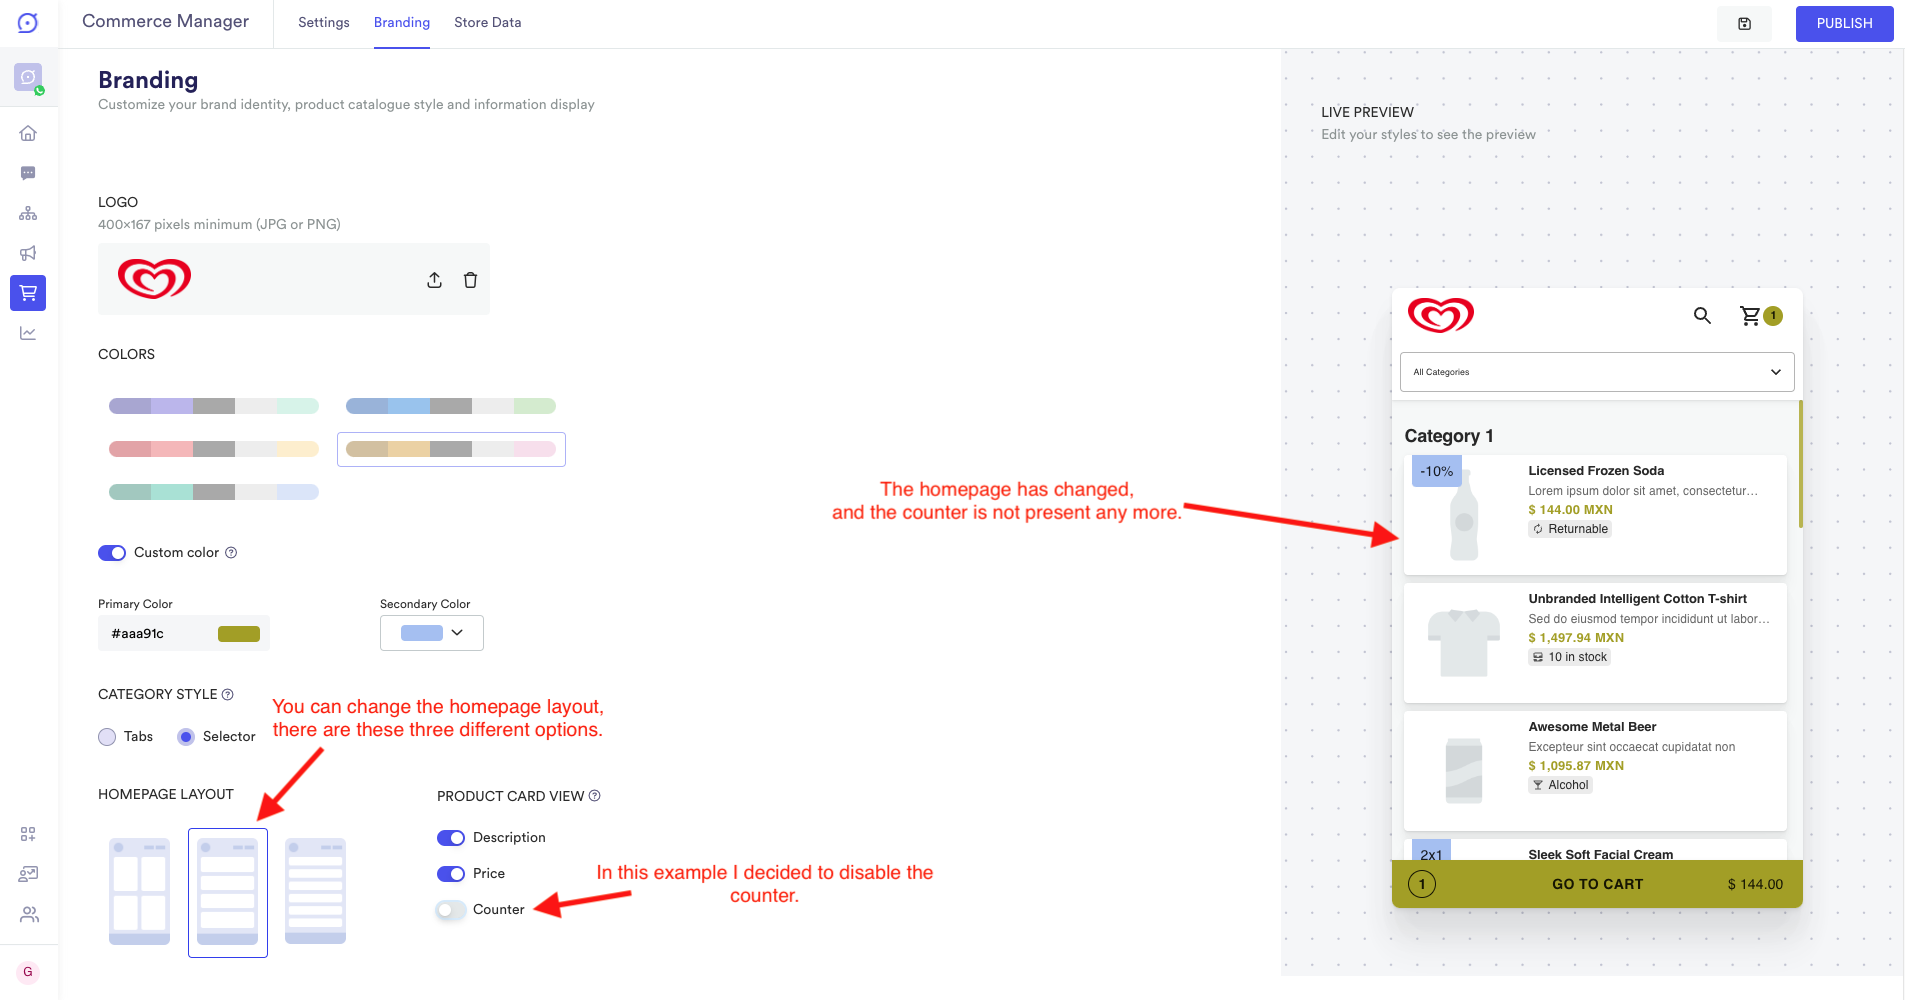
Homepage layout with no counter.
Changing favicon image
In order to change the favicon image, you need to upload a new file as shown below:
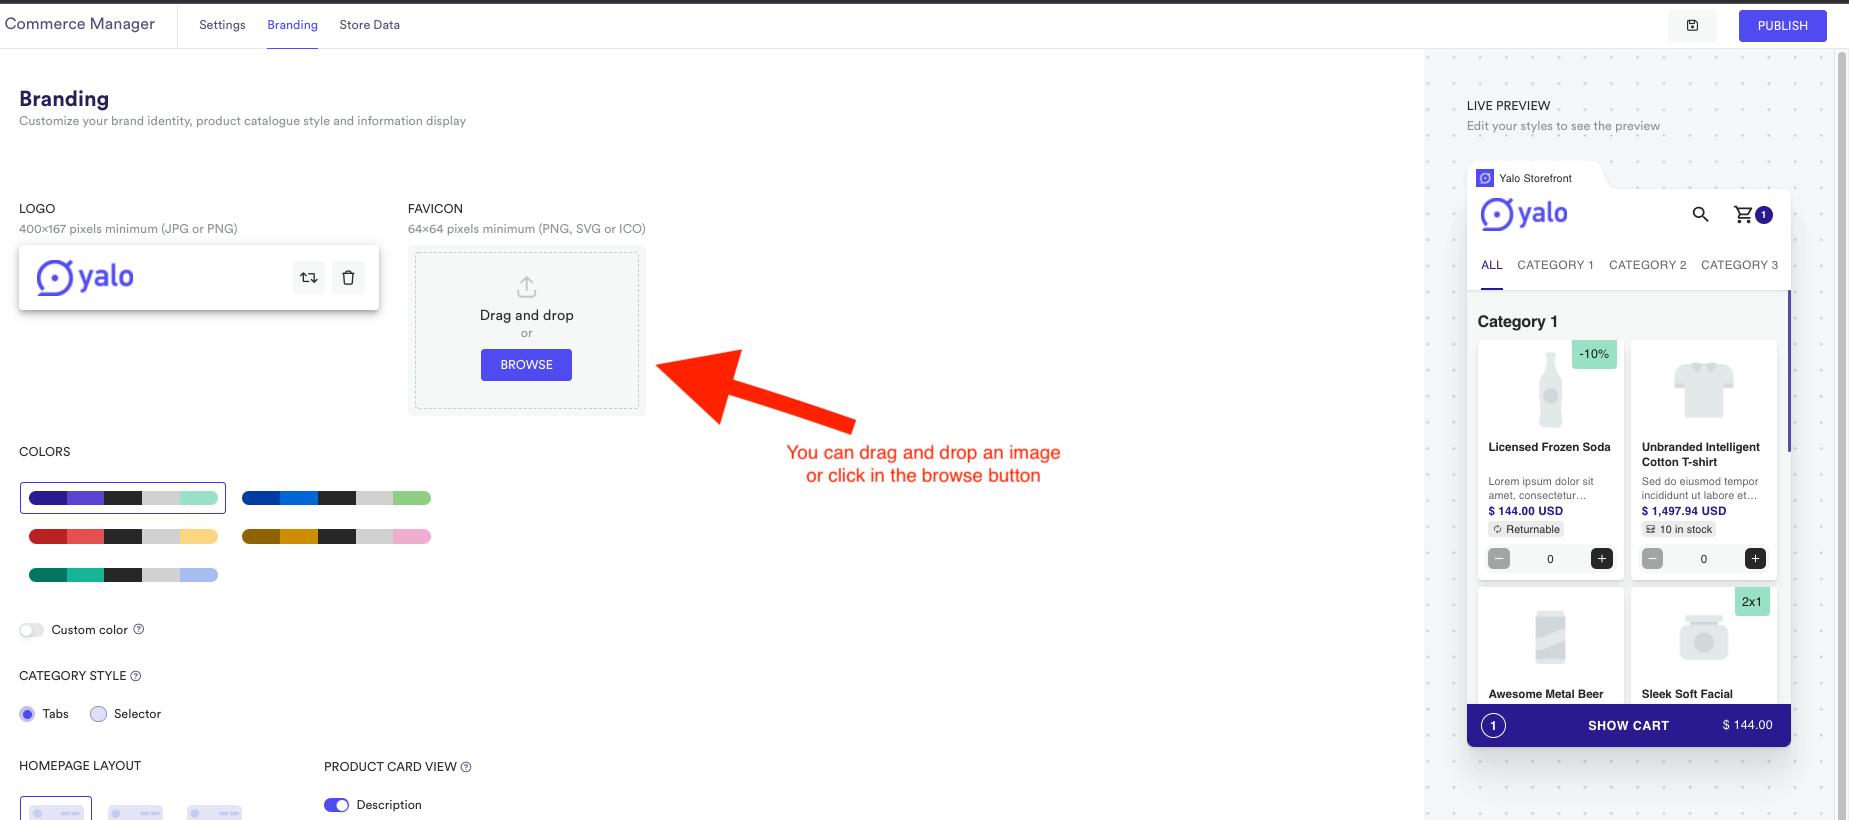
favicon logo upload
If you pressed the browse button then you just need to select a new image from your file system.
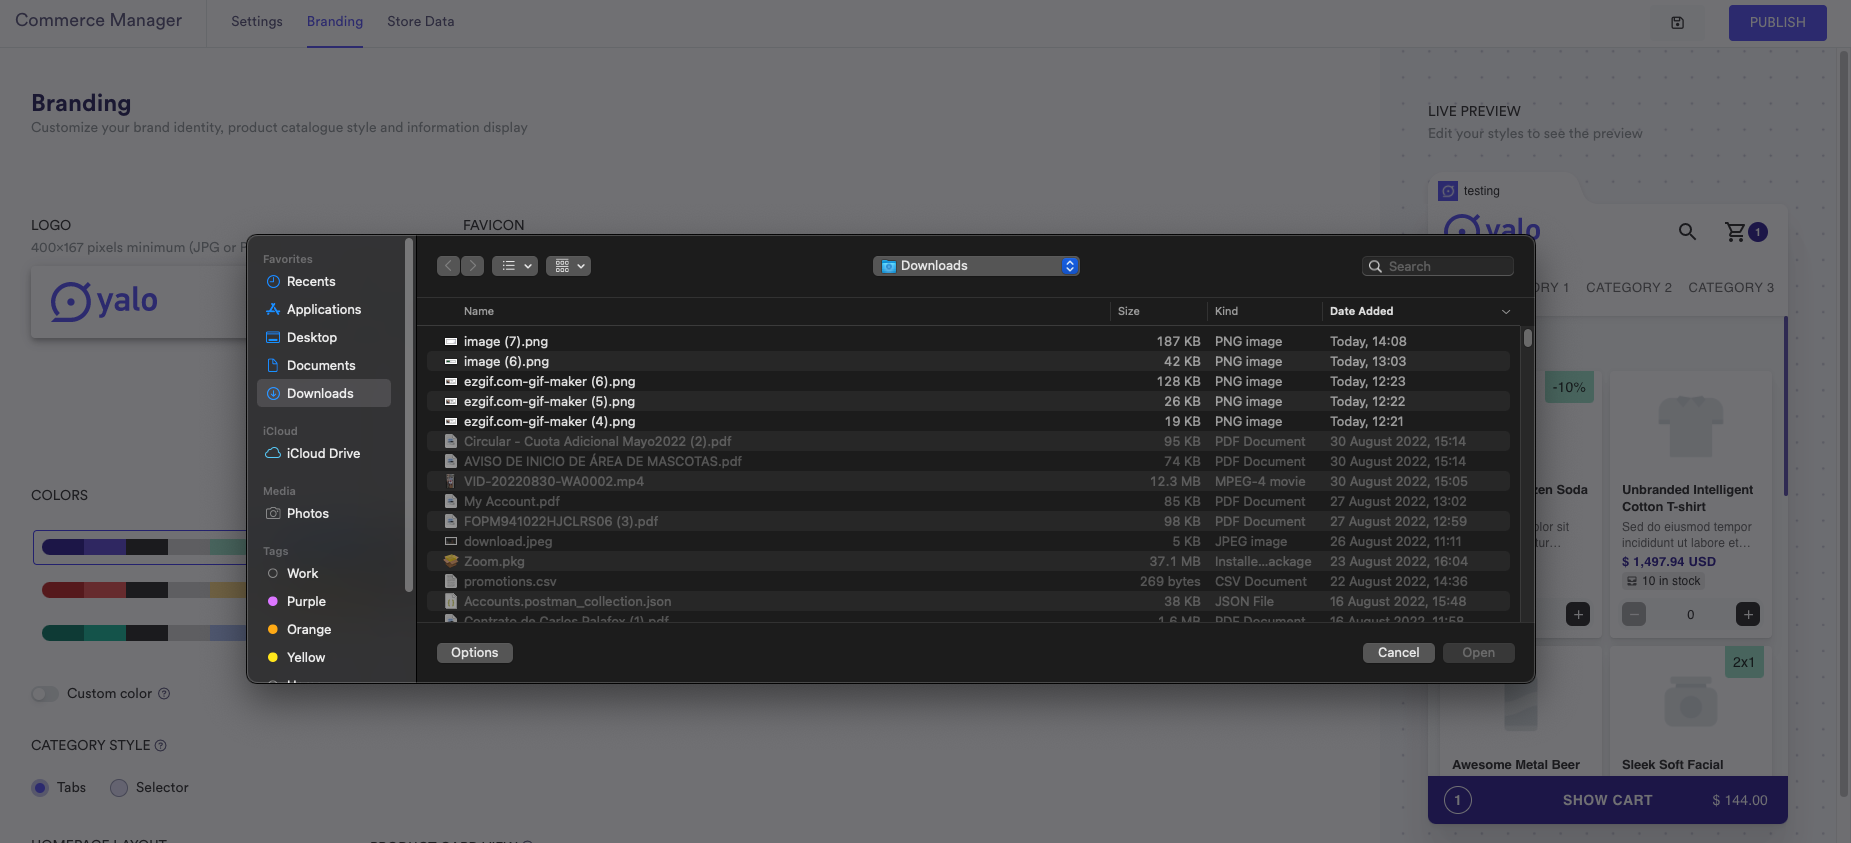
file selection
Once the favicon is updated you will see it in the live preview
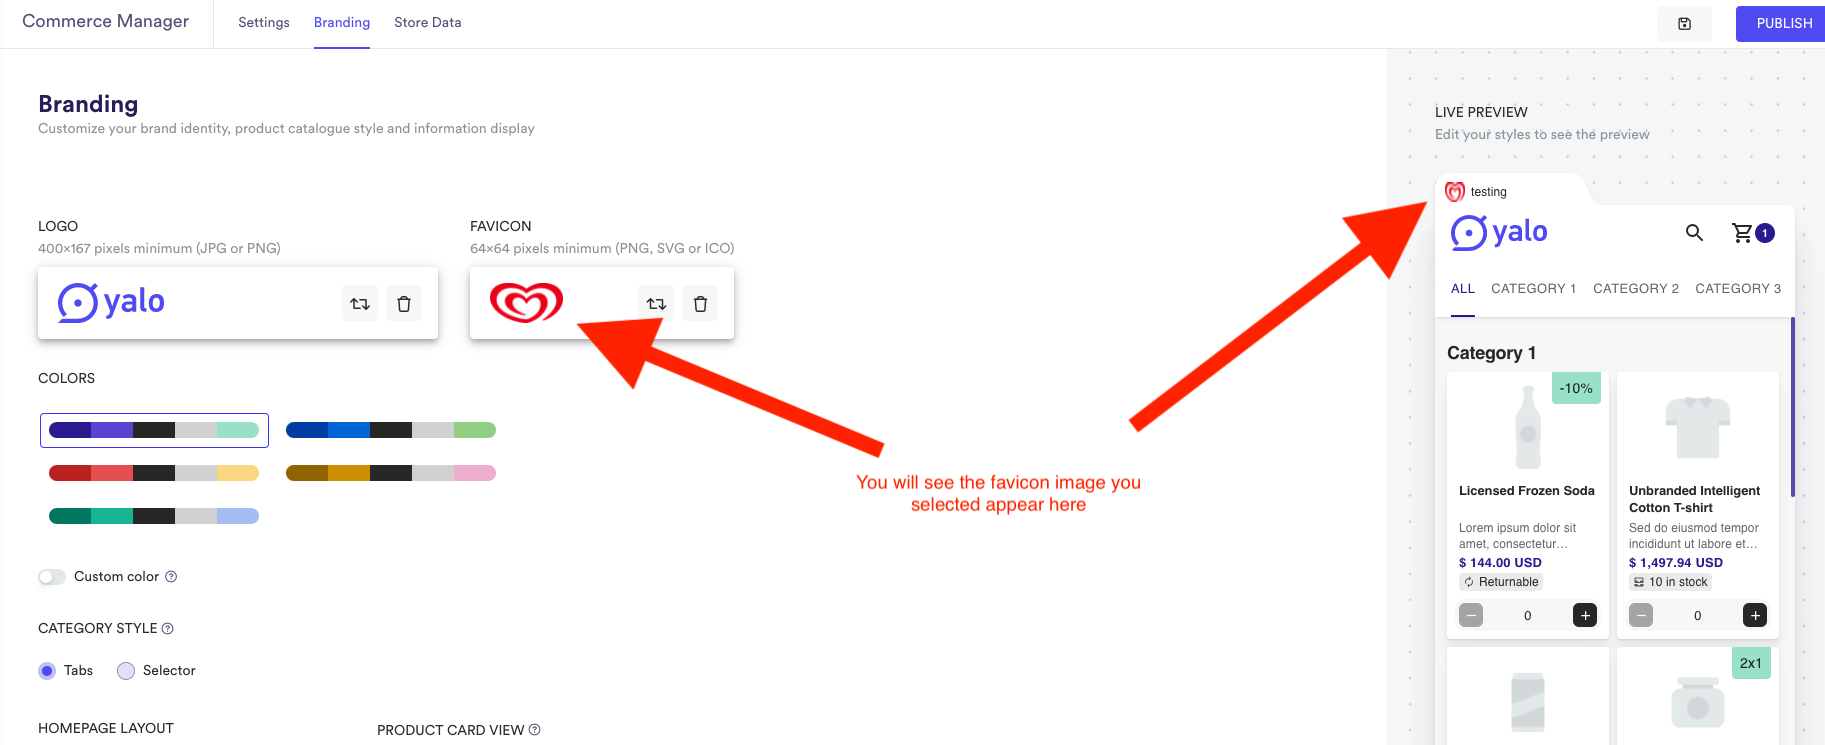
favicon updated
💡 The valid file extensions are png, jpg, svg, and ICO. Even though, the size is not validated at this moment this would change in the future.Update metadata title and description
To update the metadata title or description go to the bottom part of the branding page after the HomePage Layout section you will see a Metatags section with inputs for title and description
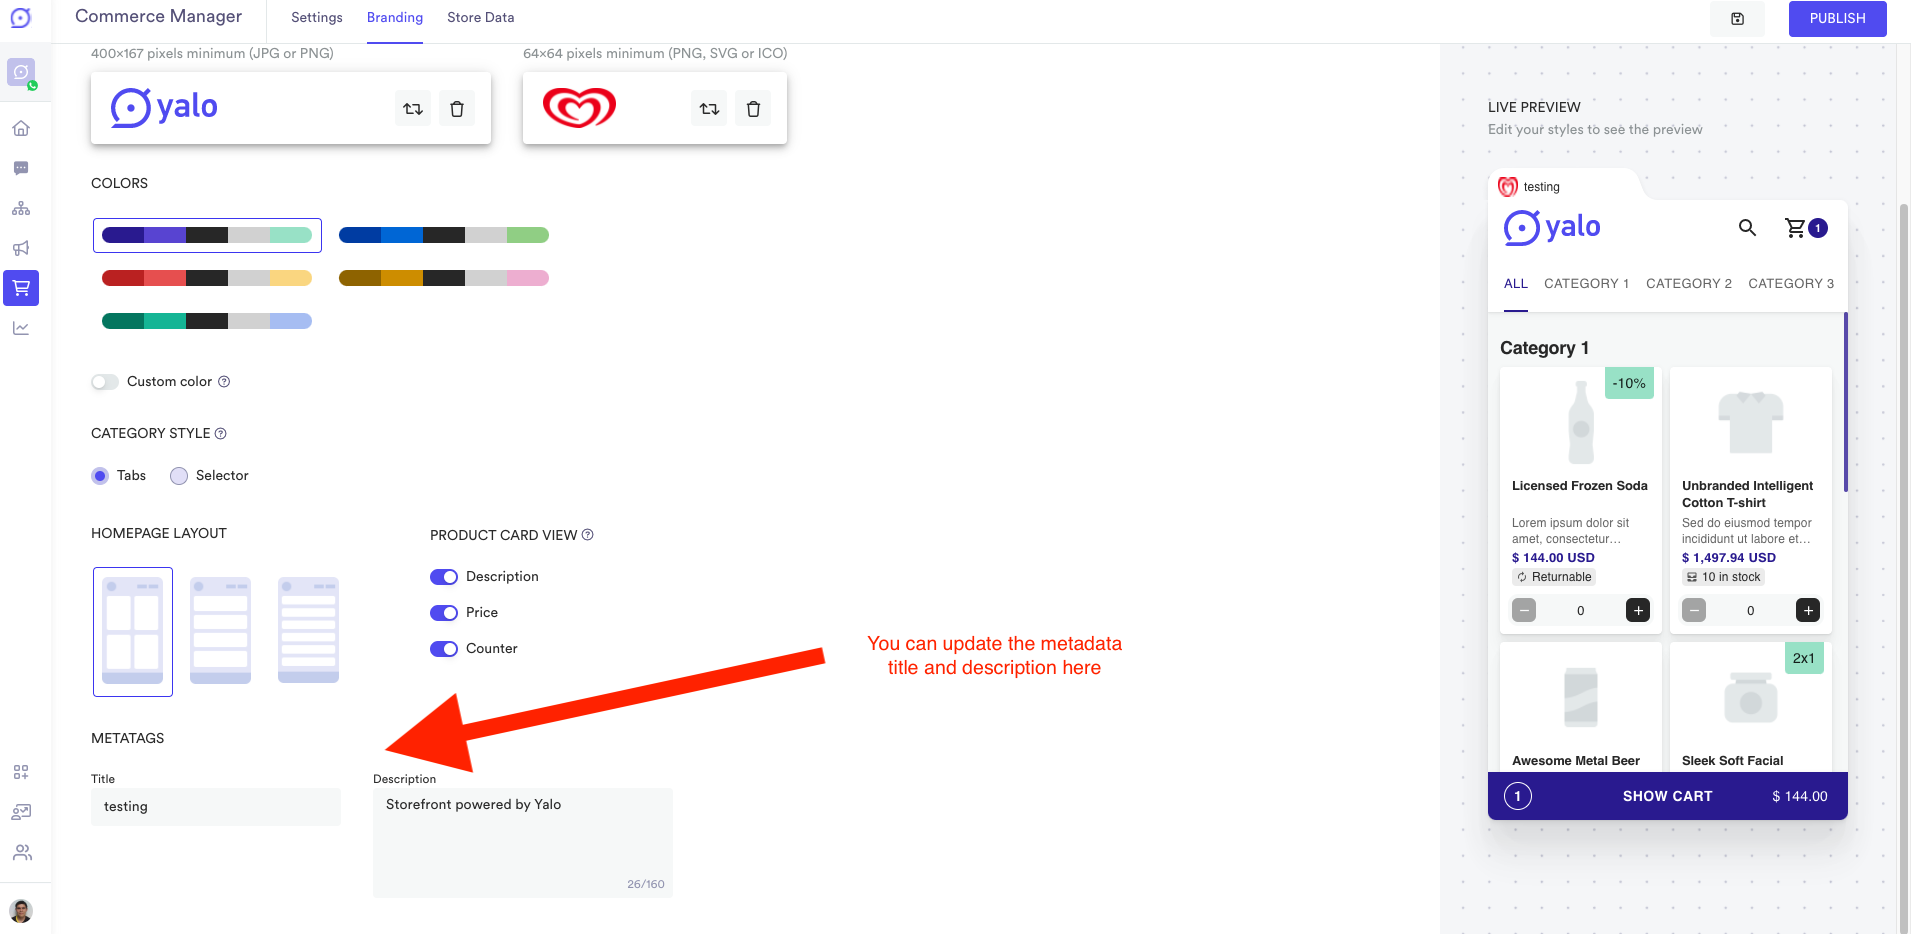
Metadata section
In this inputs you can write the specific title that will appear in the browser tab and the description you desire for the metadata, for the case of the title you can see it change in the live preview in the top part
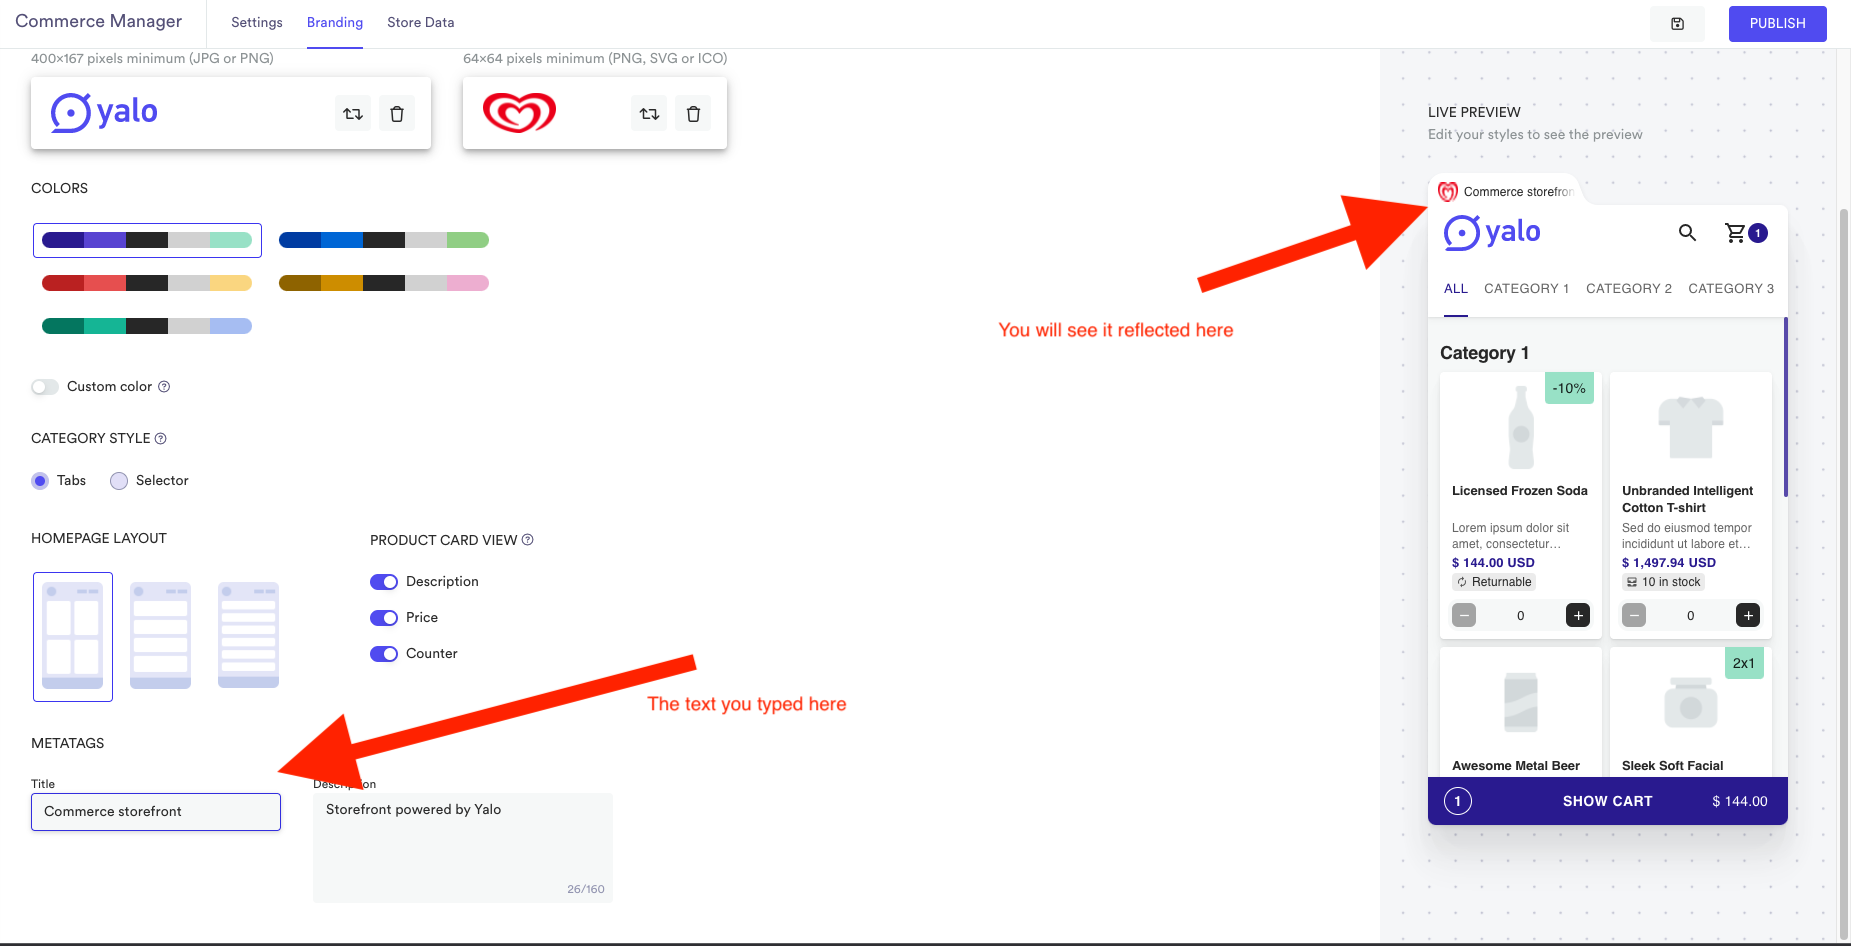
Title update
💡 The limit of characters for description field is 160Saving your changes
Once you’re happy with your customizations you can save them as shown below:
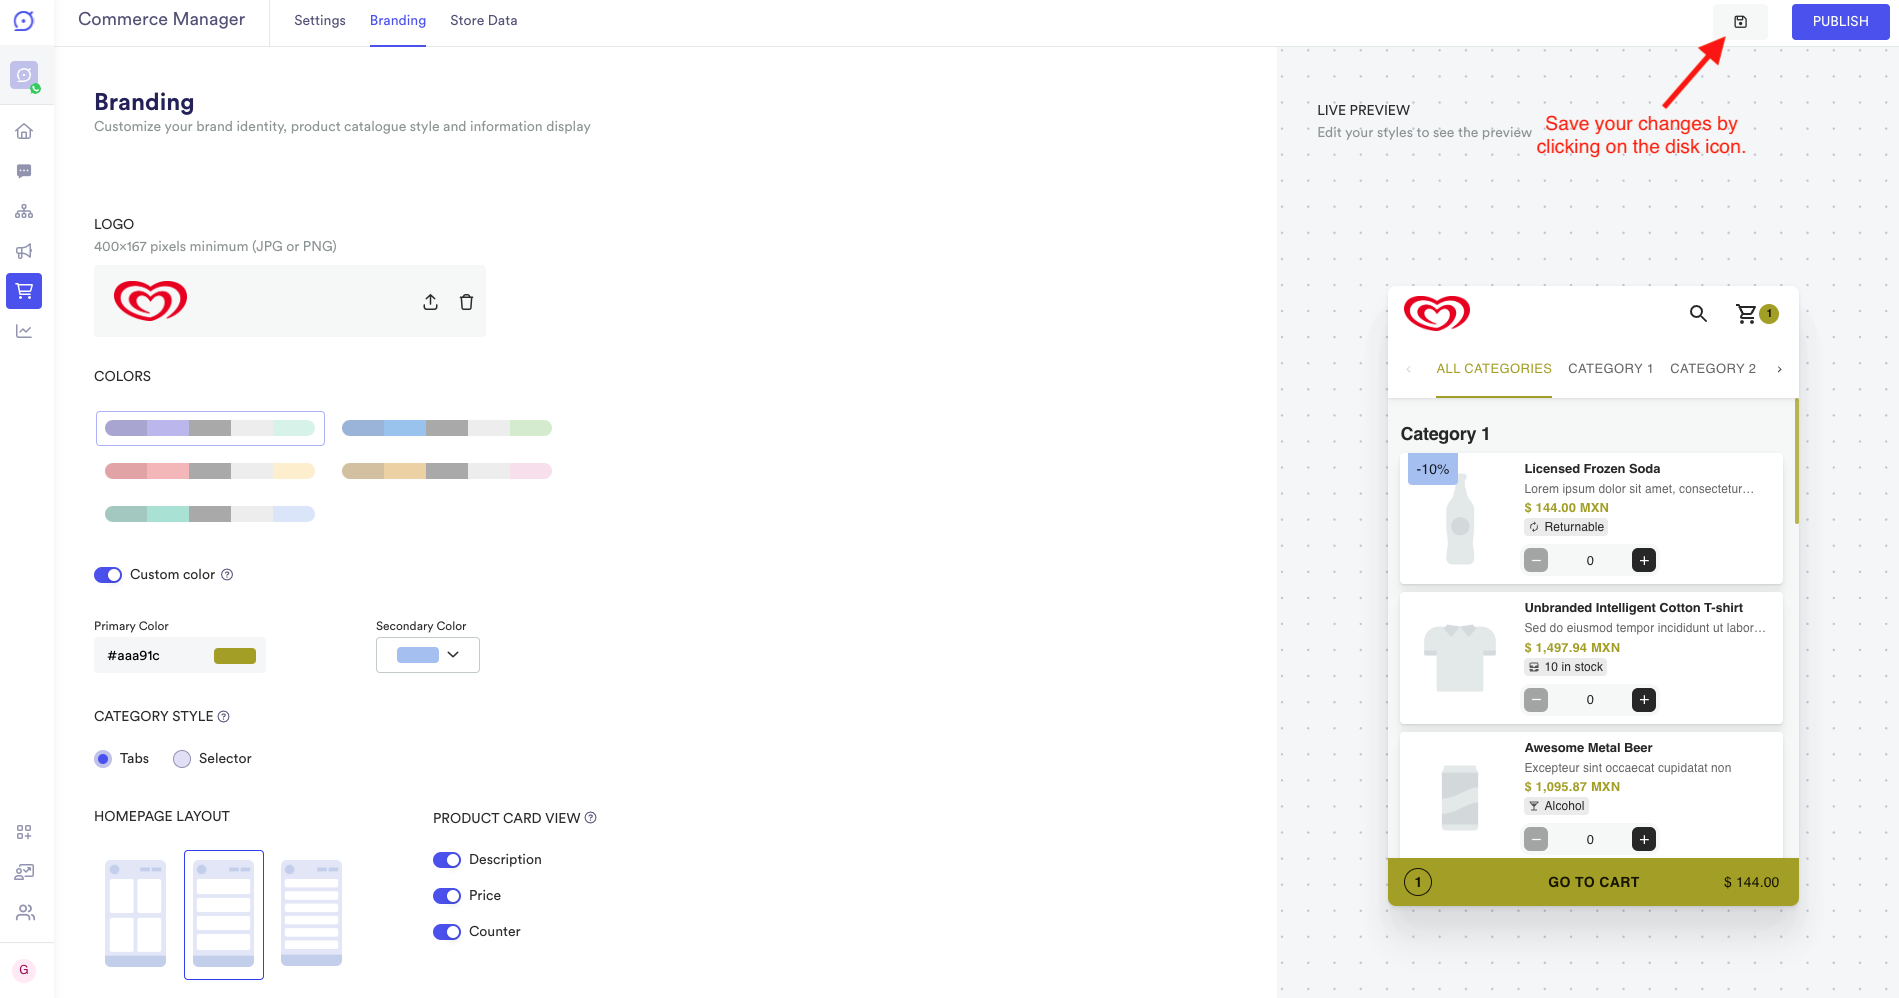
Clicking on the save button.
Publishing your changes
Once you’re happy with your customizations you can publish them as shown below:
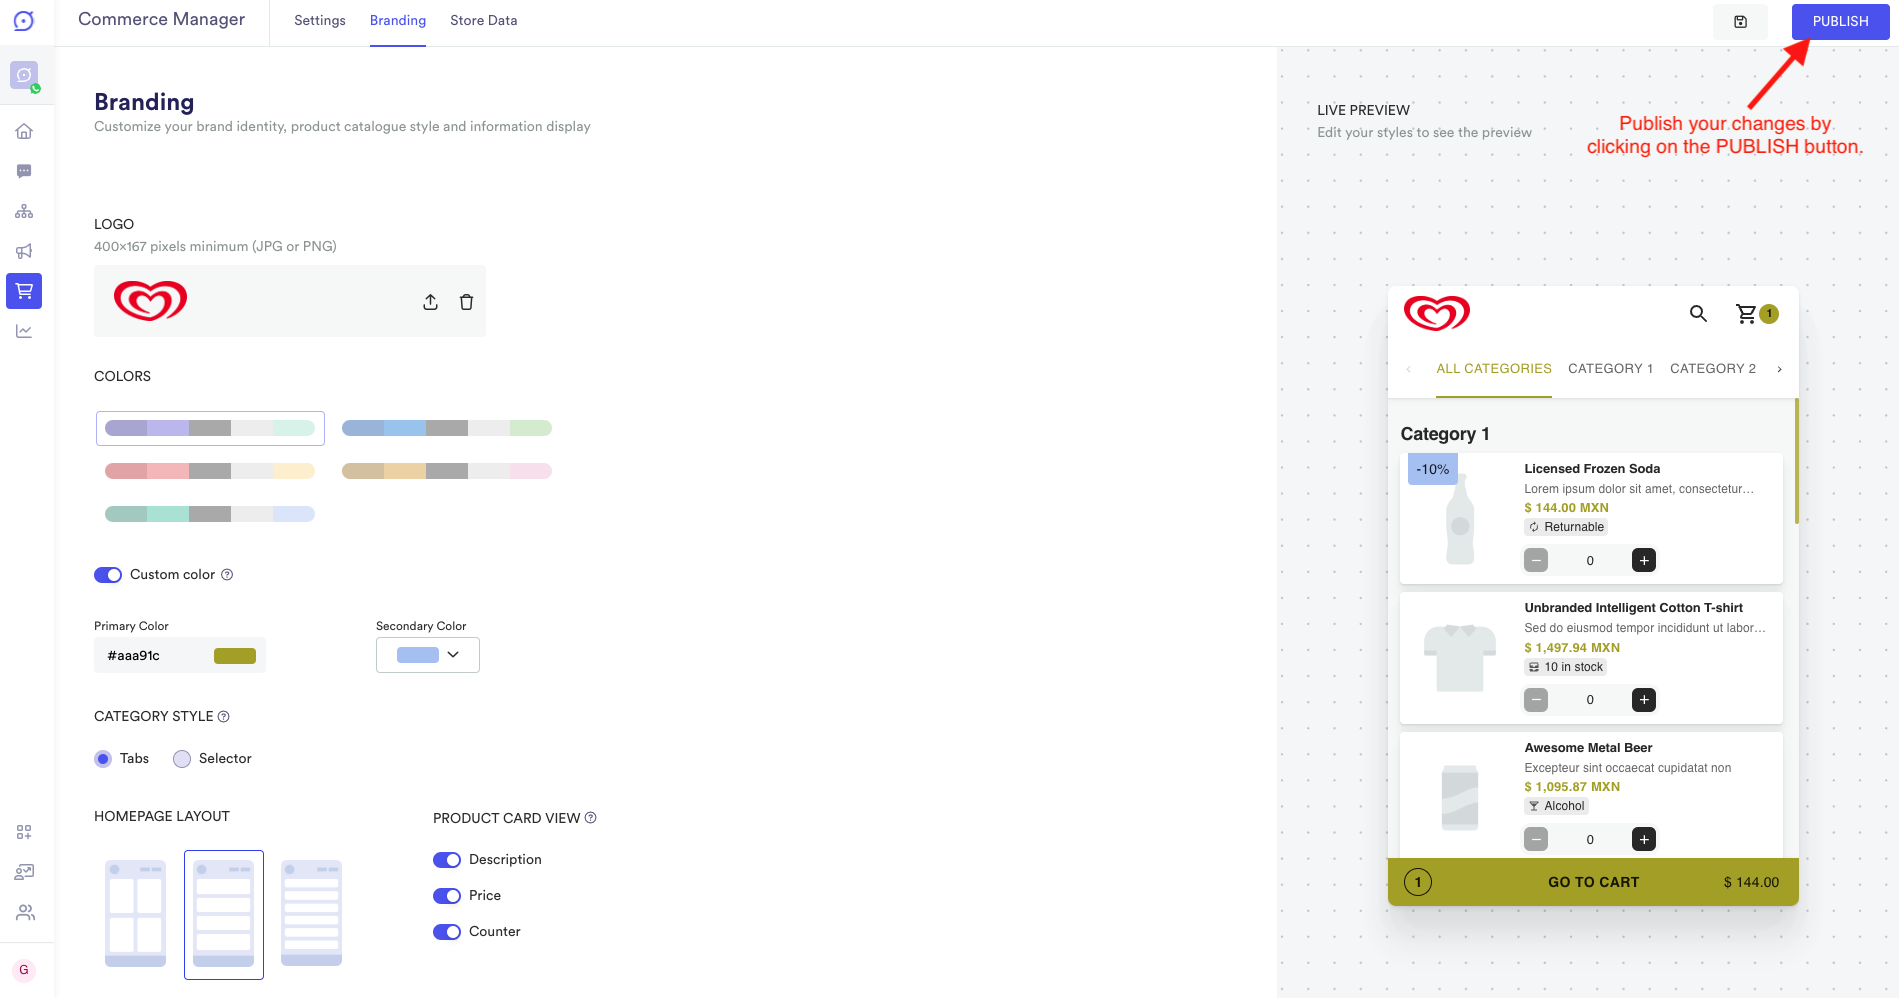
Clicking on the publish button.
💡 The **order** in which you save and publish your storefront’s branding **matters**, make sure you save your changes first and then publish them.Unsaved changes alert
Let’s suppose you’re customizing your storefront’s branding, and for any reason, you forget to save the changes before leaving the page you will see an alert to let you decide between “leave and discard the changes” (cancel button) and “leave and save the changes” (ok button).
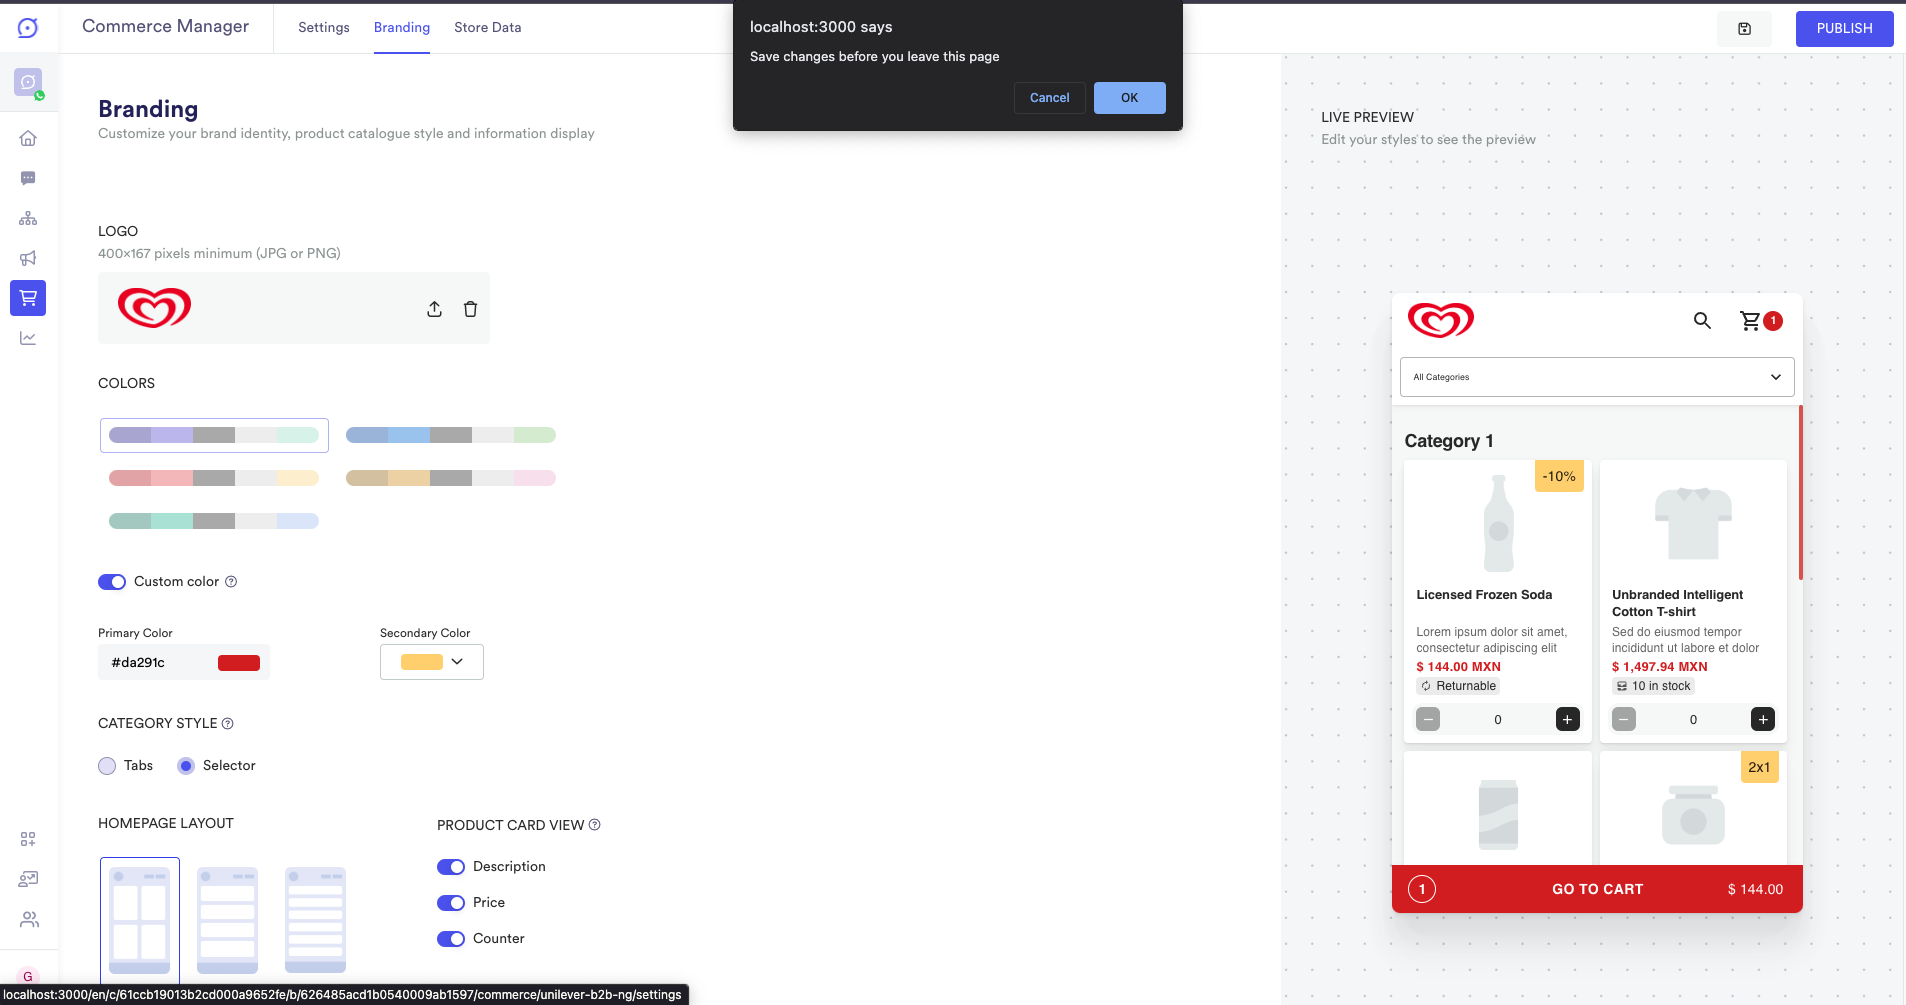
Alert to warn the user about losing changes.
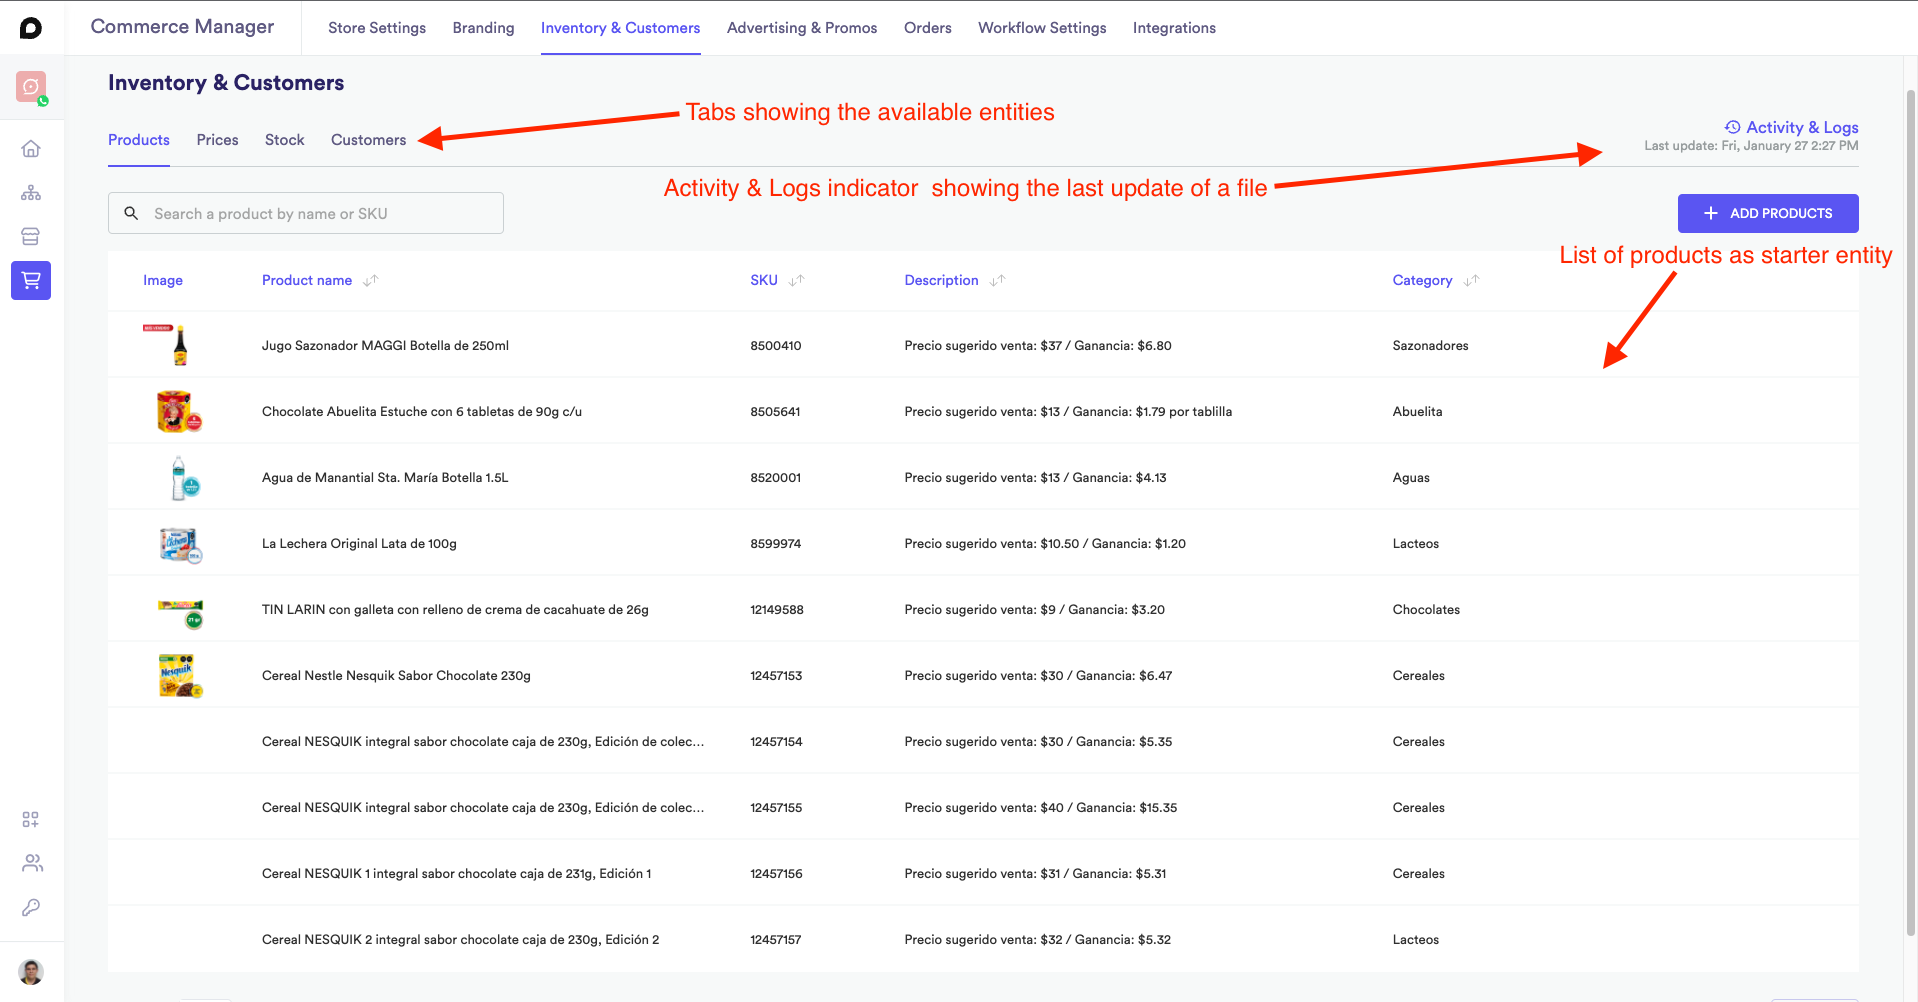
Inventory & Customers
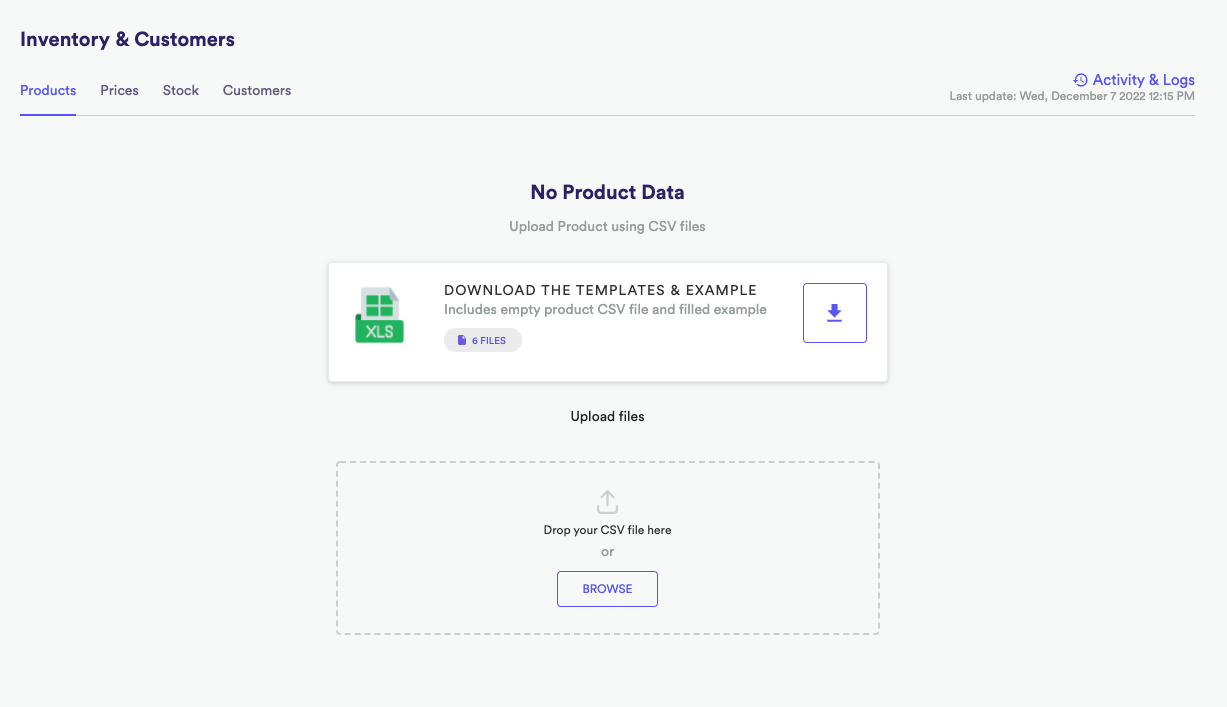
As you can see in the top menu there is an option to go to the Inventory & Customers section. Once you are on the Inventory & Customers page you will see something similar to this with the information related to the selected storefront:
If no information has been uploaded to your storefront you will see a page like this from which you can download the templates or drag and drop a csv file for the system to process
Products
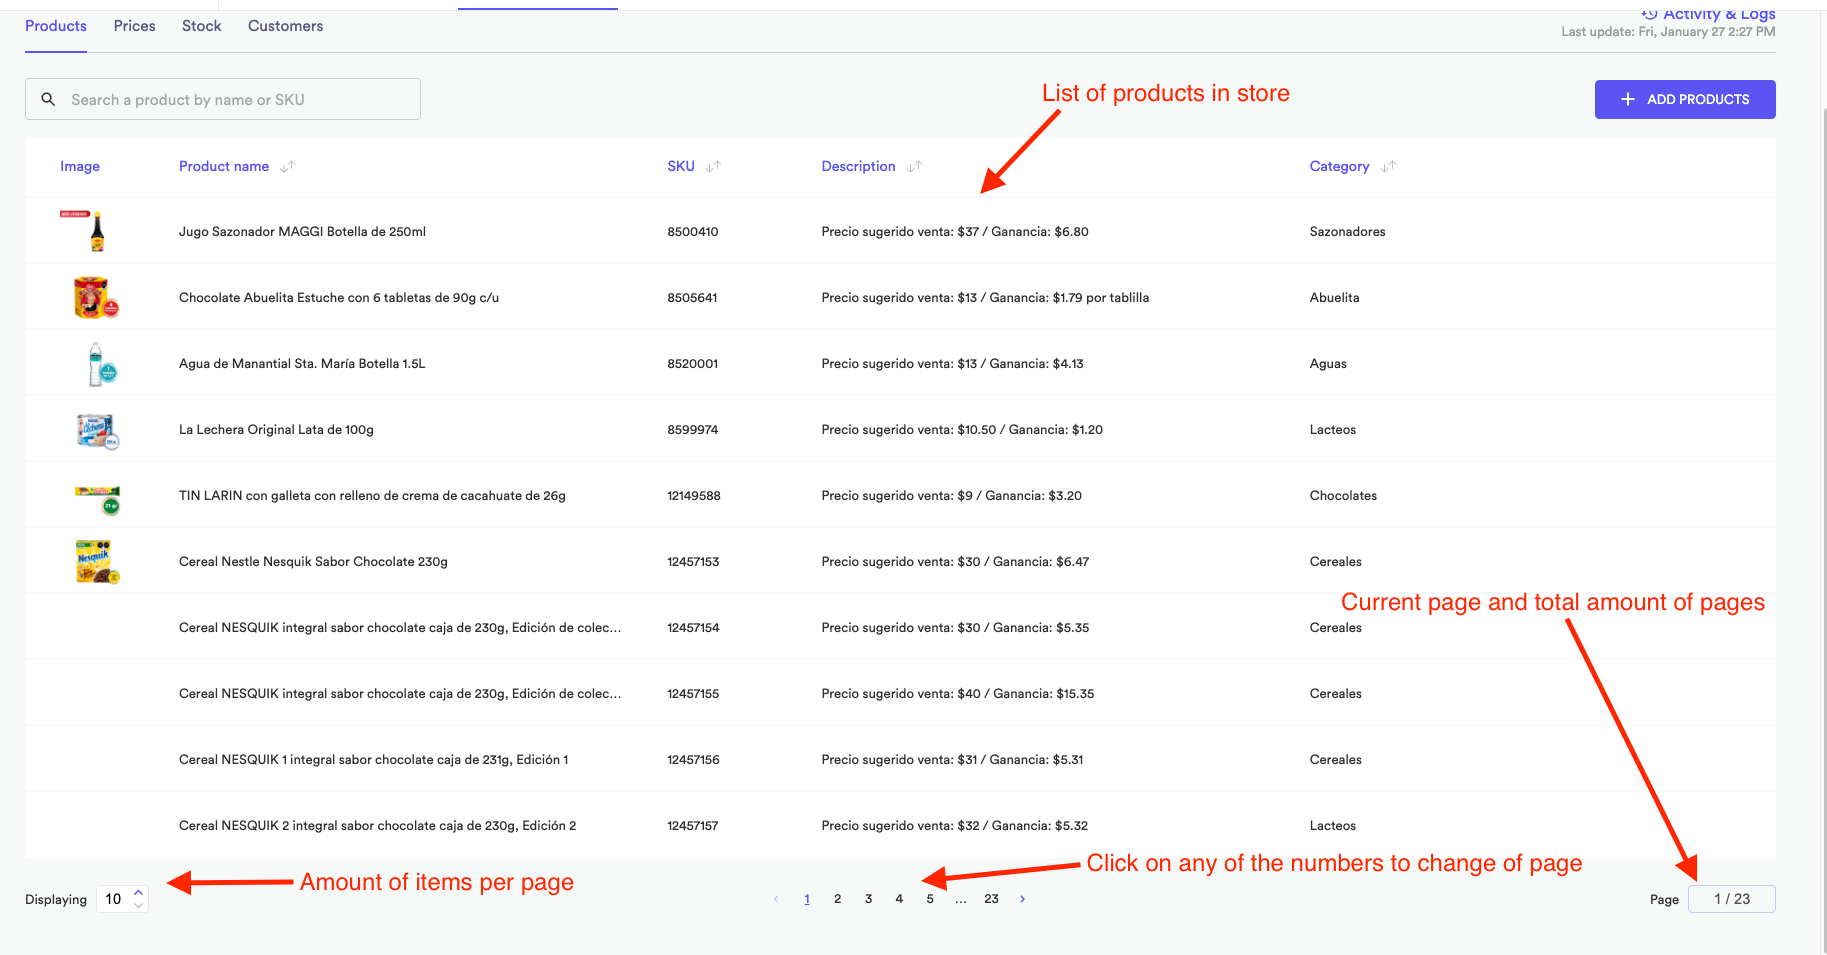
Just as you enter the Inventory & Customers page, you will see the list of products you store has:
Using the search feature
You can use the search product functionality to look for a product by name, then make click on the SEARCH button.
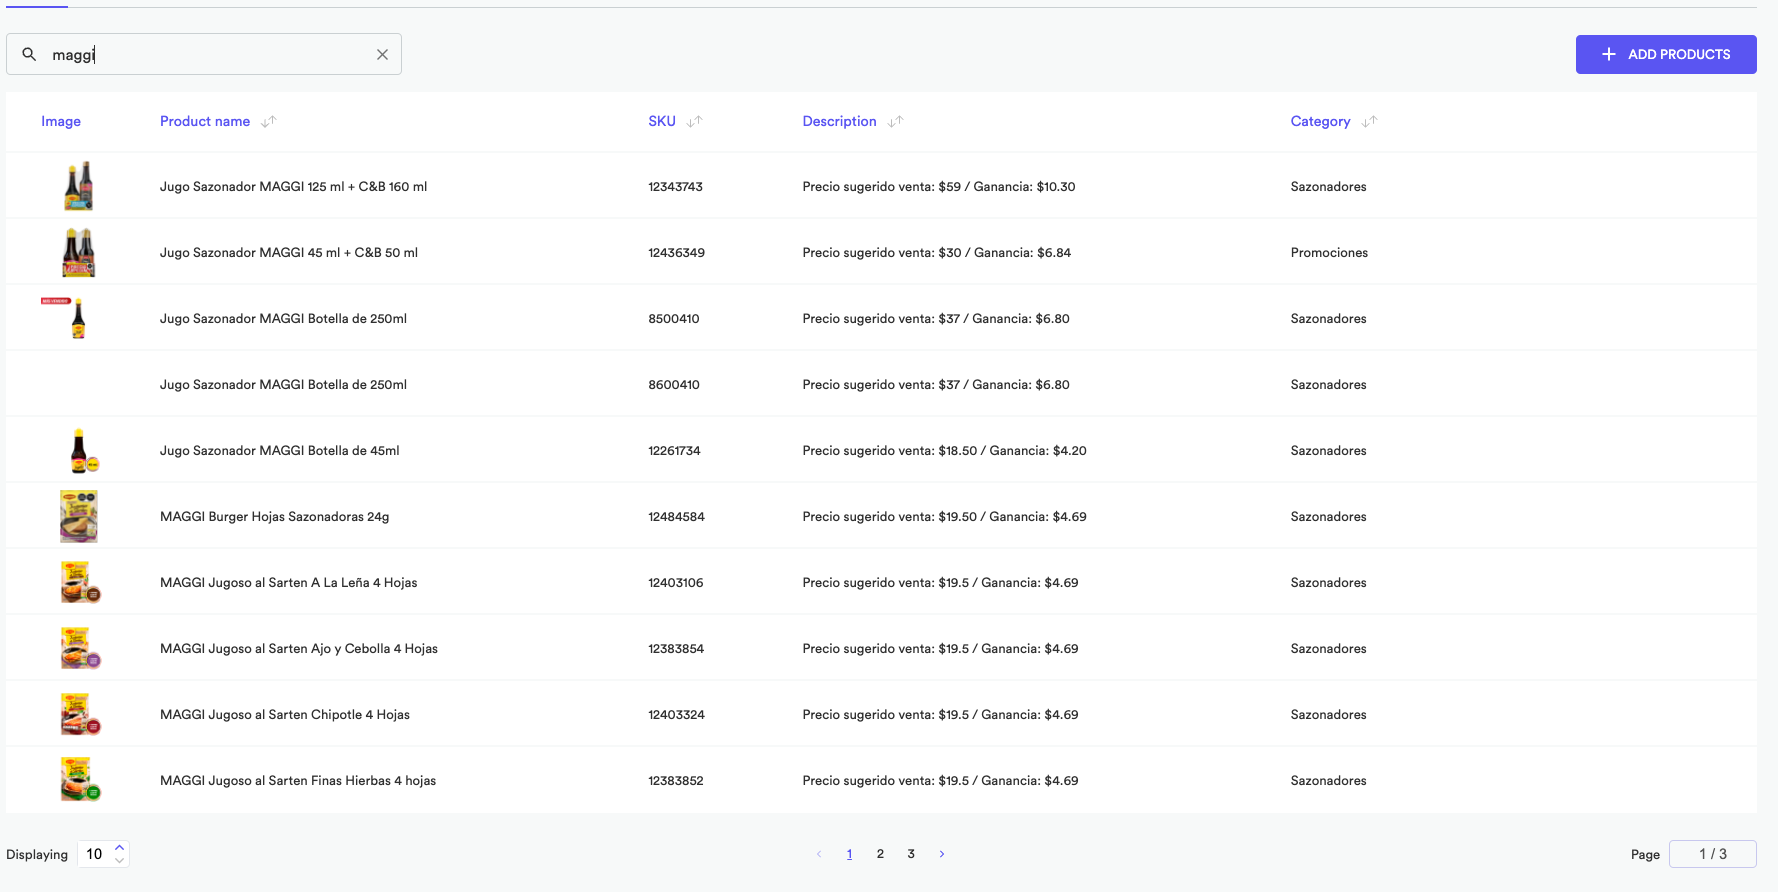 💡 You can search for the name, sku or description of your product
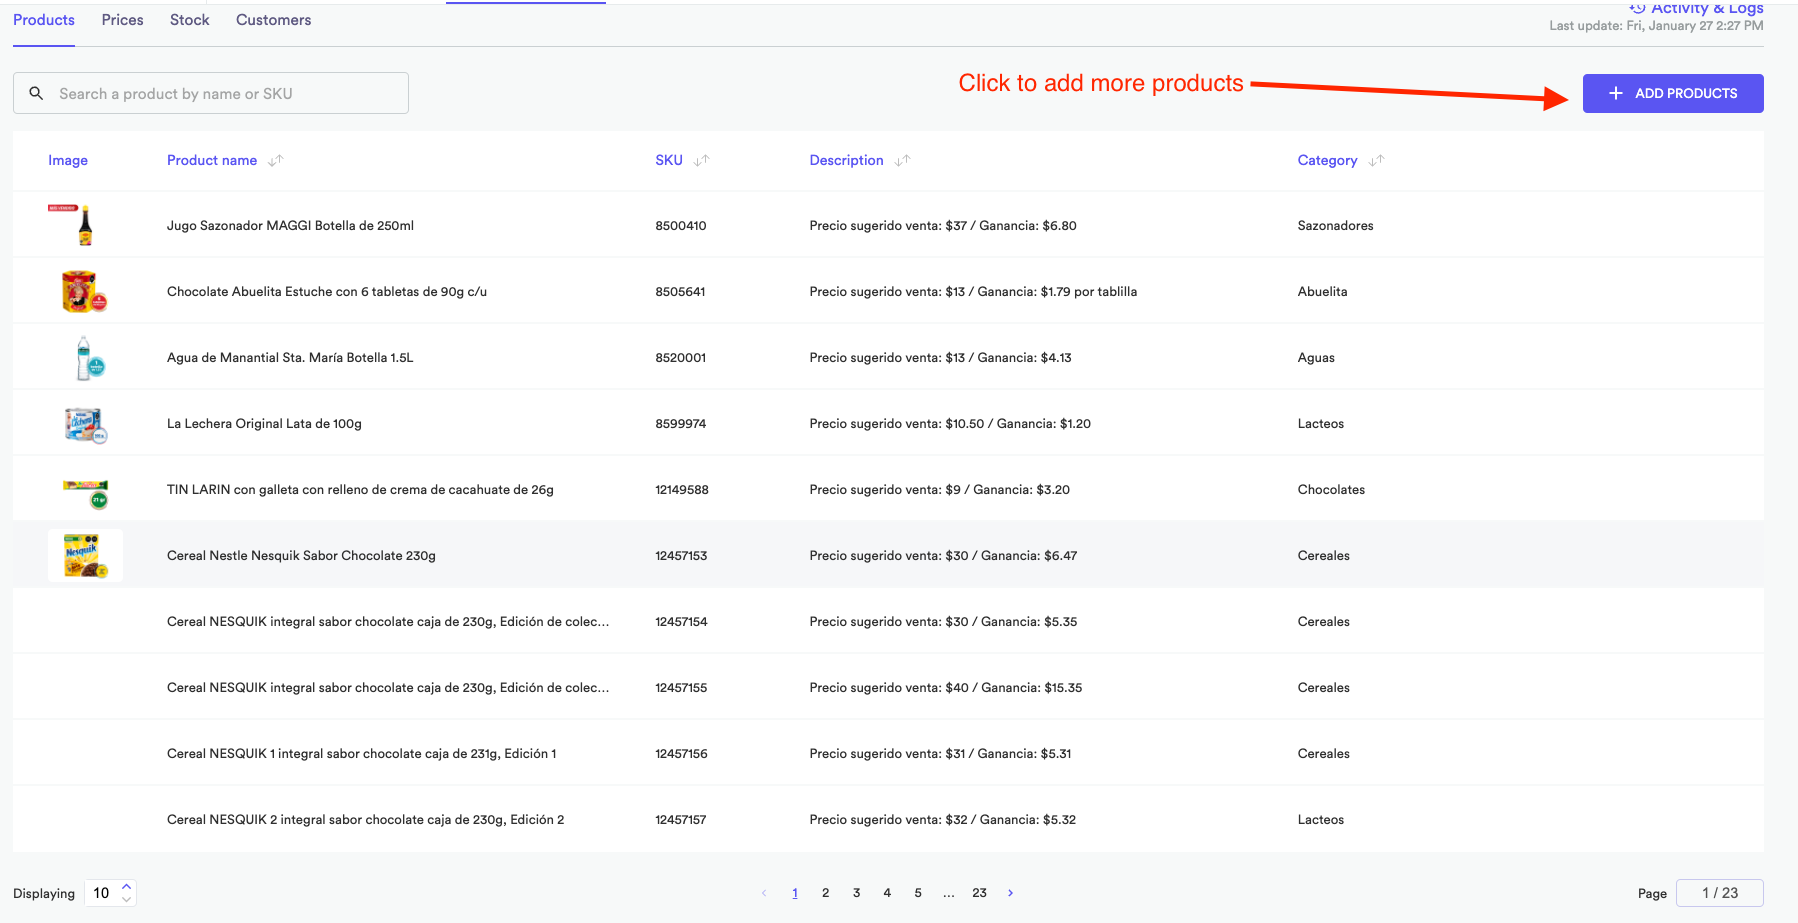
Upload new files for products
To add/replace products just click the + ADD PRODUCTS button
Clicking this button will render the following modal
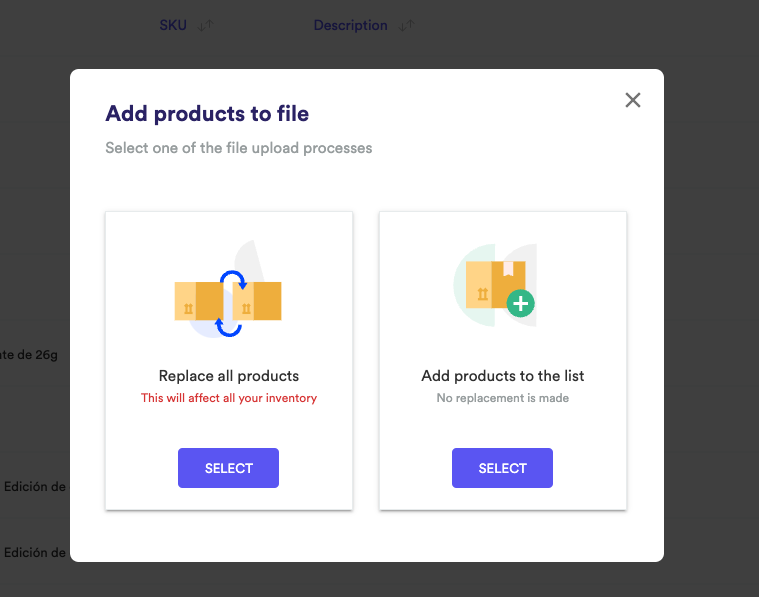
The modal will allow you to either replace all your products or just add more products to your current list
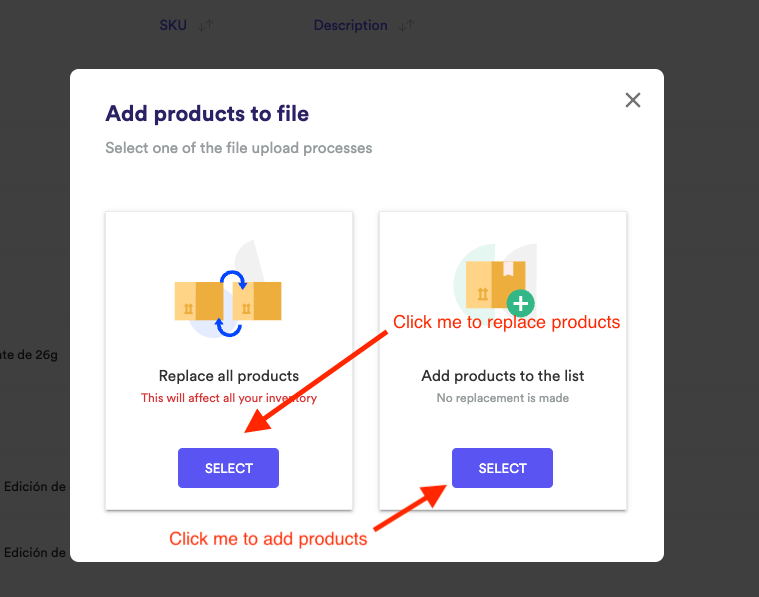
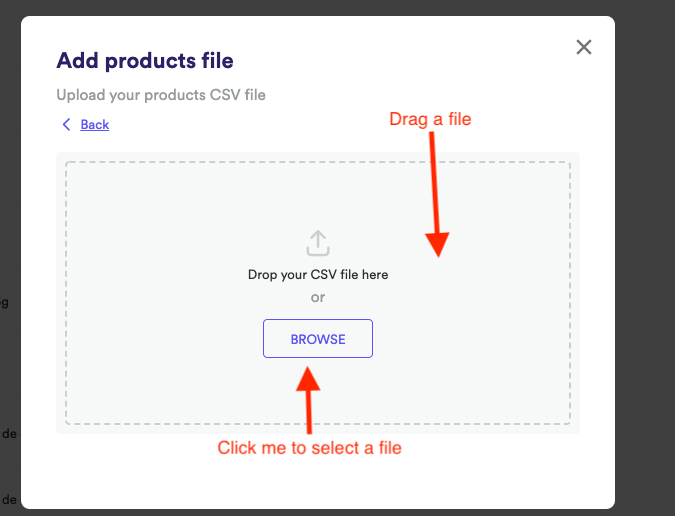
Once you click on either option the modal will render a csv uploader where you can drag and drop a csv file or click on it to select a file from the file manager of your system
Once you select a file the name of it will be render in the modal allowing you to upload it to our system to be process, or delete it to select a new file in case the selected file is not the correct one
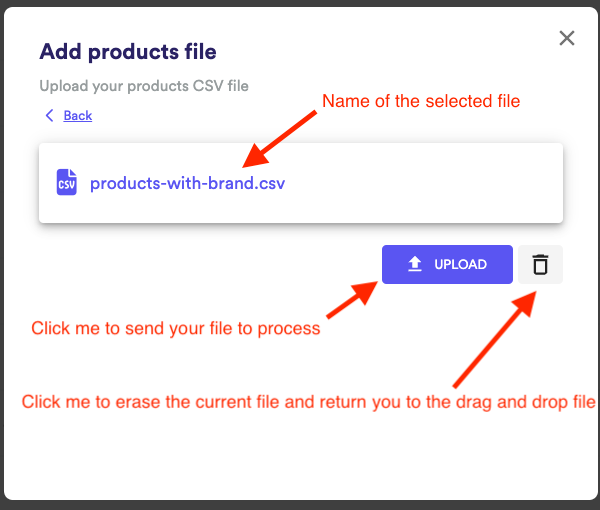
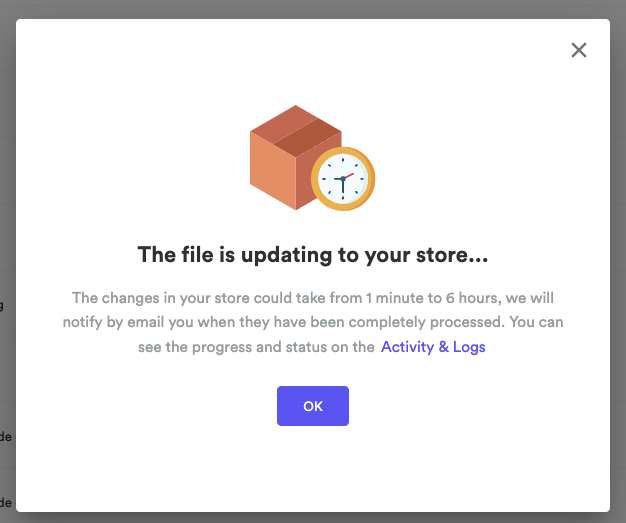
Once you click on the upload button the following modal will be shown, clicking on the OK button will close the modal
Prices
In the inventory & Customers page you will see a tab that will say Prices:

After clicking on the tab the prices list will be render
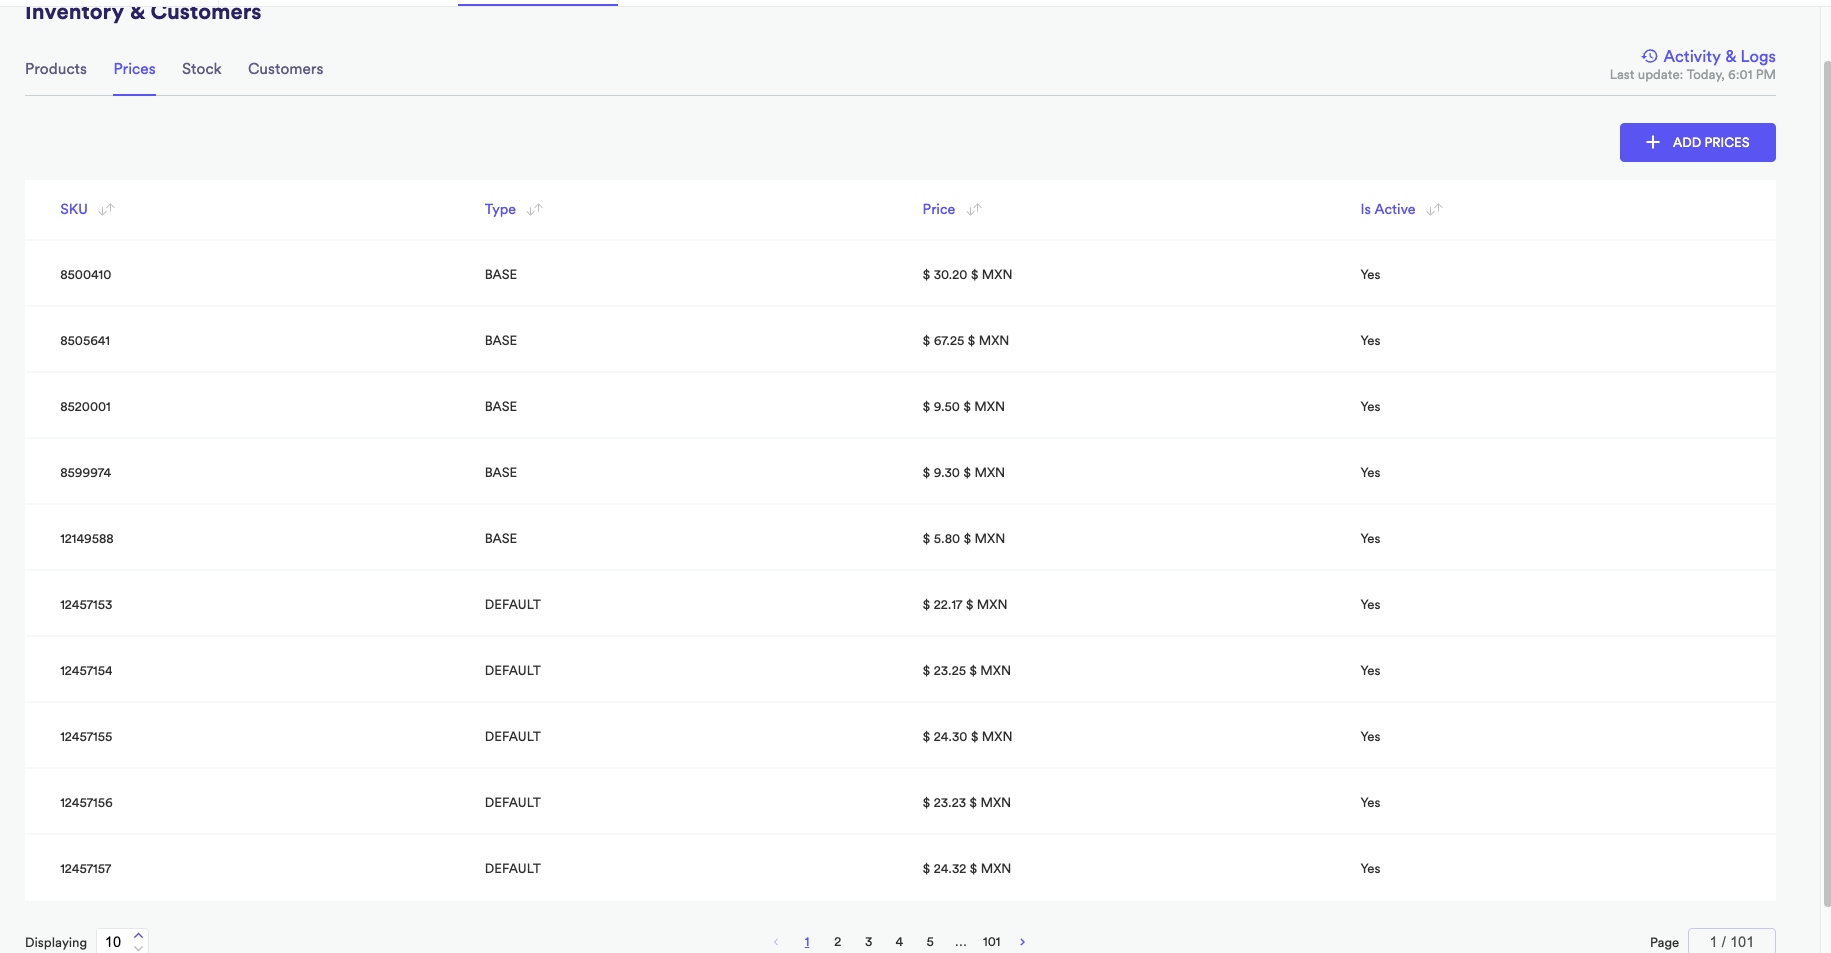
Prices list for a given storefront.
💡 To replace or add more prices please follow the same process as products just click `+ ADD PRICES` buttonCustomers
In the inventory & Customers page you will see a tab that will say Customers:

After clicking on the tab the customers list will be render
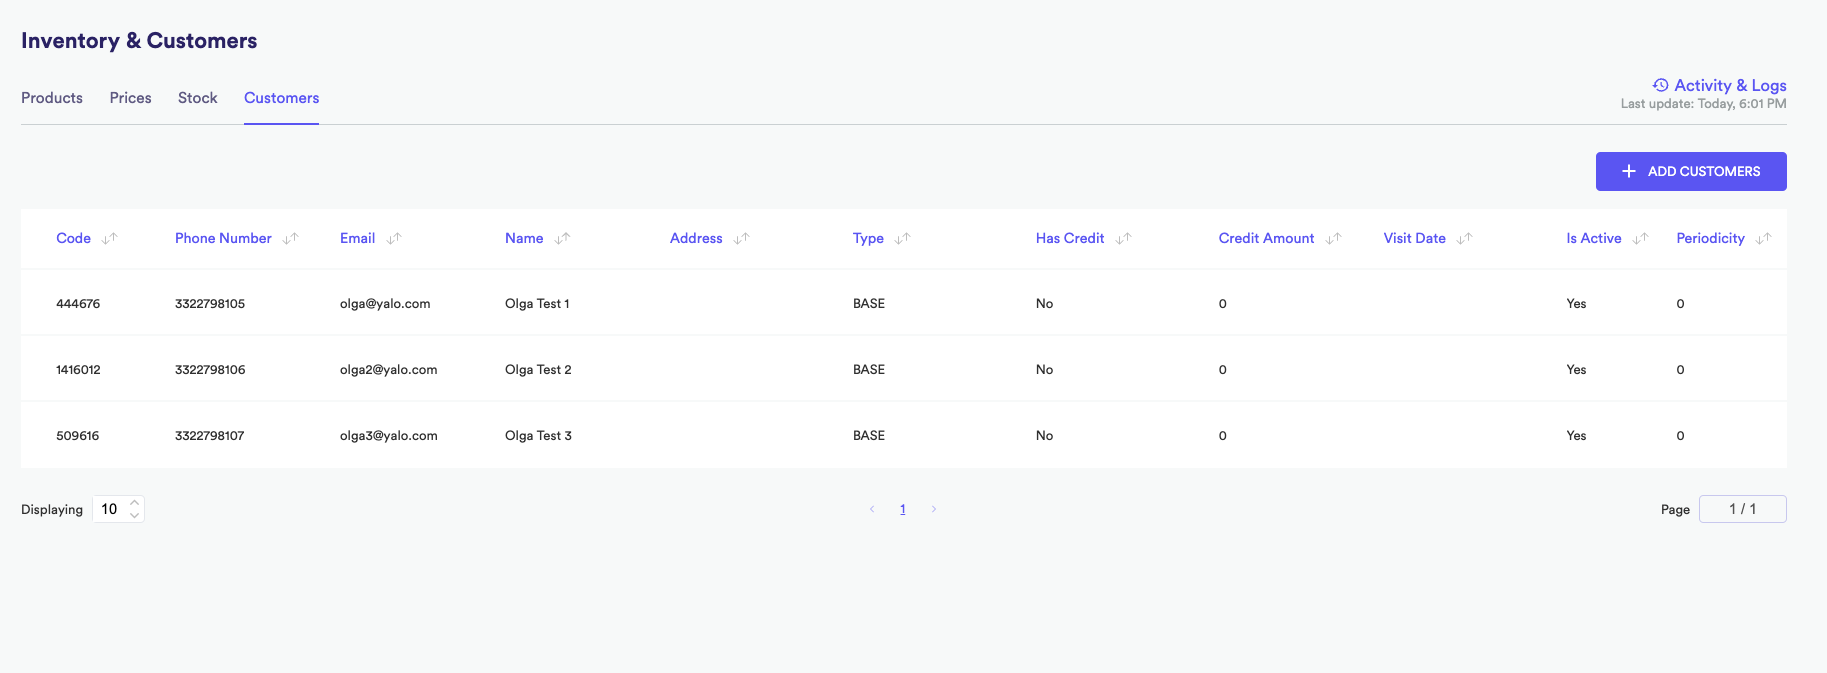
Clients list for a given storefront.
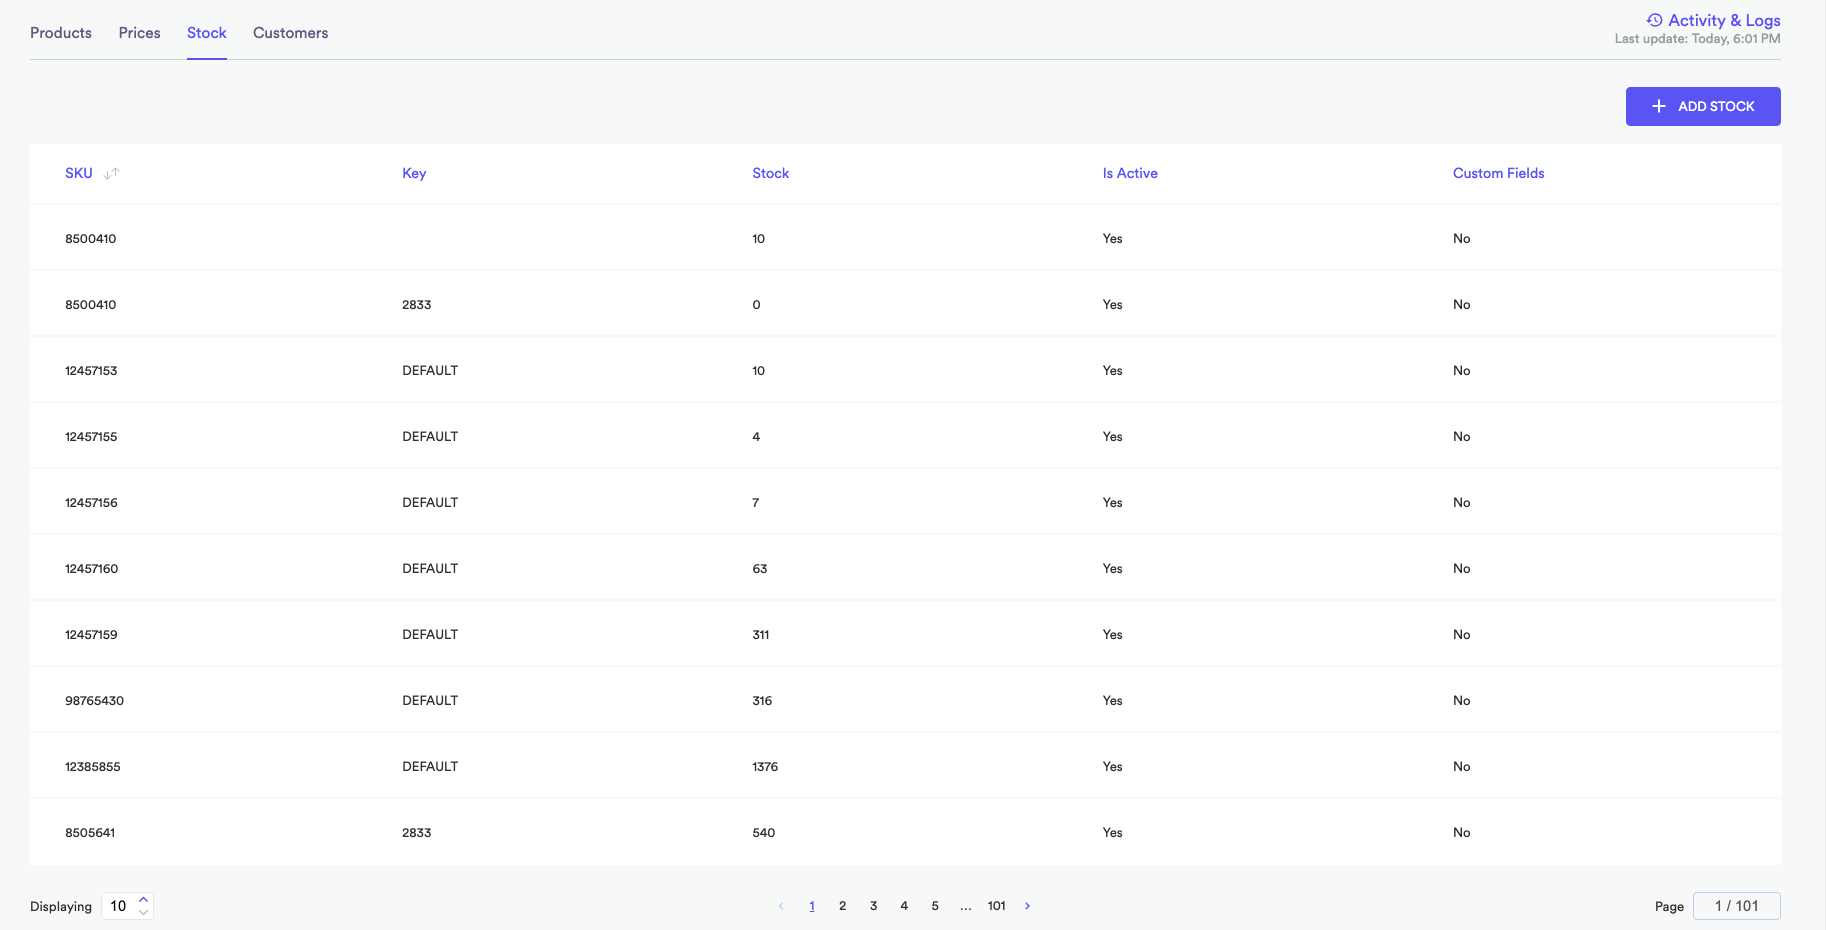
💡 To replace or add more customers please follow the same process as products just click `+ ADD CUSTOMERS` buttonStock
In the inventory & Customers page you will see a tab that will say Stock:

After clicking on the tab the stock list will be render
Enabling stock warnings
By default, a storefront doesn’t show any stock feedback to the user. You can enable two levels of warning, go to Settings -> Business Rules and activate the Enable Stock toggle button.
When you enable stock, a modal will appear with the two levels of warning that you can activate, it could be both of them or just the one you want to show:
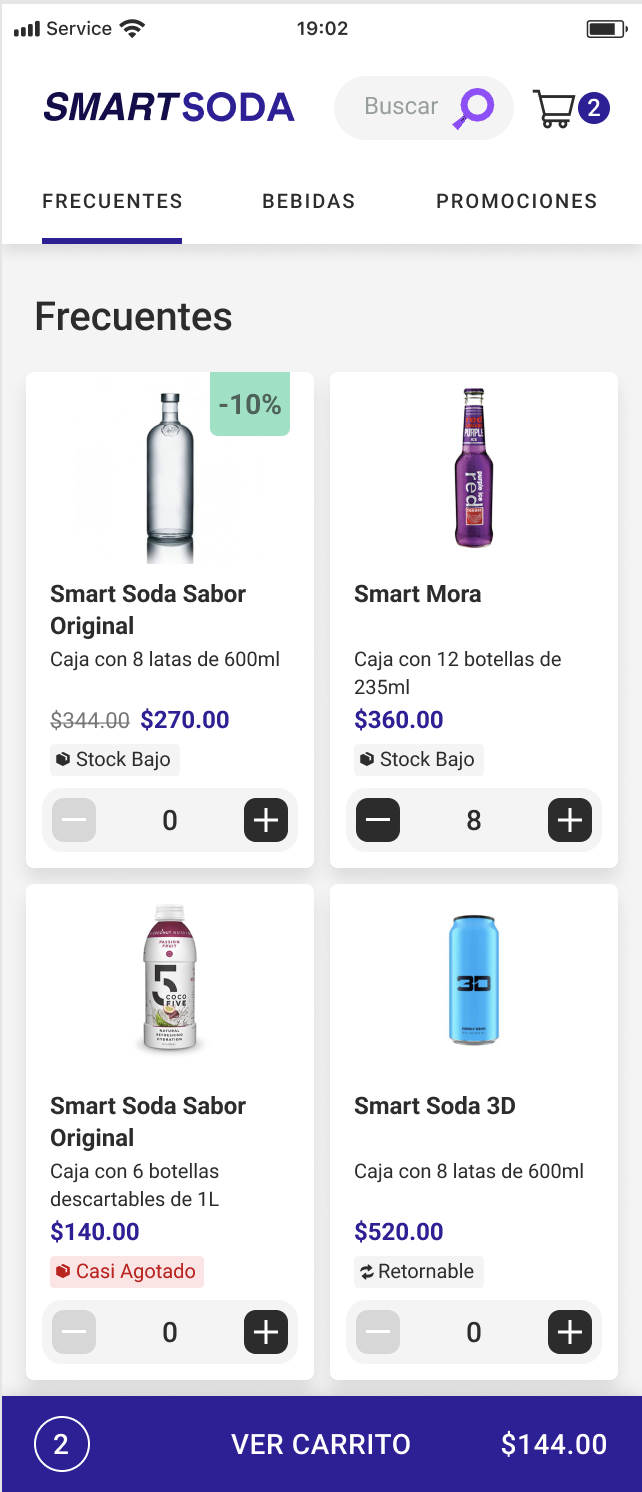
- Level 1 (Low stock): It is designed to show a tag on each product with the warning when there is low stock. (ex. 100 units or less)
- Level 2 (Almost sold out): It is designed to show a highlighted tag with the warning when the stock is about to end. (ex. 10 units or less)
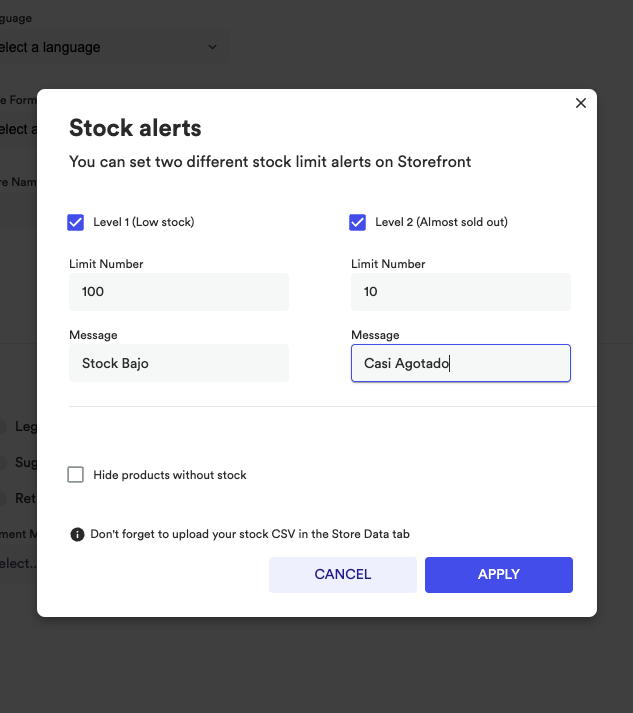
To activate a tag, press the corresponding checkbox and set a Limit Number to show when the stock on a product is equal or lower, and a Message to show in the tag. You can use the string {{value}} to show the current quantity of stock of the product.
Also, by default a storefront display products without stock disabled, you can check the option to Hide products without stock in order to avoid showing them to the user.
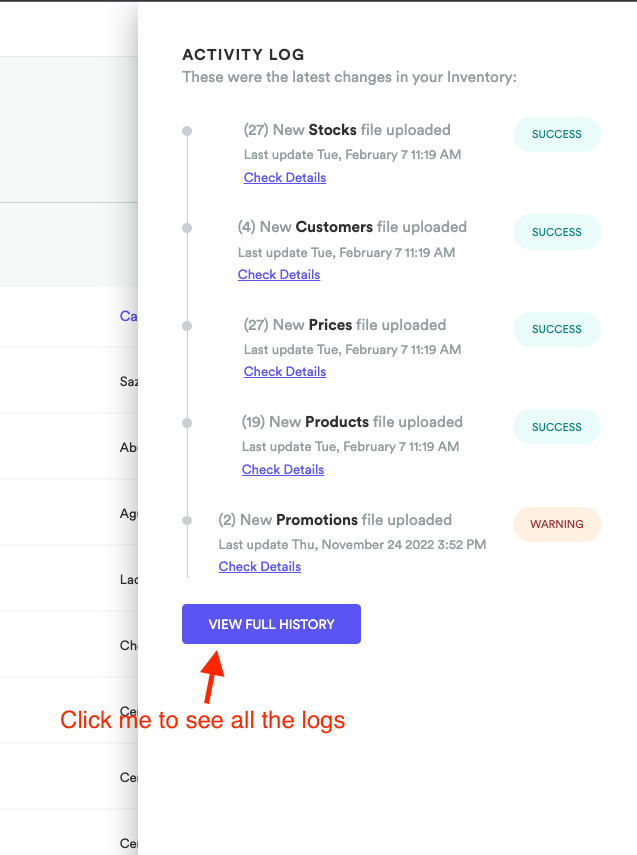
Activity & Logs
Inside the Inventory & Customers section you will find in the top right part the activity & logs link
which if you click it, will open a side content showing you the most recent logs of the proccess csv files


If you want to see the full history of logs you can click on the VIEW FULL HISTORY button
If you click on that button you will be redirect to the activity log page
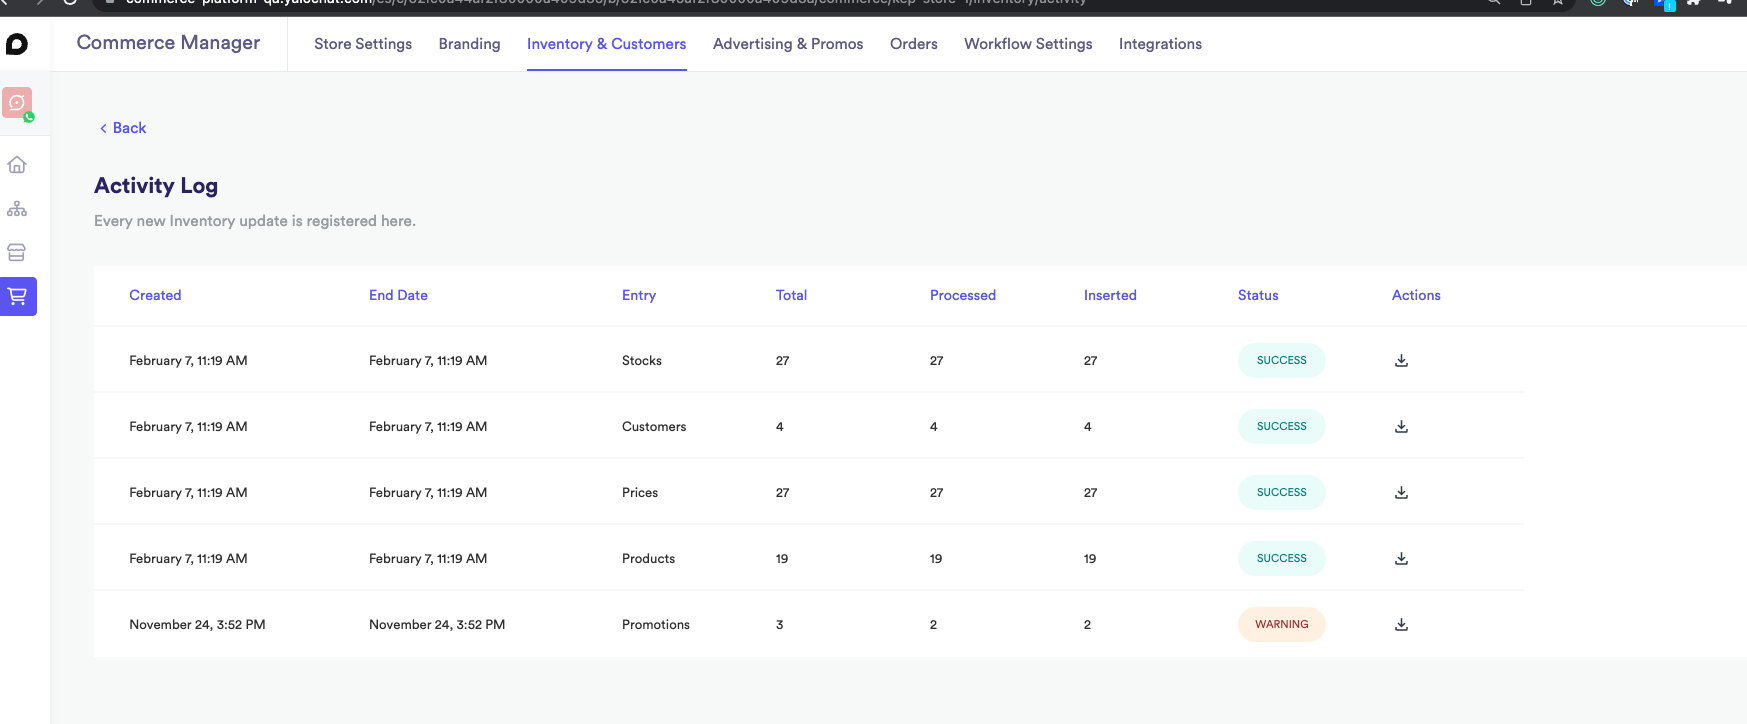
If you want to see the specific details of a log just click on the action button of the desire log
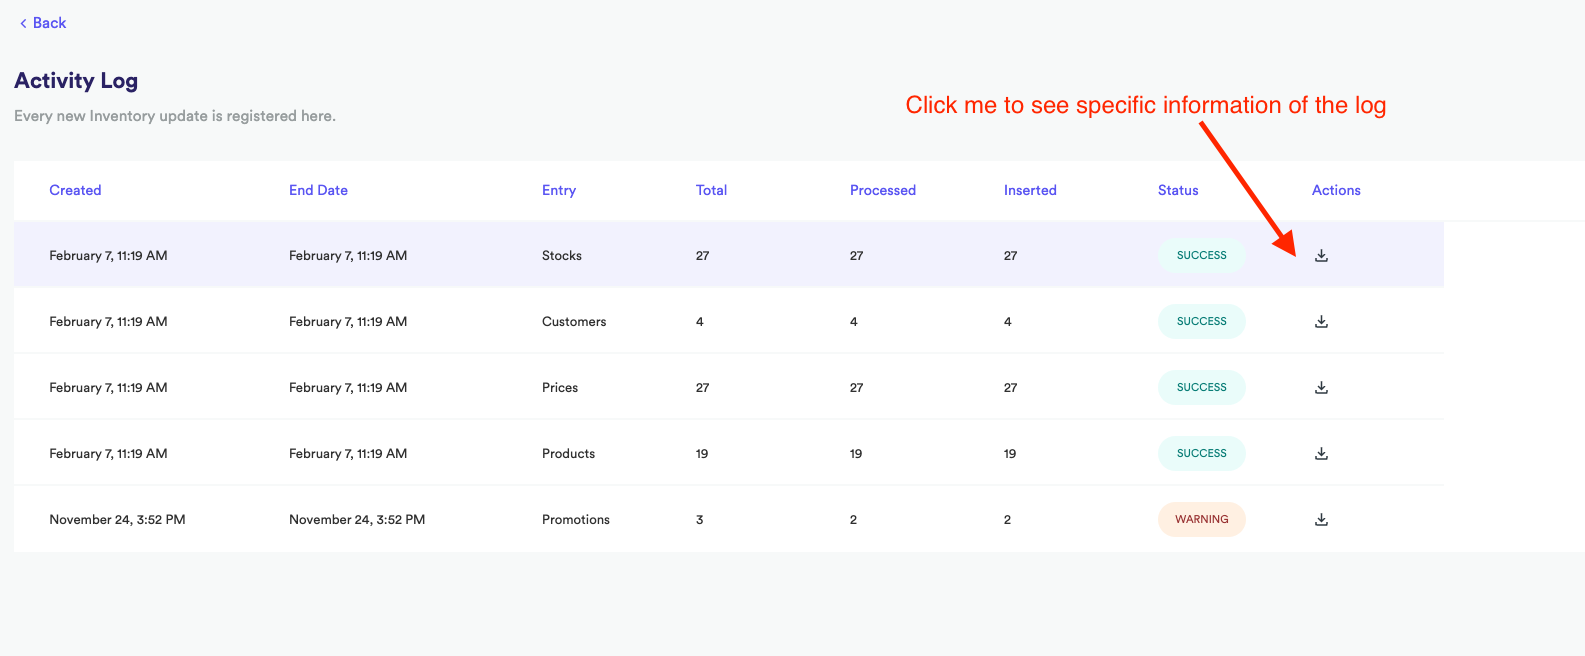
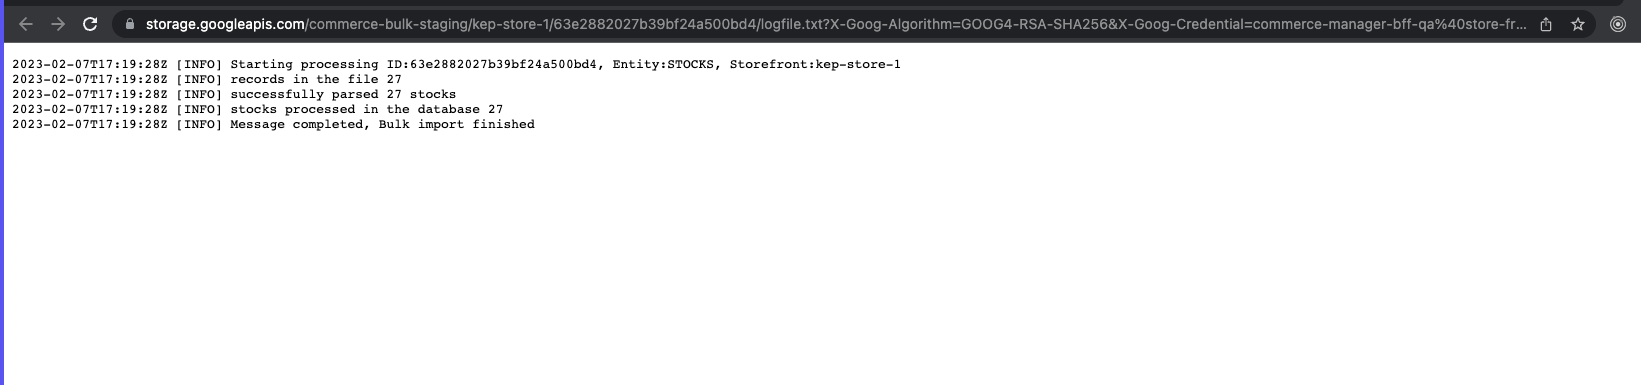
Once you click on the button a new tab will be open and it will show you the specific information of the log
Finally to return to the inventory & customers section just click on the Back link on the top left part of the screen

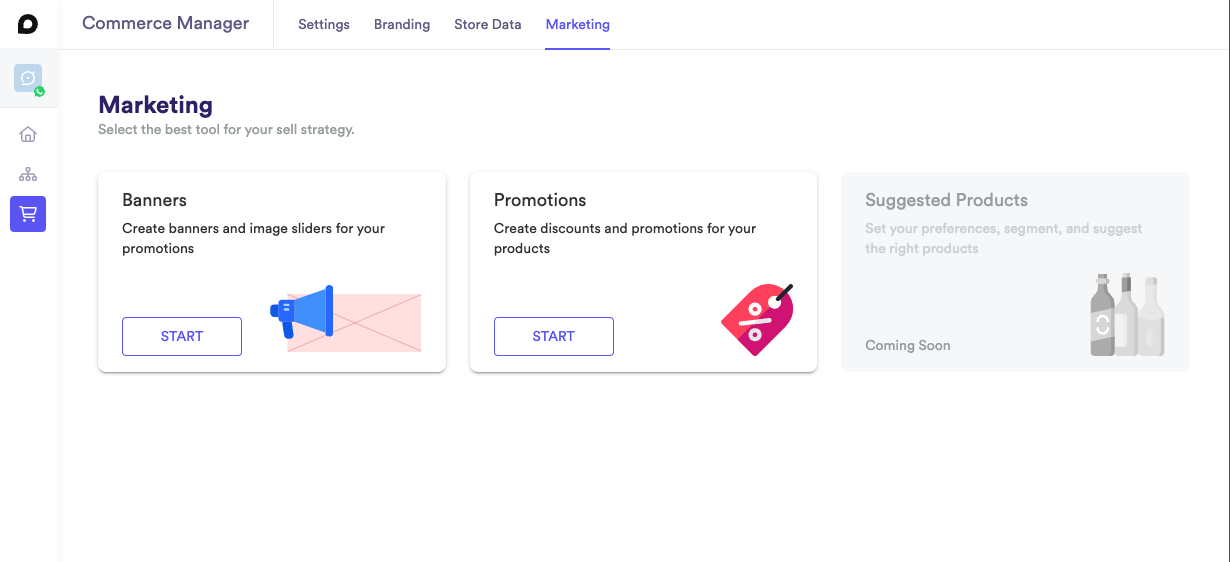
Marketing
Marketing section, helps you create marketing strategies to boost sales on your storefront.
- Banners: Here you can create image sliders to highlight your best products or promotions.
- Promotions: Here you can upload your promotions csv file to manage the promotions available in the store
- Suggested Products (coming soon): This section will allow you to manage user segments to recommend products to them.
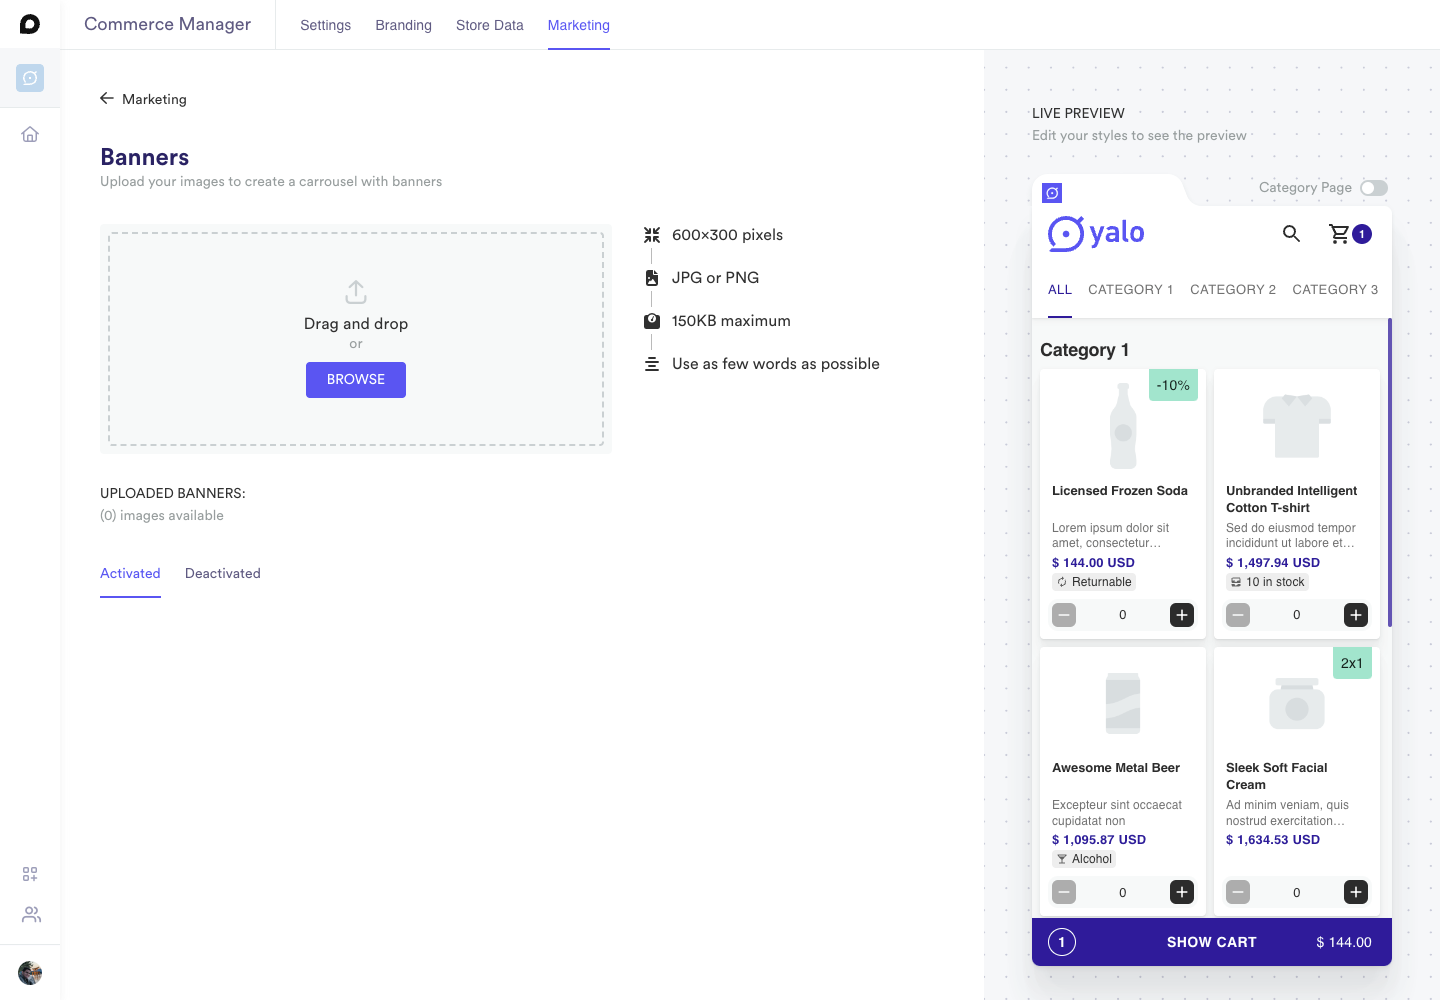
Banners
The first time you visit this section, you will see an area to upload your images. Before you begin, you should consider the following:
- You can upload as many banners as you want, but you can only activate a maximum of 6.
- The recommended size for each banner is 600px (width) x 300px (height).
- The format of the image must be JPG or PNG
- The max size for the file is 150kb
- It is recommended not to use too many texts in the banner, to avoid saturating the design and making it more attractive for the user.
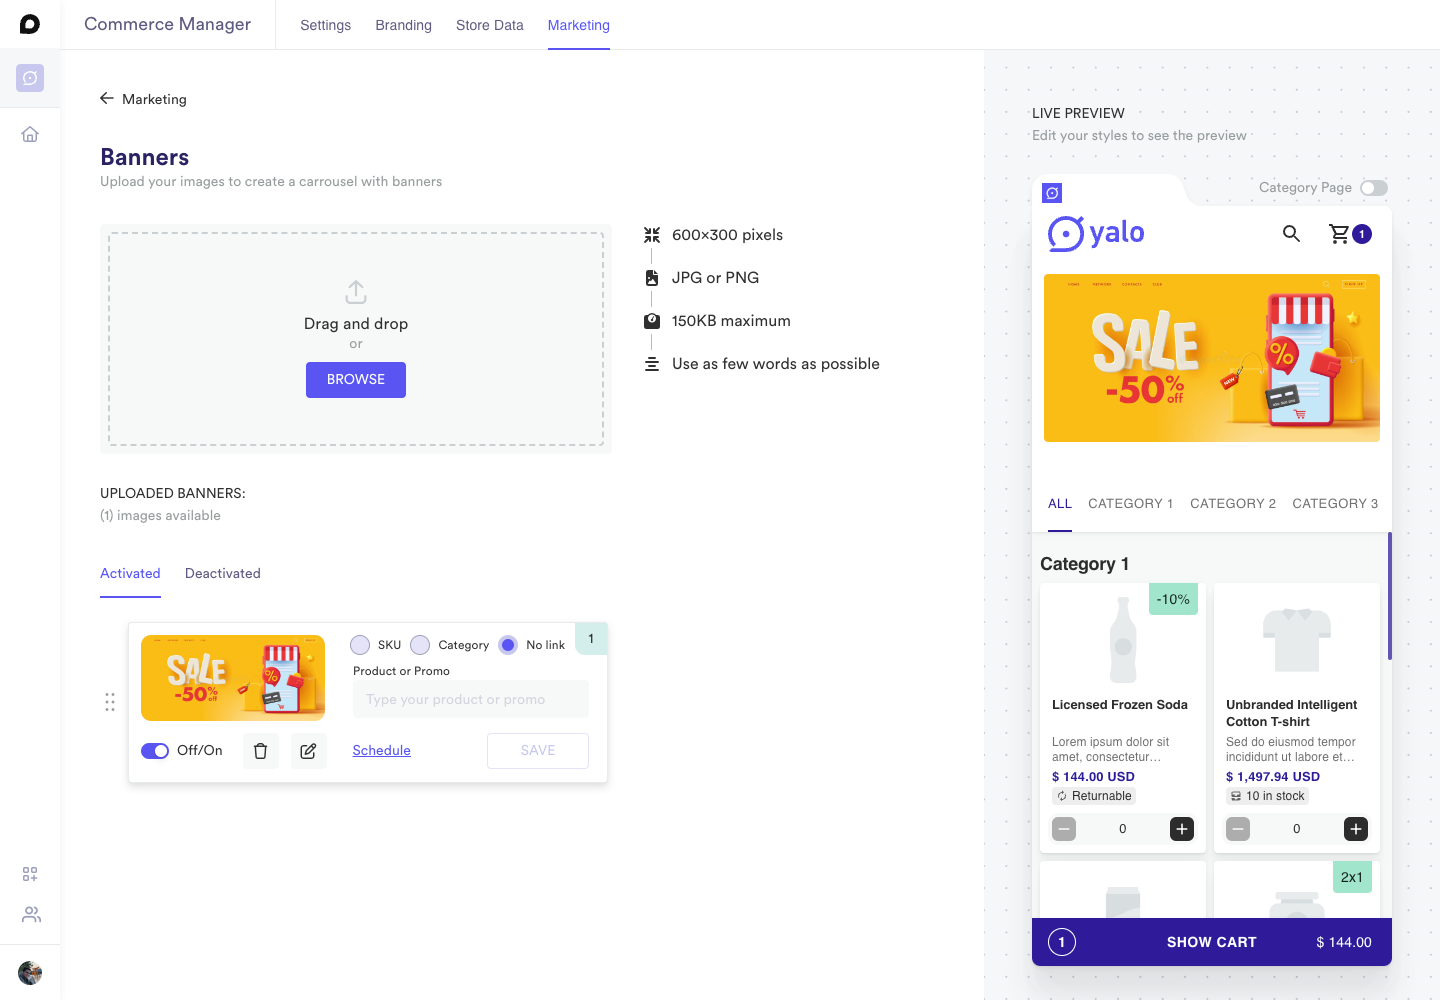
Uploading a Banner
Once you have created your first banner following the recommendations above, simply drag the file into the Drag and drop area or press the Browse button to select it from your system folders.

If all goes well, your banner will appear below in the Activated Banners section and a preview will appear in the Live preview area.
By default, a banner is always activated in the first position, without any associated product or category, and is scheduled to be displayed for one year. All of this can be easily customized.
Customizing a Banner
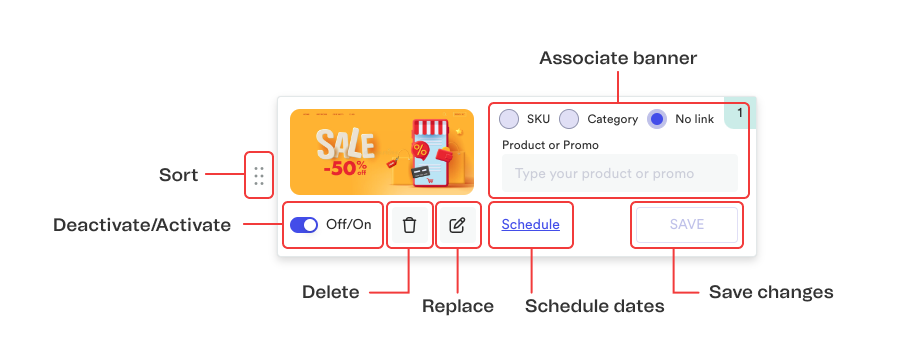 ⚠️ Remember that every change you make to a banner will not be saved until you click the banner's `Save` button. Each button will only save the changes made to the corresponding banner.
Associate
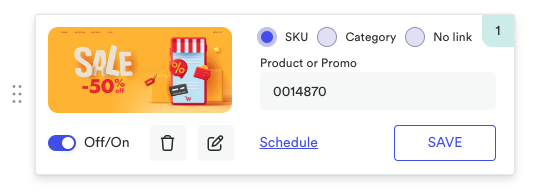
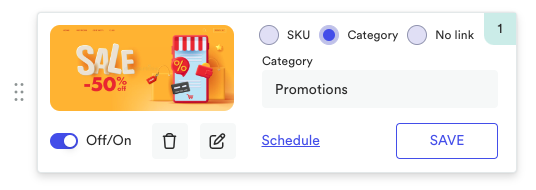
By SKU: Select the SKU option and fill the Product or Promo field with the product SKU.
By Category: Select the Category option and fill the Product or Promo field with the category name (Be sure to write the category as it is written on the Products Data).
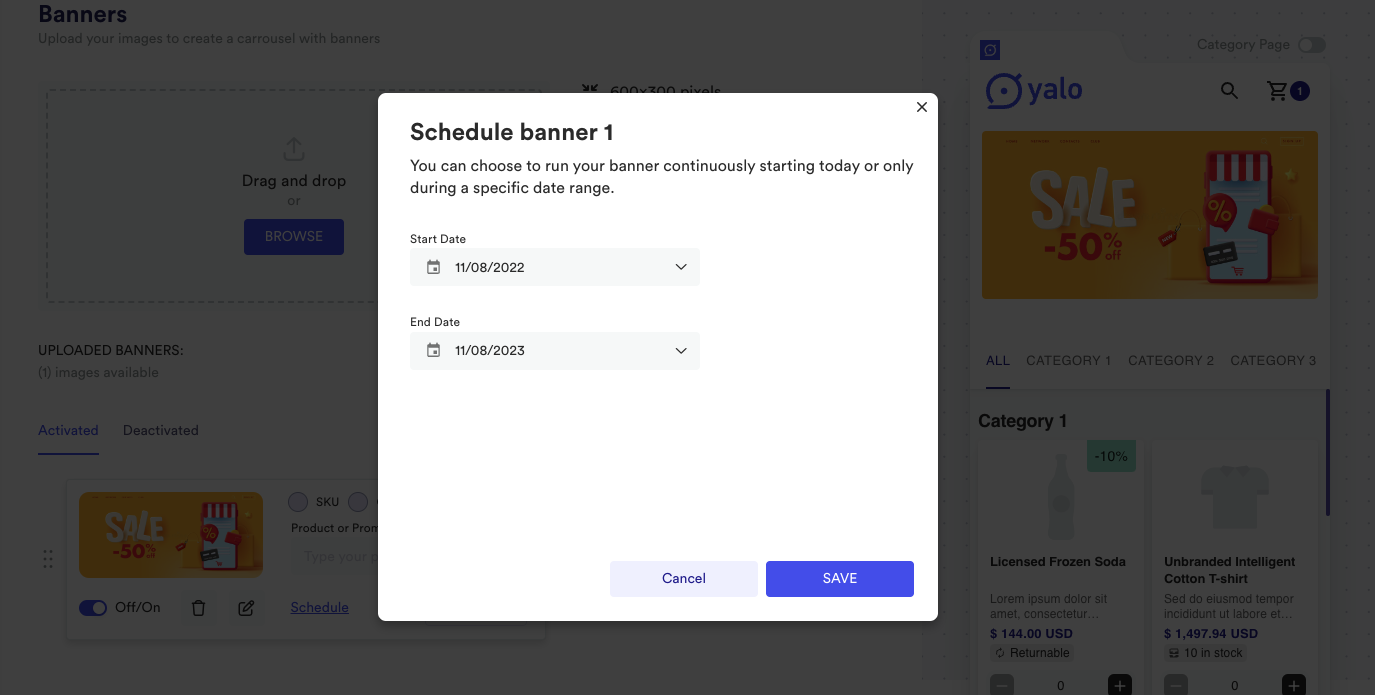
Schedule
By default a banner is scheduled to display for one year, but you can change this by clicking the Schedule button on the banner you want to edit, this will open a modal where you can schedule the date range to display the banner.
Replace
If you want to replace or update the image of a banner, simply press the Replace button (the one with the pen icon), it will open a system browser to select the new image.
Deactivate/Activate
If you want to remove a banner from the carousel, but you don't want to remove it. You can use the On/Off toggle button. When you save changes to the banner, it will be moved to the corresponding tab (Activated or Deactivated).
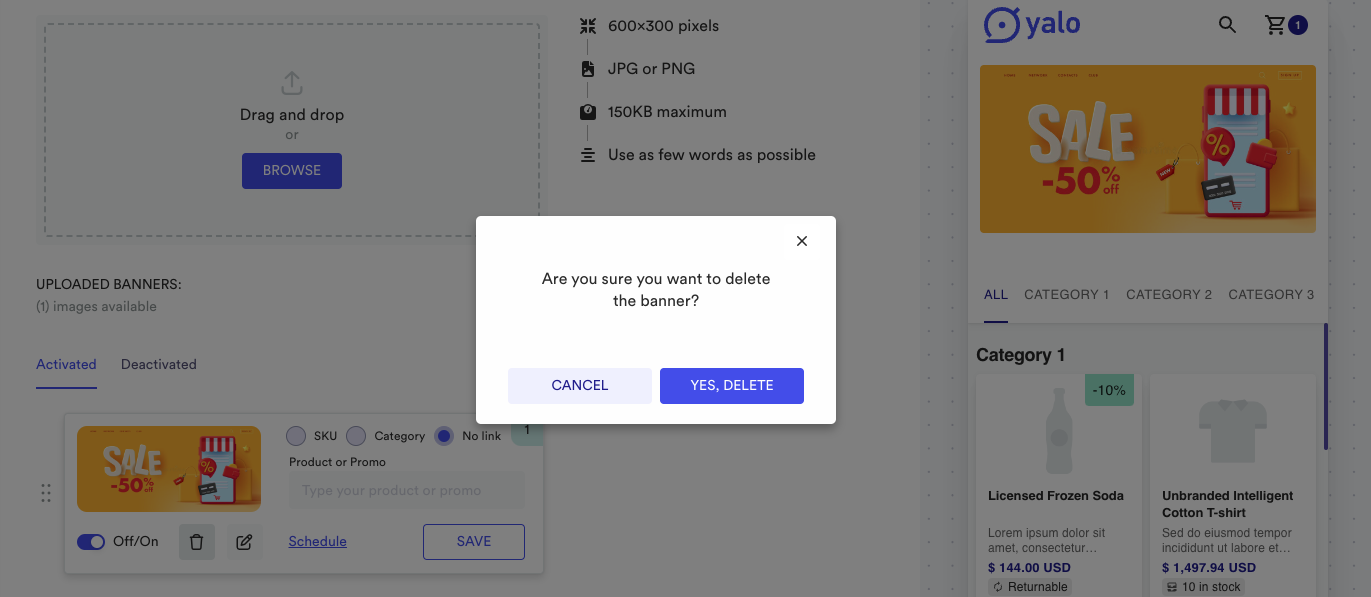
Delete
To delete a banner press the Delete button (the one with the trash can icon), it will ask you if you are sure to delete it. Please note that this is a permanent deletion, which means that the file and all data related to the banner will be removed from the database.
Sorting Banners
By default, each new banner ranks first in the display order. You can change that order by pressing the sort button and dragging the banner to the desired new position. Please note that the sort order will be saved automatically, so any changes will be applied immediately.

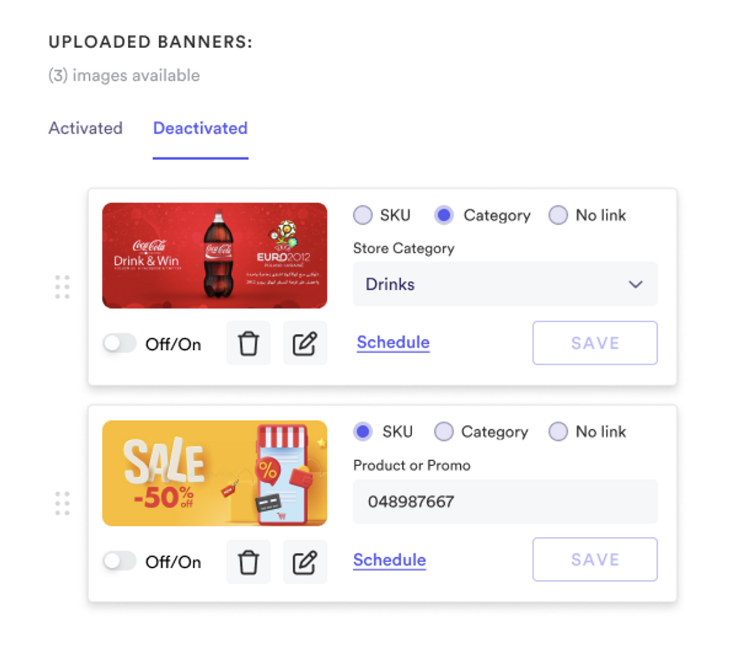
Deactivated Banners
When a banner exceeds the date on which it was scheduled to be displayed, it automatically goes to the area of deactivated banners, or if you disable it manually.
The banners in this area can be further edited in order to be activated again. Take into account that even if you change the schedule, you must manually activate it again with the Off/On button.
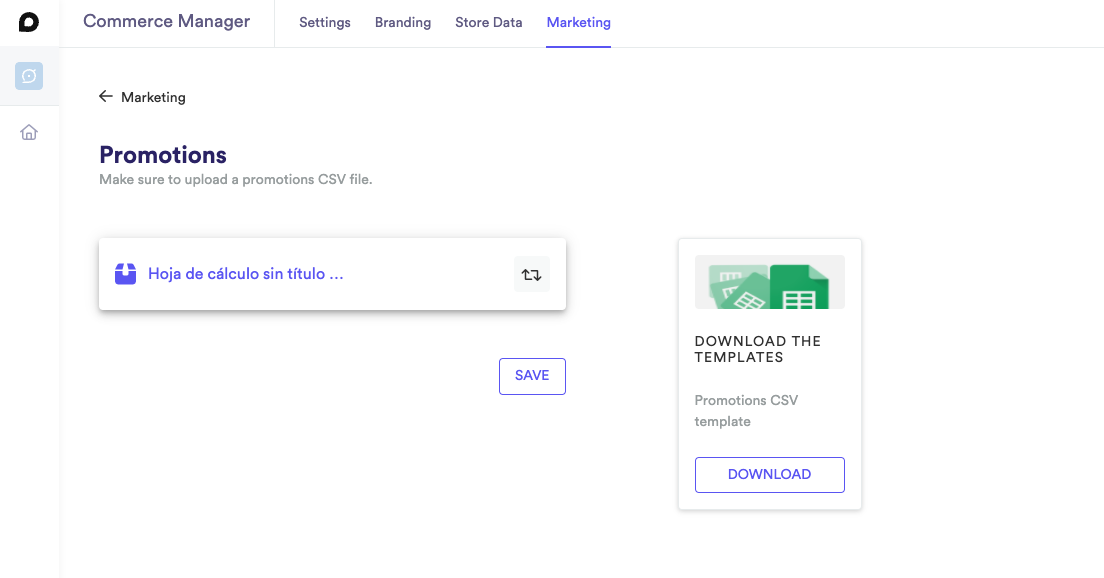
Promotions
The first time you visit this section you’ll see a place to upload the csv file, a section to download the templates for the file and also a button with the word SAVE that is disable
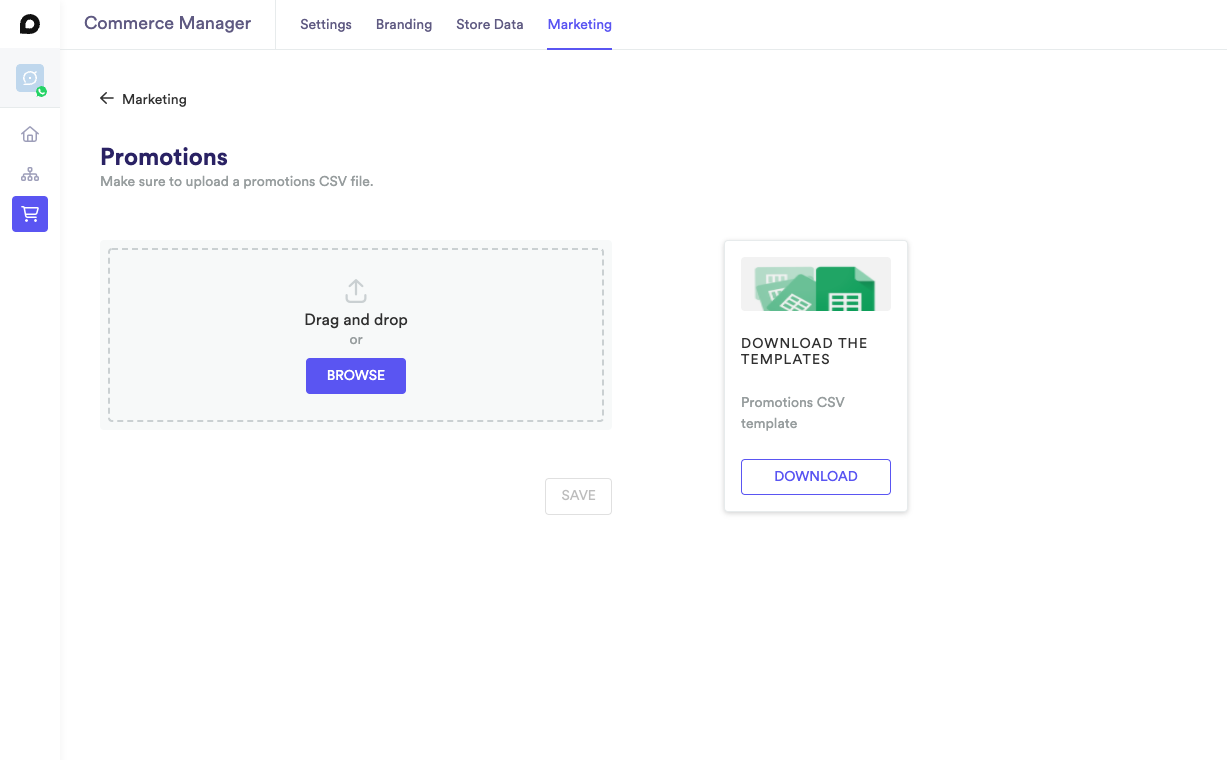
Uploading a file
To upload a file you can either drag and drop a file directly from your systems file management or click in the browse button
if you click the browse button you will see the following file selection menu
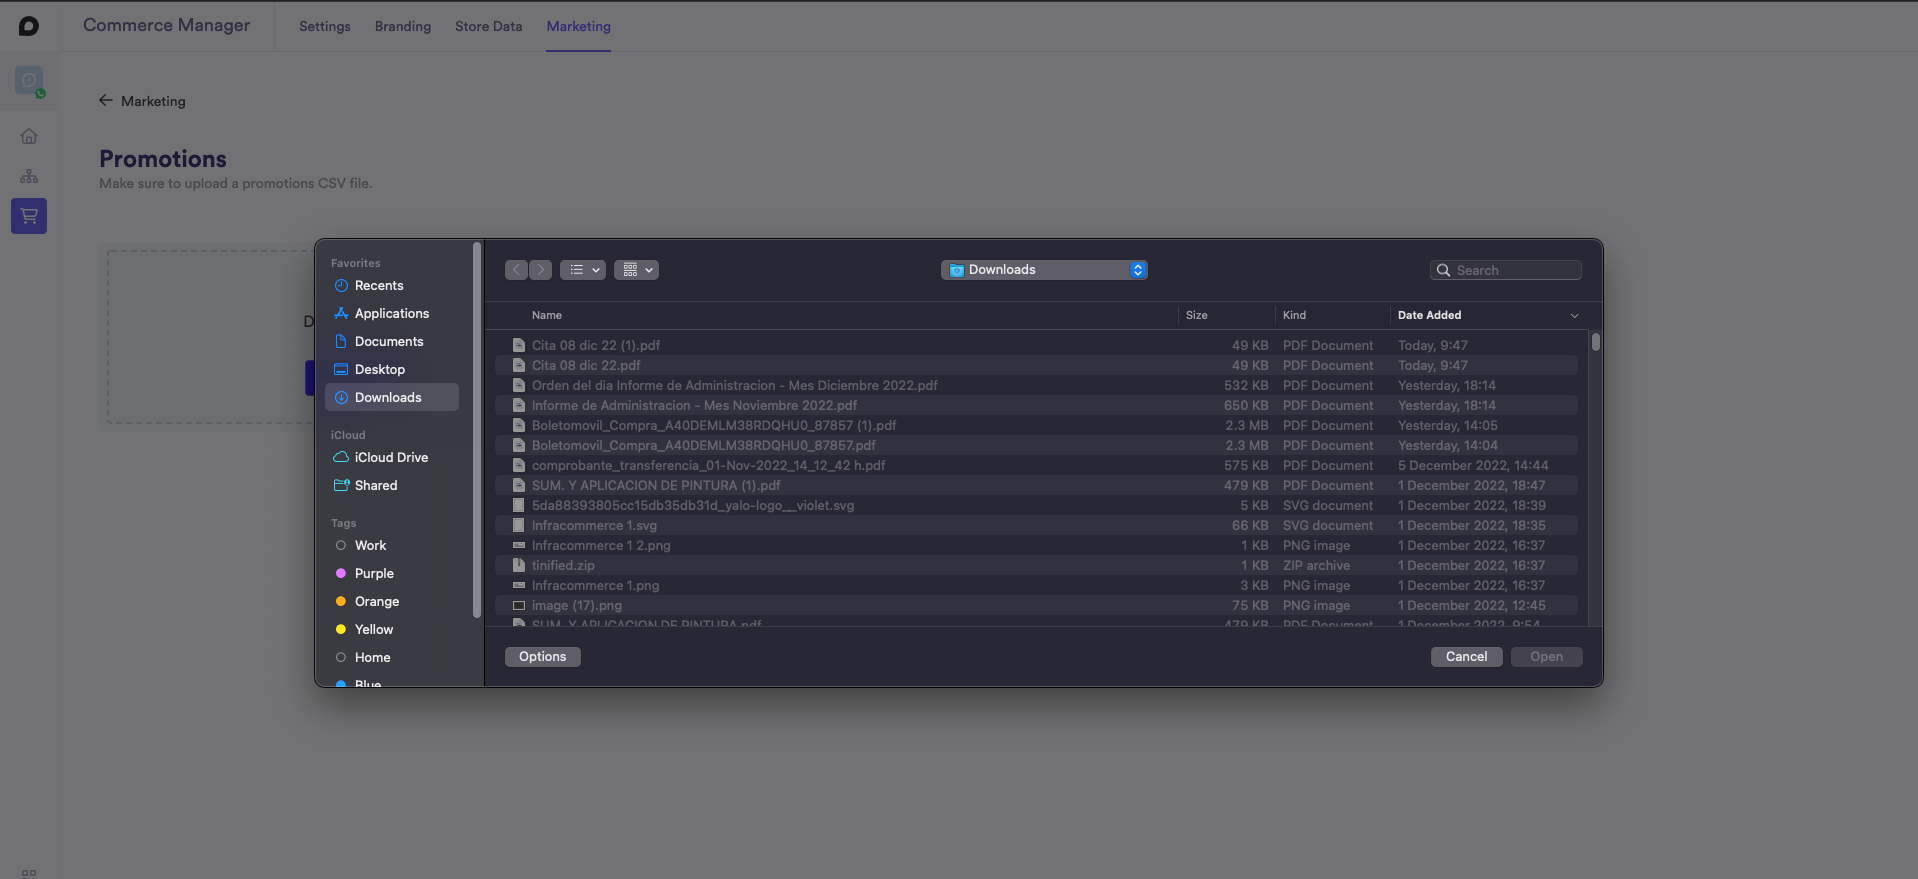
File selection
Once you select a file you will see a loader appearing in the Drag and Drop box
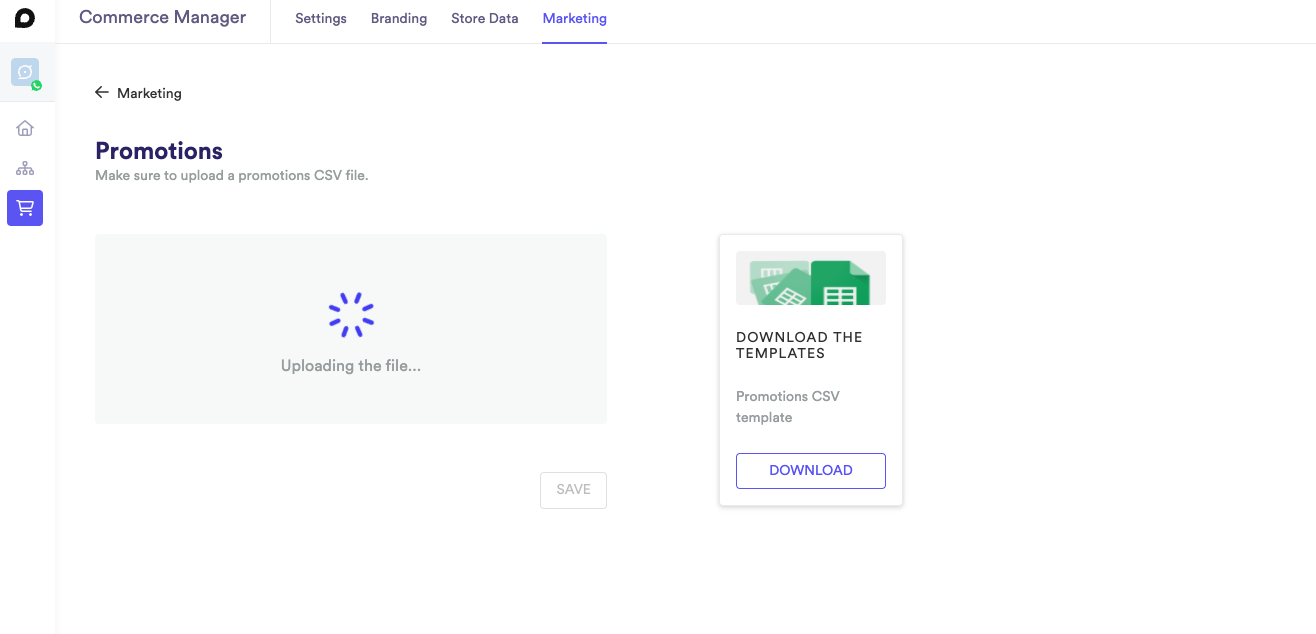
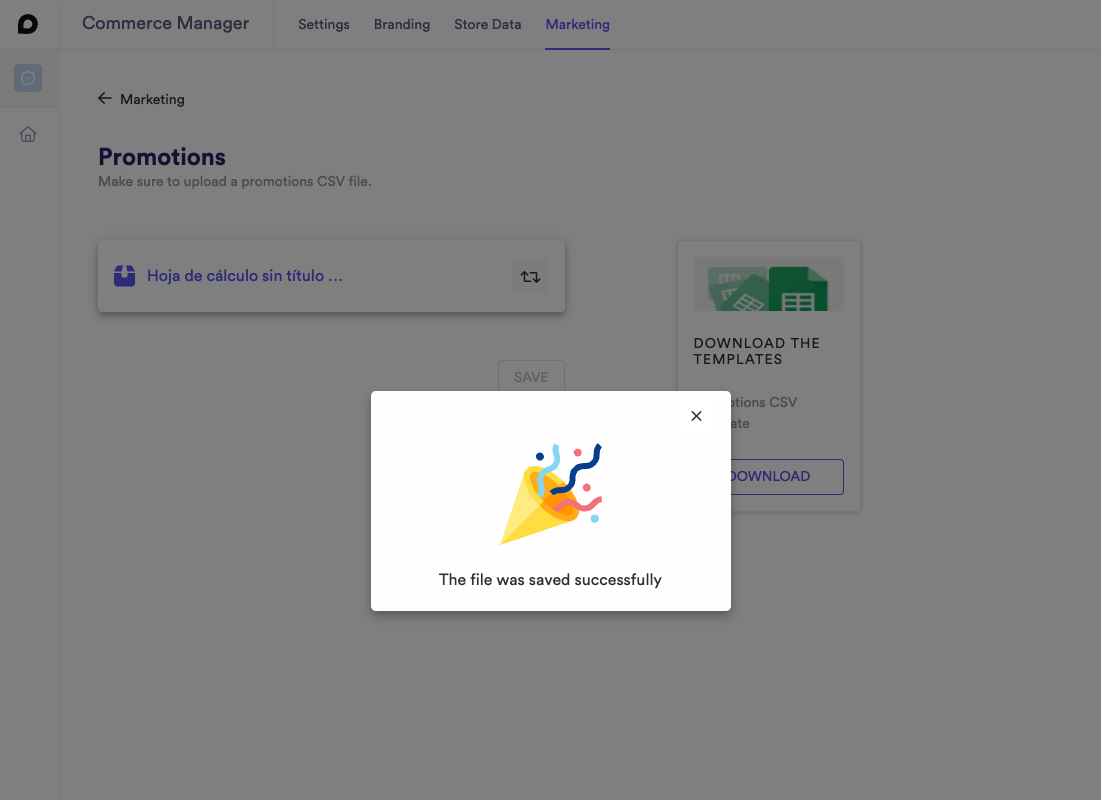
Once the file is successfully upload you will see an alert appearing in the screen with a File was save successfully
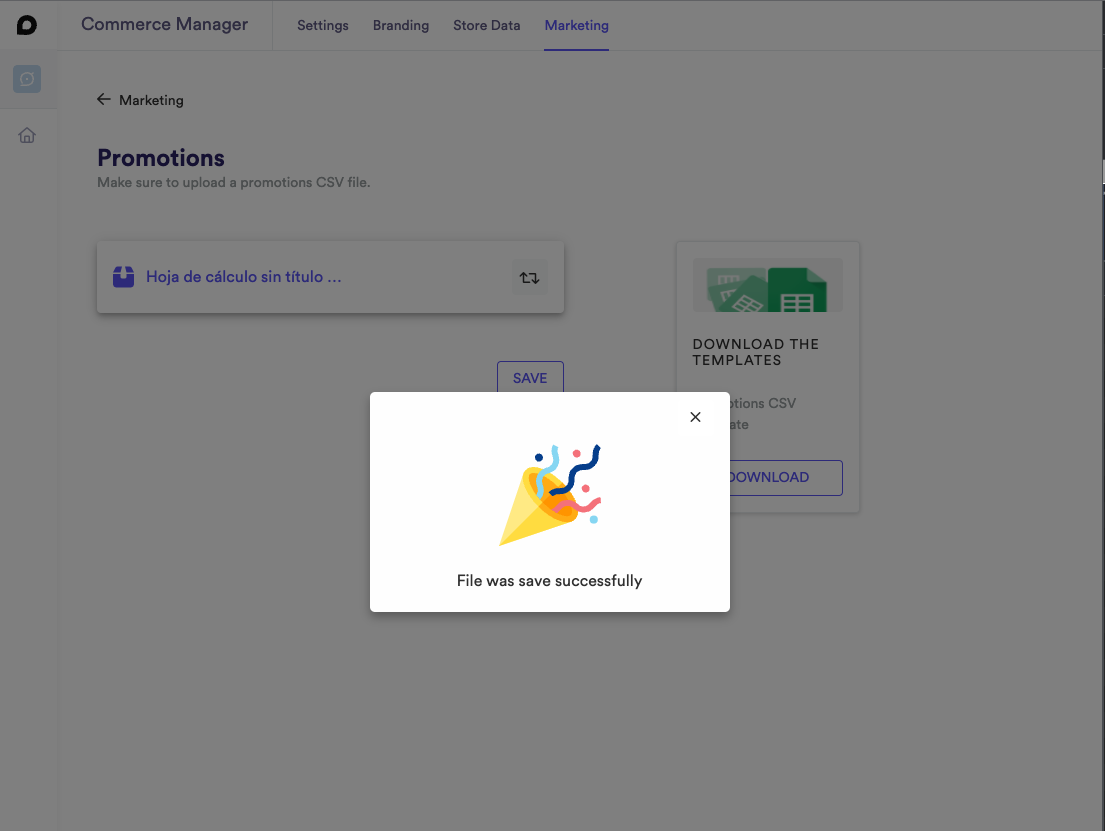
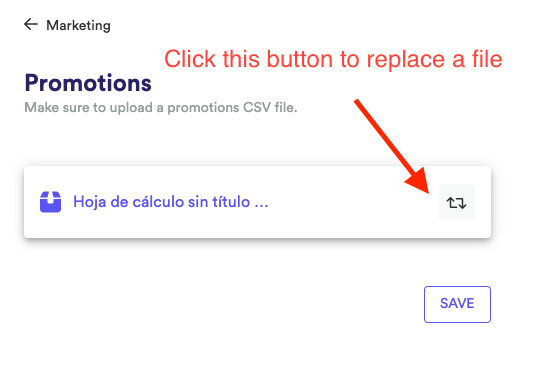
After closing this message, you will see the name of your file and also the save button will be enable
If you want to replace this file you can click on the button that contains two arrows in a circle
If you click on the arrows button the following alert message will appear to confirm this actions is what you want to do
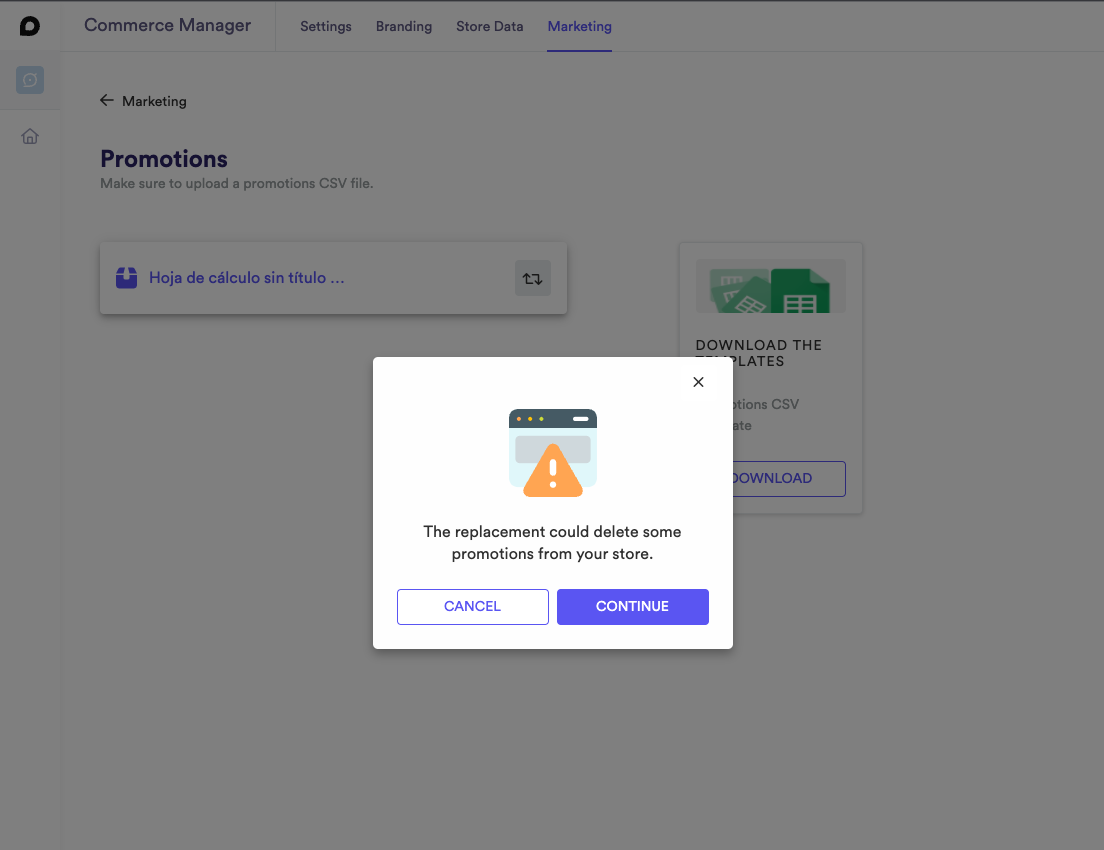
Clicking on Continue will then make the file selection menu to appear, clicking on Cancel will stop the operation and close the alert
Once you want to save the file you just upload just click on the save button
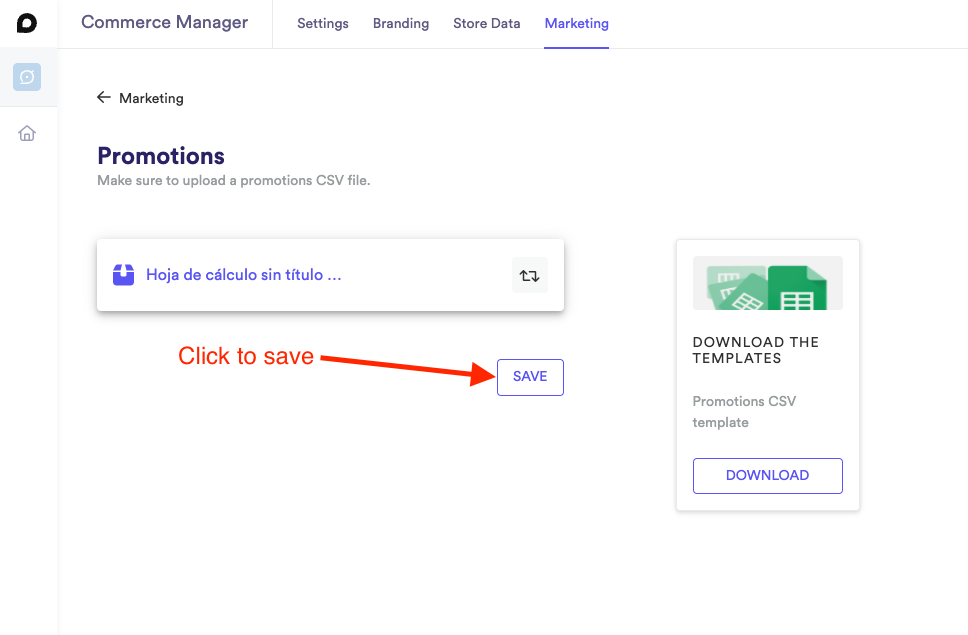
Once you click on the Save Button another alert will appear to indicated that everything was successful
See Content of your file
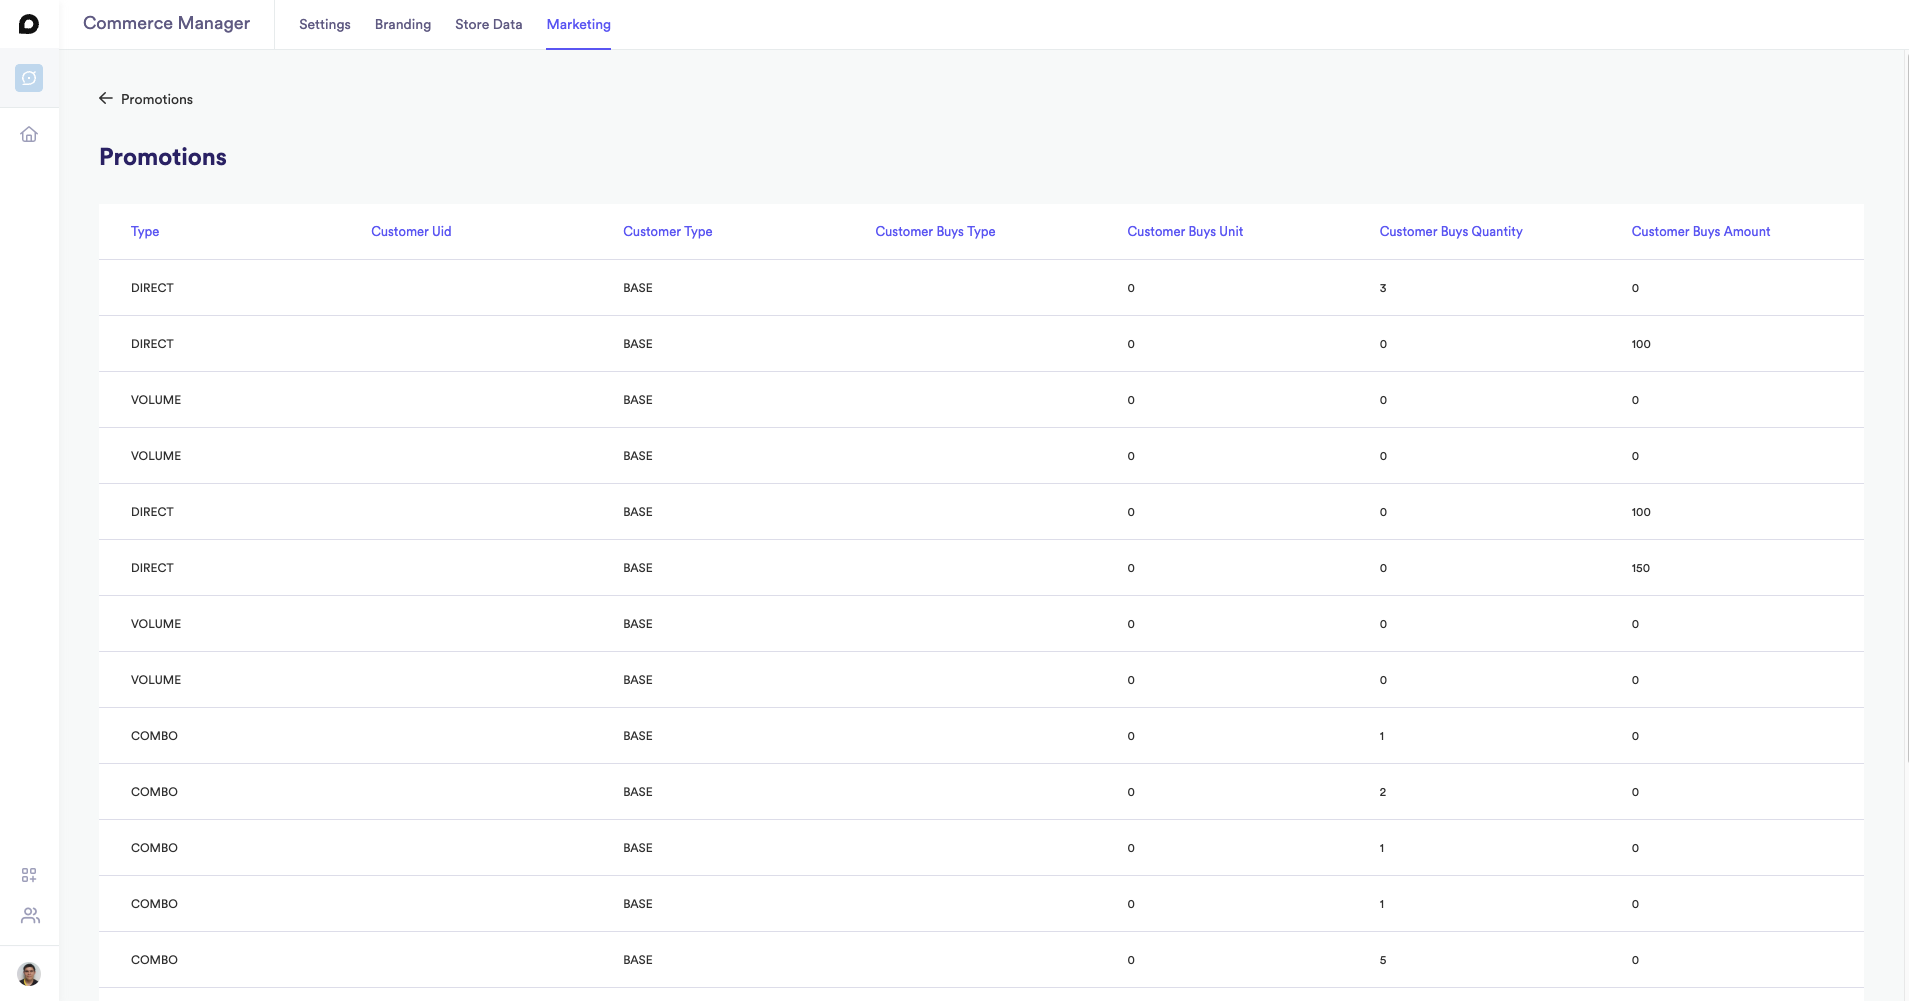
Once you save the file you can click on the box where the name of you file is

Once you click in the box you will be redirect to the promotion list view
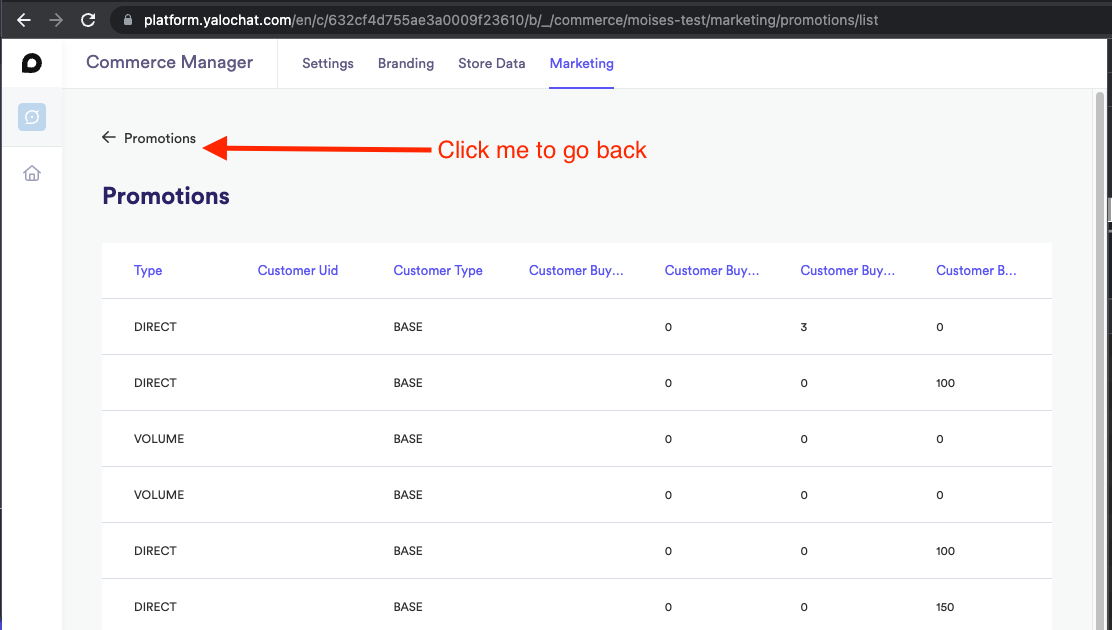
To go back to the previous page just click on the Promotions label with and arrow on the top left side
Workflow Settings
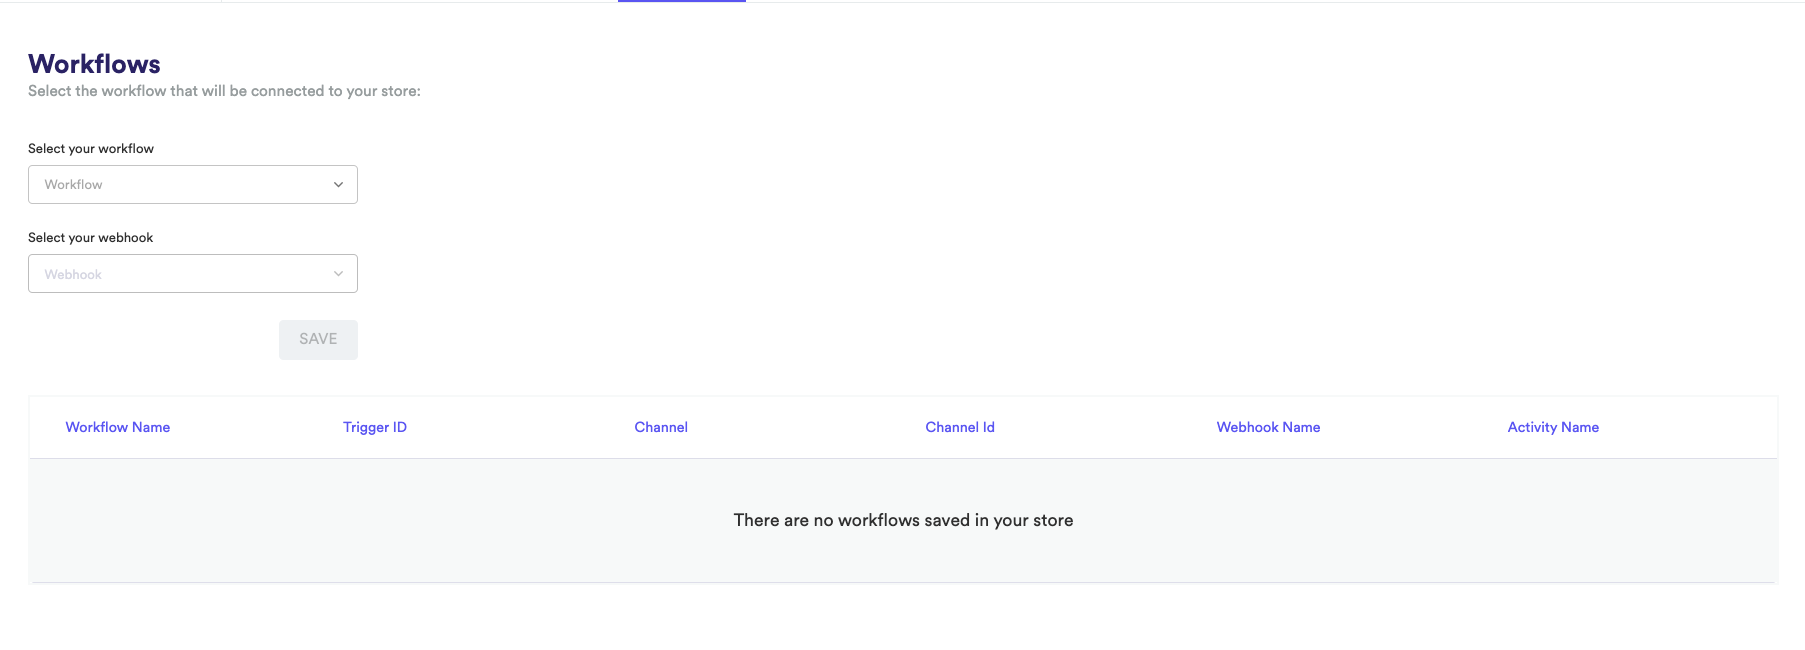
This section will allow you to select a flow from flow builder that will be connected to your storefront
When entering for the first time to this section you will encounter 2 selector and an empty table, the webhook selector and save button will be disable
Selecting a workflow
To select a workflow you will need to click on the first selector that says Select you workflow
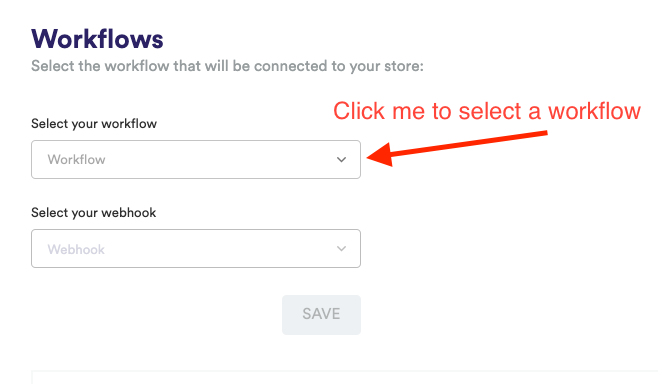
Select a workflow selector
Once you click on that selector a dropdown will be render with all the workflows available
 ⚠️ You’ll be able to see only workflows that are assigned to your user
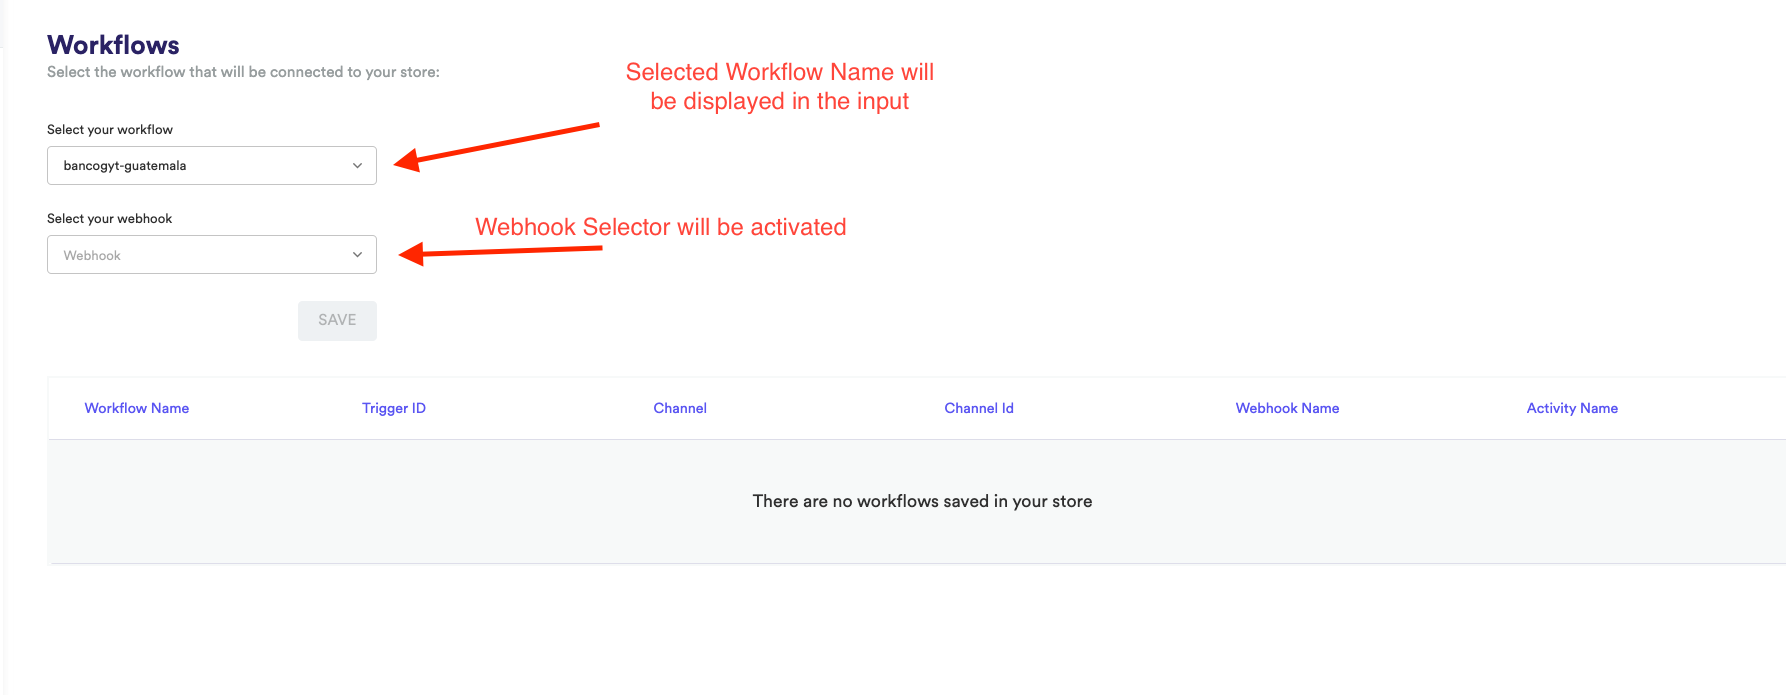
Click on the workflow name you want and it will activate the second selector which is the webhook/component selector
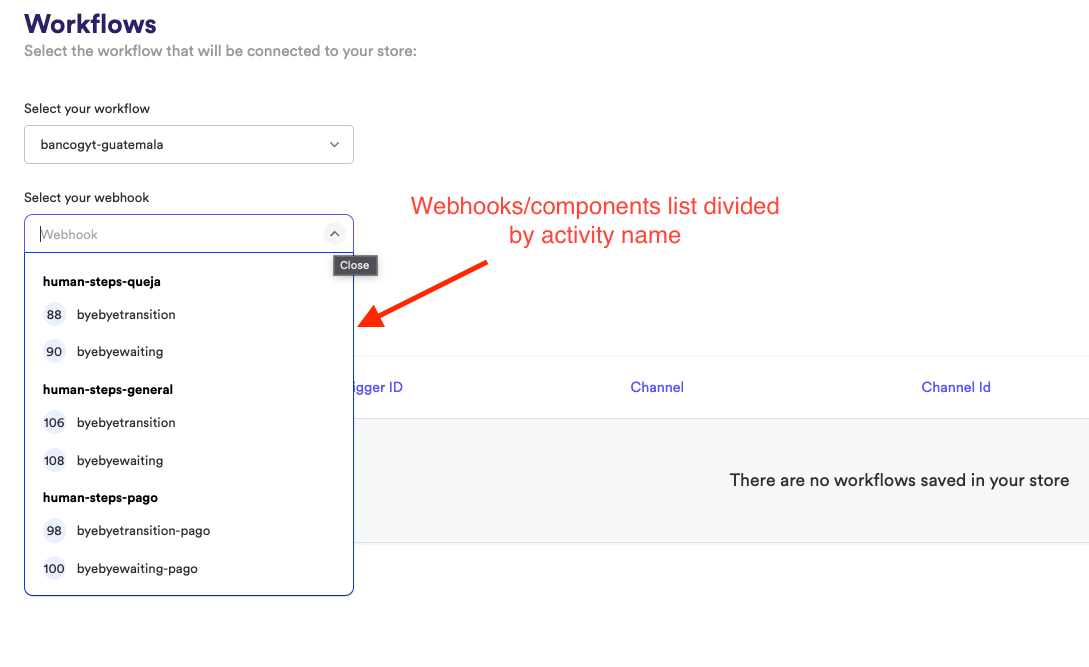
if you click on the webhook selector a list of webhooks will appear in a dropdown, this list will be divided by the activity name
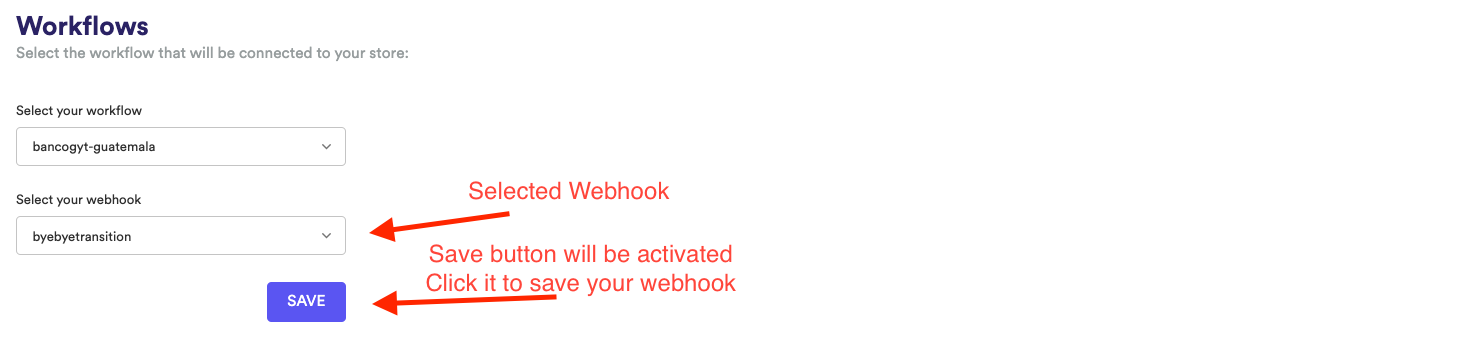
Once you click on the desire webhook the save button will be activated, clicking on it will save your changes to your storefront
Once you save you changes the table will be updated and will show you the workflows currently saved in you store
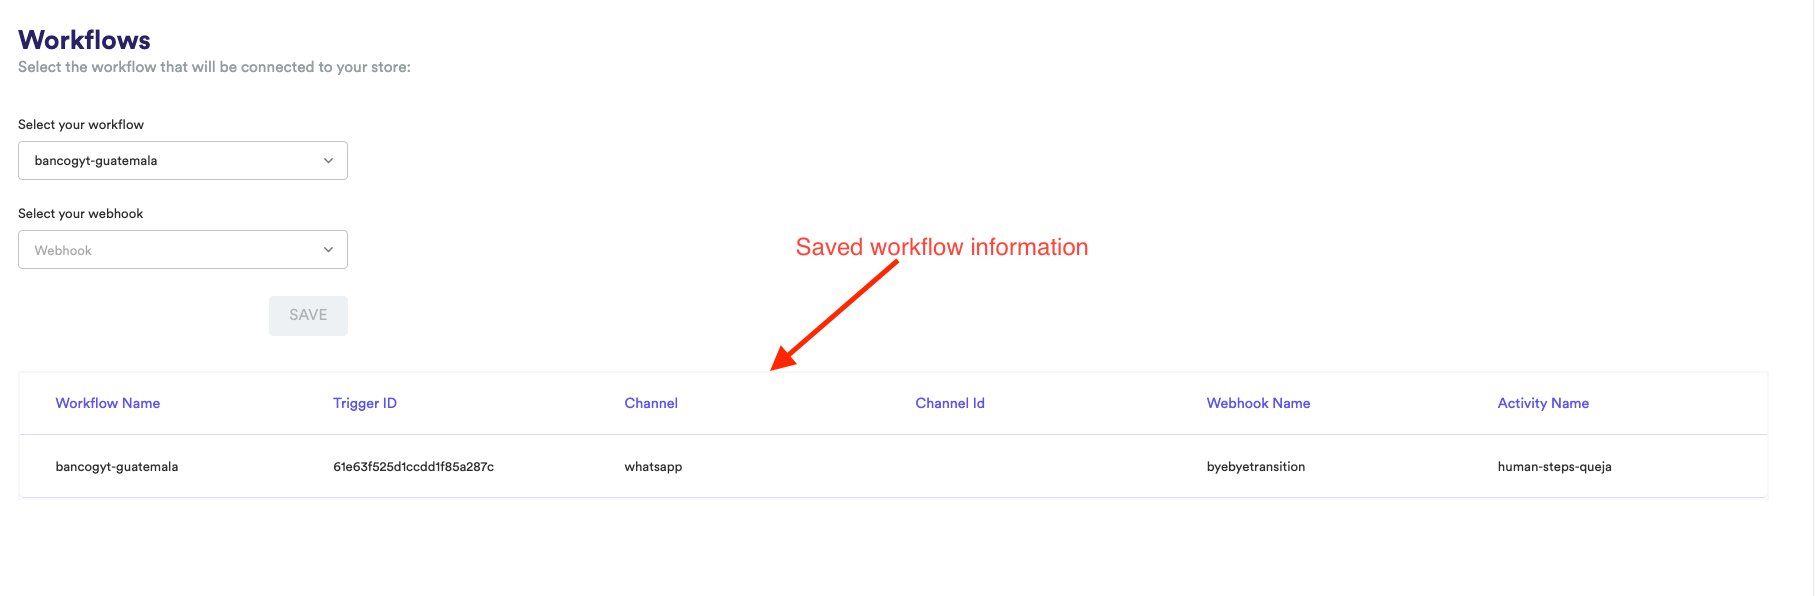 ⚠️ Selecting another webhook from the same workflow will update your previous information
Orders
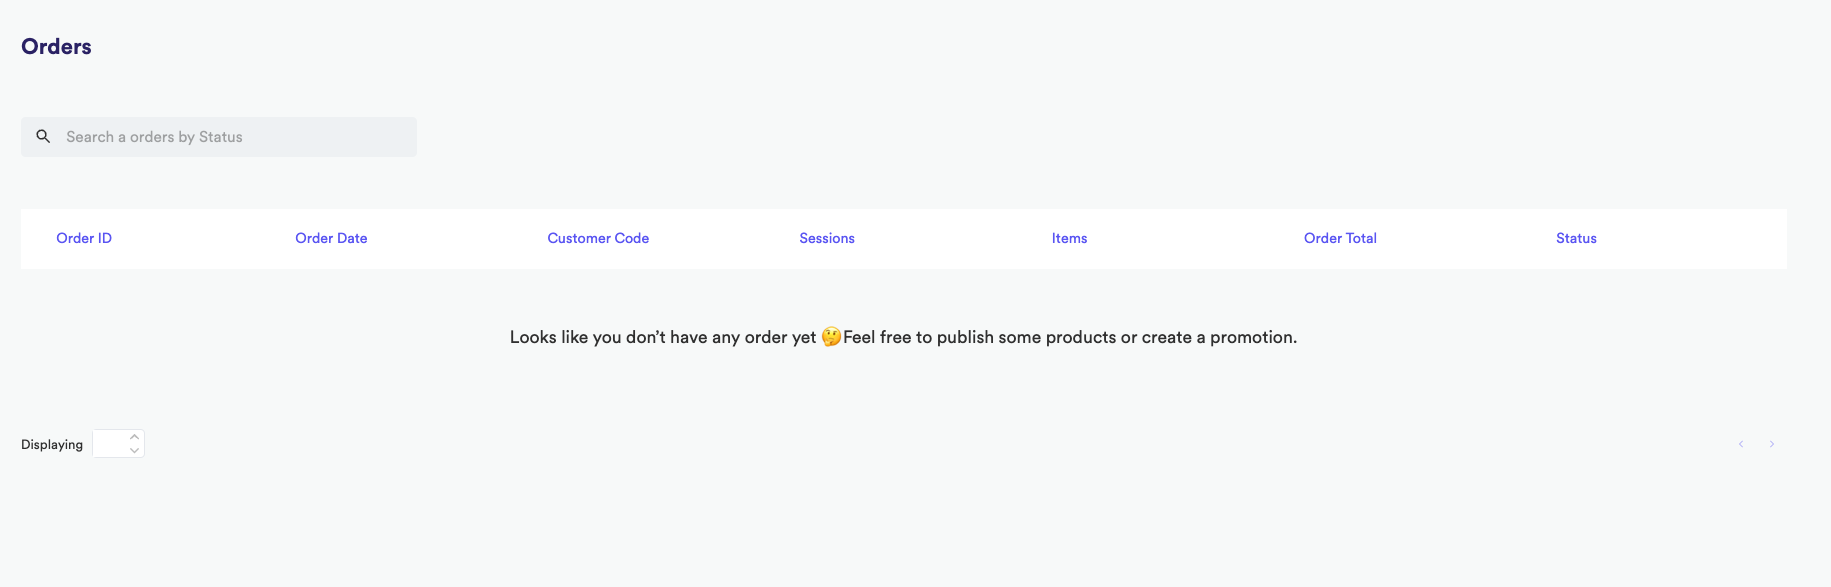
This section will allow you to see all the orders of your store from the newest to the oldest
When you store does not have orders you will see a screen like this
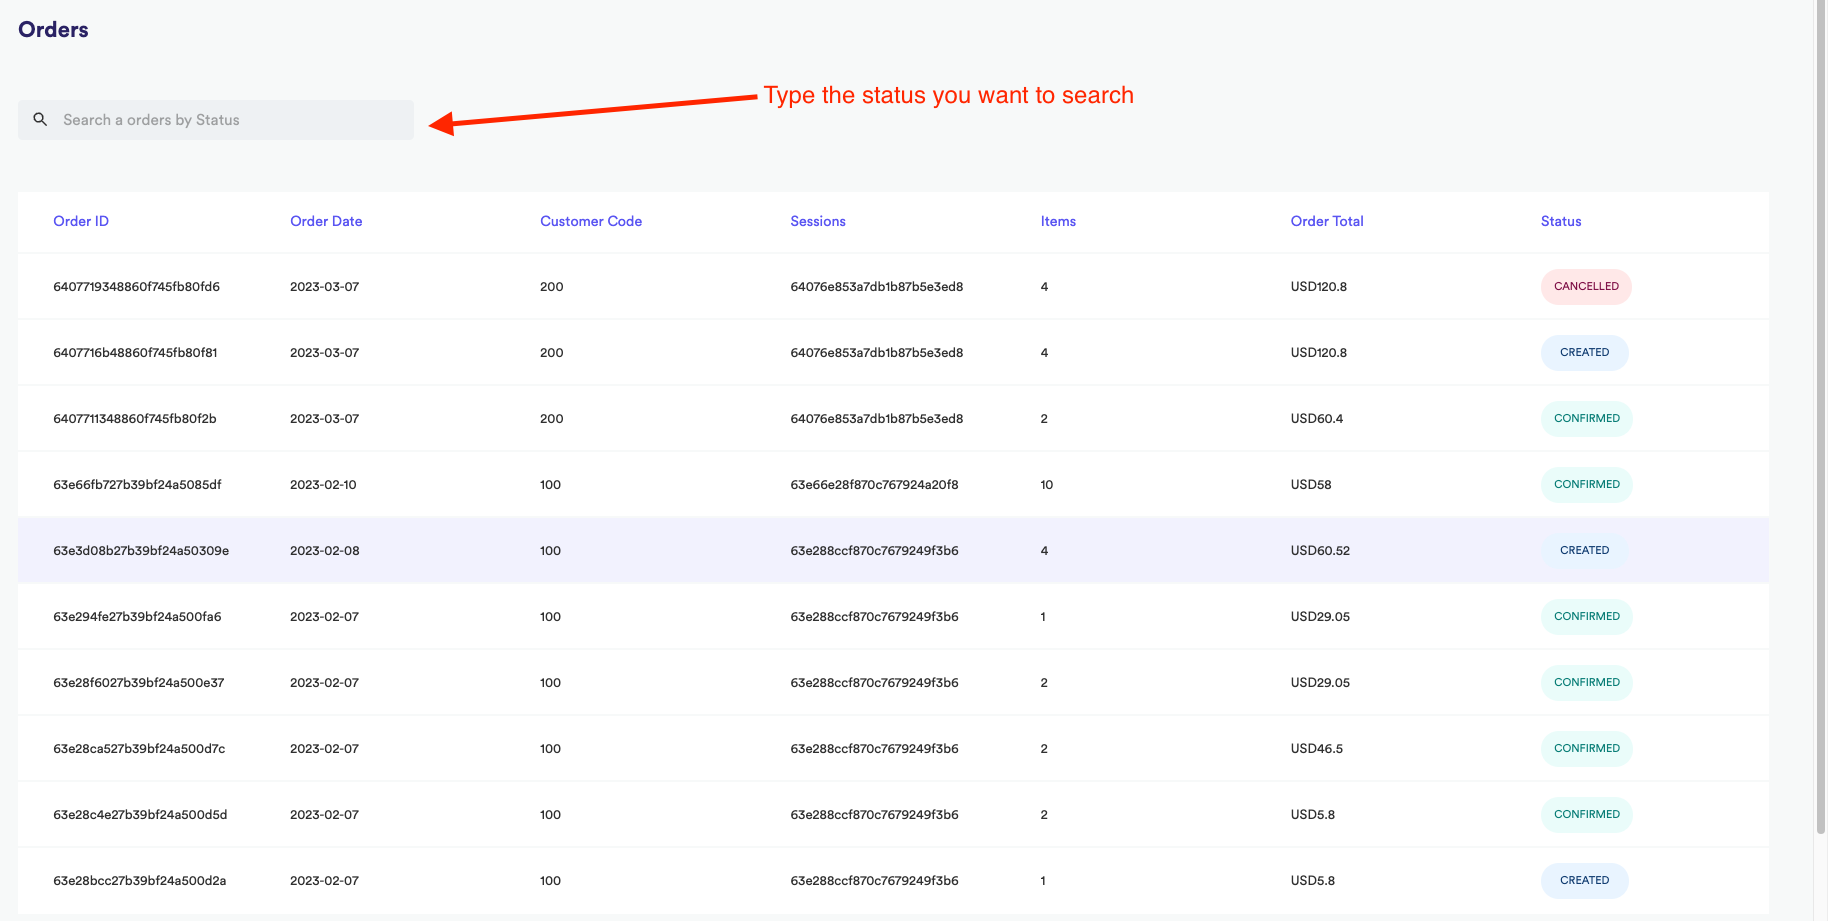
Once youre store starts to have orders they will appear like this

The list of orders includes the order id, the date when the orders was created, the customer code whom made the order, the session, the quantity of items, the total od the order and the status of the same
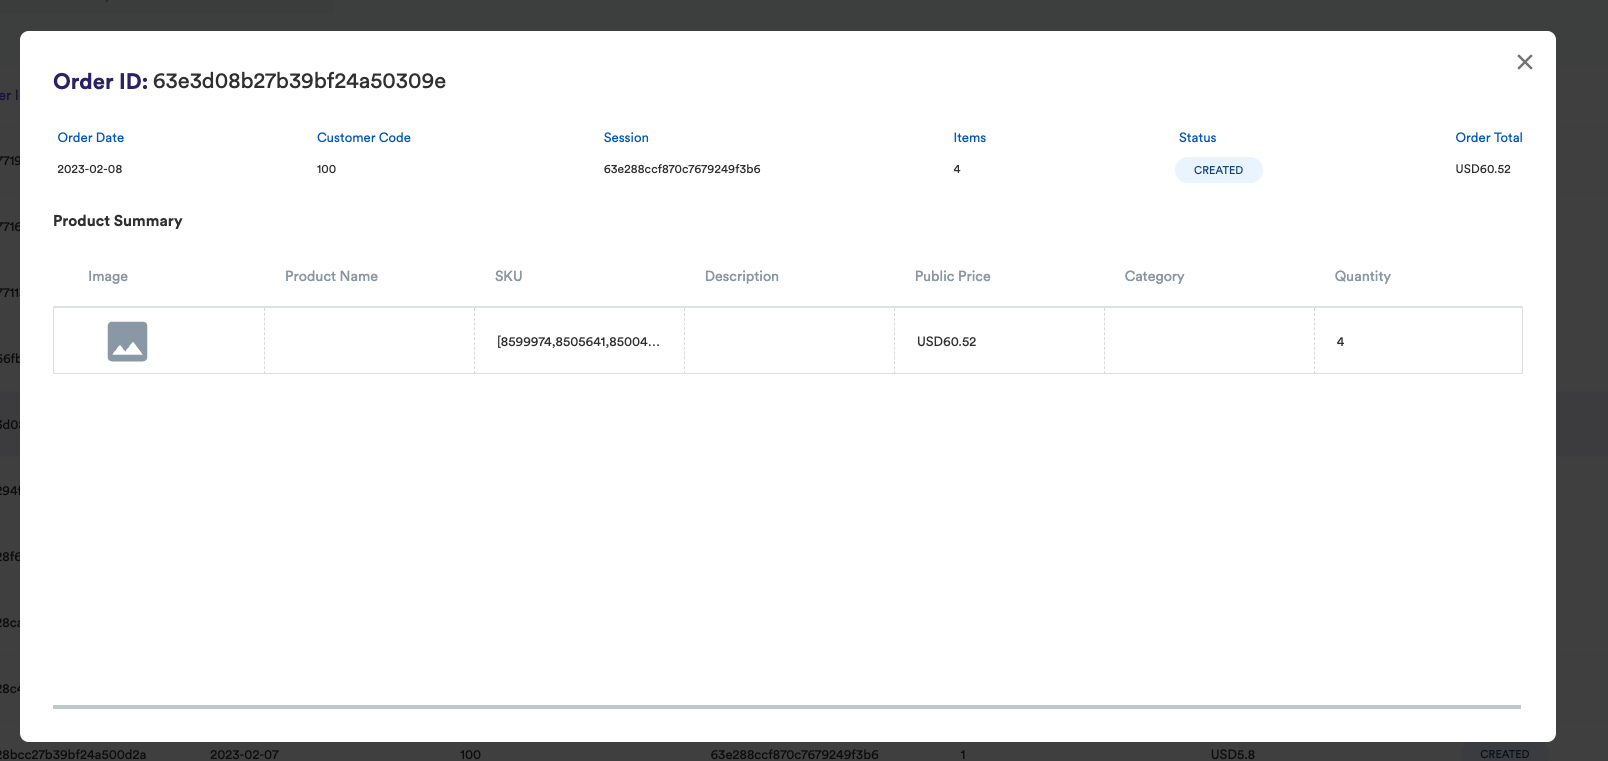
Seeing details of an order
To see the specific details of an order just click on the order you want more info and a modal will be render with all the specific information and the items that were ordered
Search orders
Currently we allow to search orders by status, just write the status you want to see in the search input and the search will be triggered automatically
If there are no result of the specific status you will see the empty orders screen
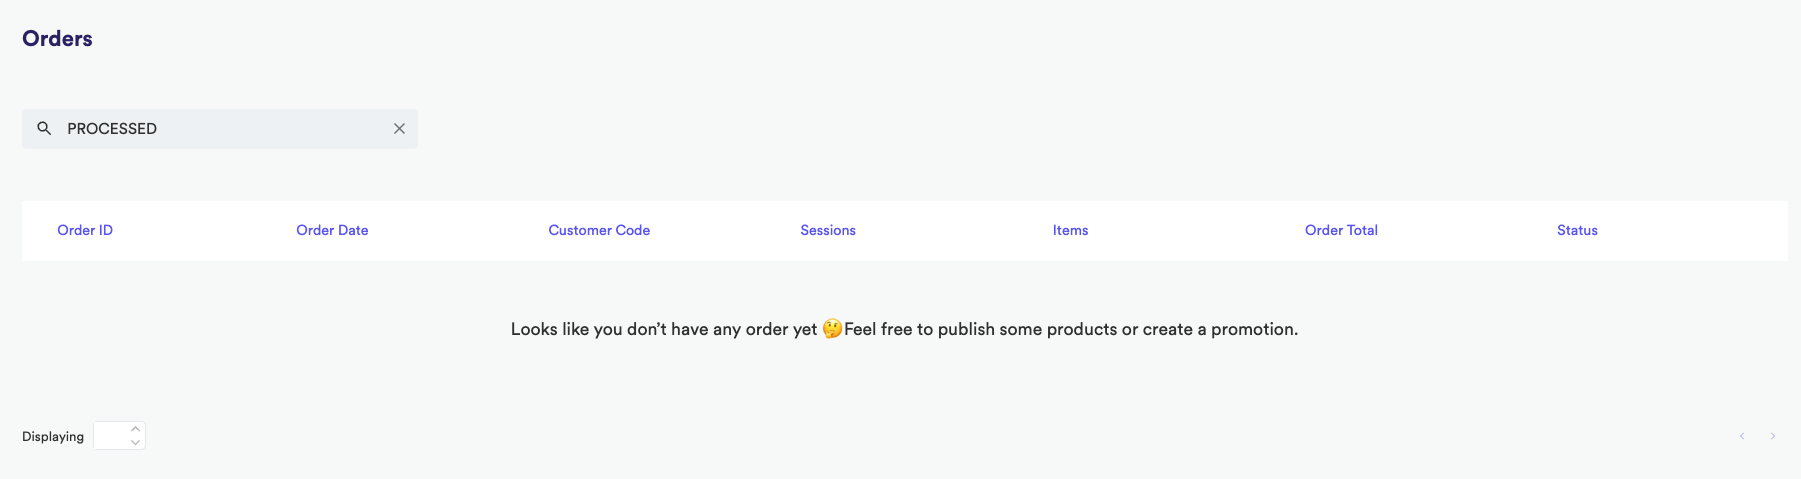
If the other hand if orders with the searched status are found you will see a list of orders with the corresponding status

Integrations
This section allows you to upload new entities data ( prices/products/customers/stock) without the need of create a csv and upload it to our system instead of that it allows you to provide a url from any system your company uses.
⚠️ For the moment we only support generic APIsThere are two ways of accessing integrations feature
- By the Inventory & Customer tab
- By the Integration tab
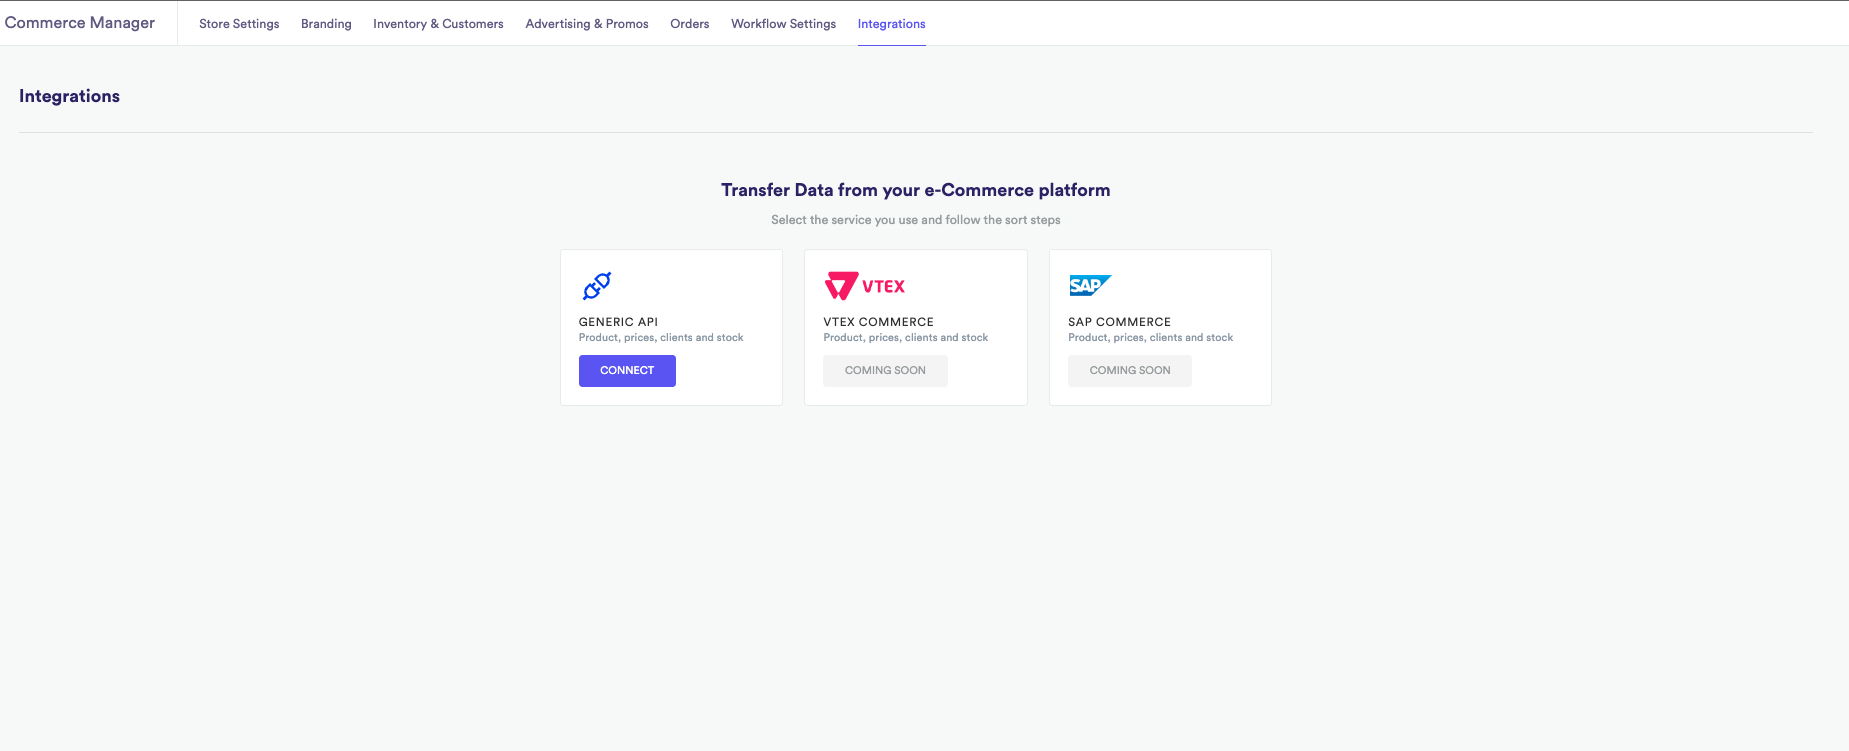
Accessing to integrations through Integrations tab
Going to the integrations tabs you will see a very similar screen to the inventory one, with the difference that you can’t upload csv files from this section
Click on the connect button will render an entity selection modal
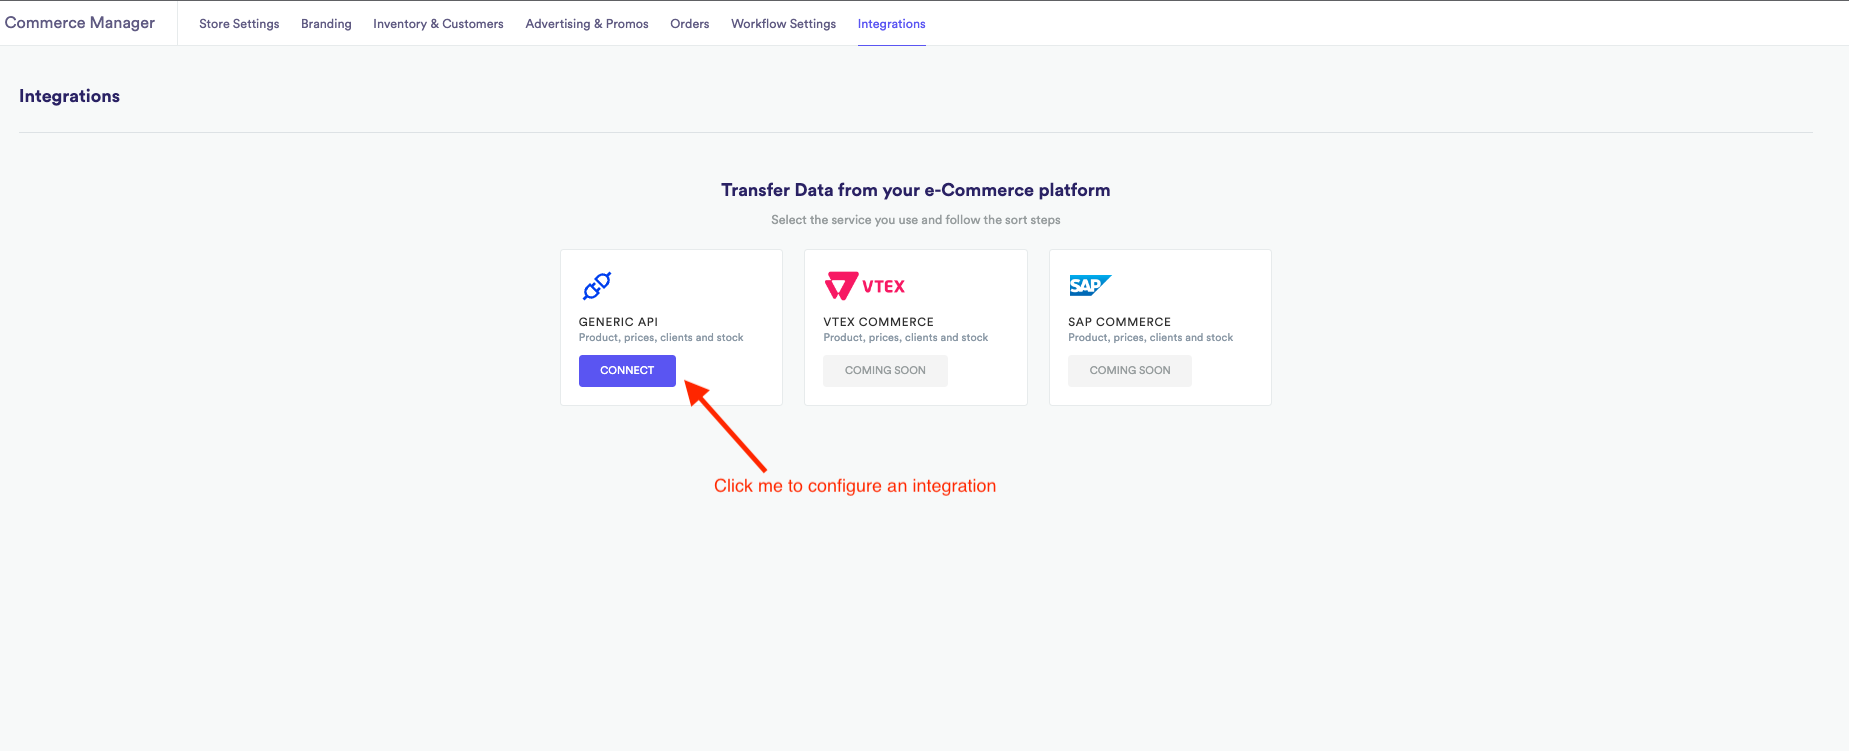
Once you click the button it will show you a modal to select which entity you want to start importing data
Entity Selector
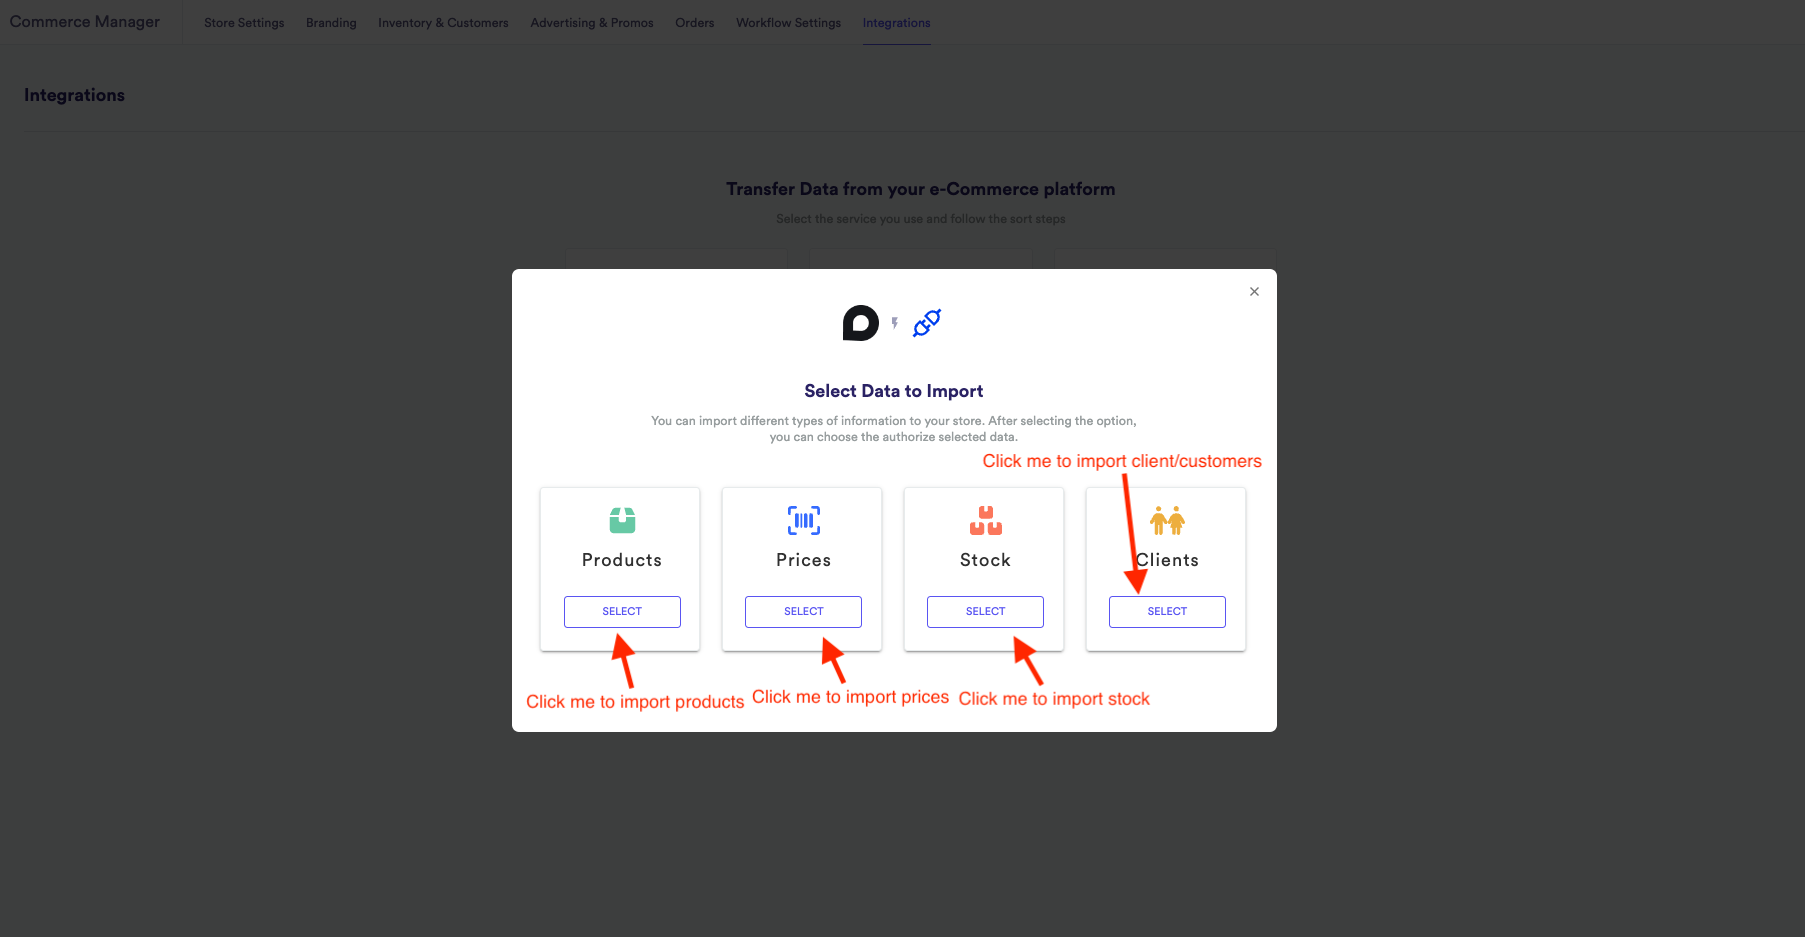
To select an entity to import data just click on the SELECT button
Authentication Modal
Once you select an entity you will see an authentication modal
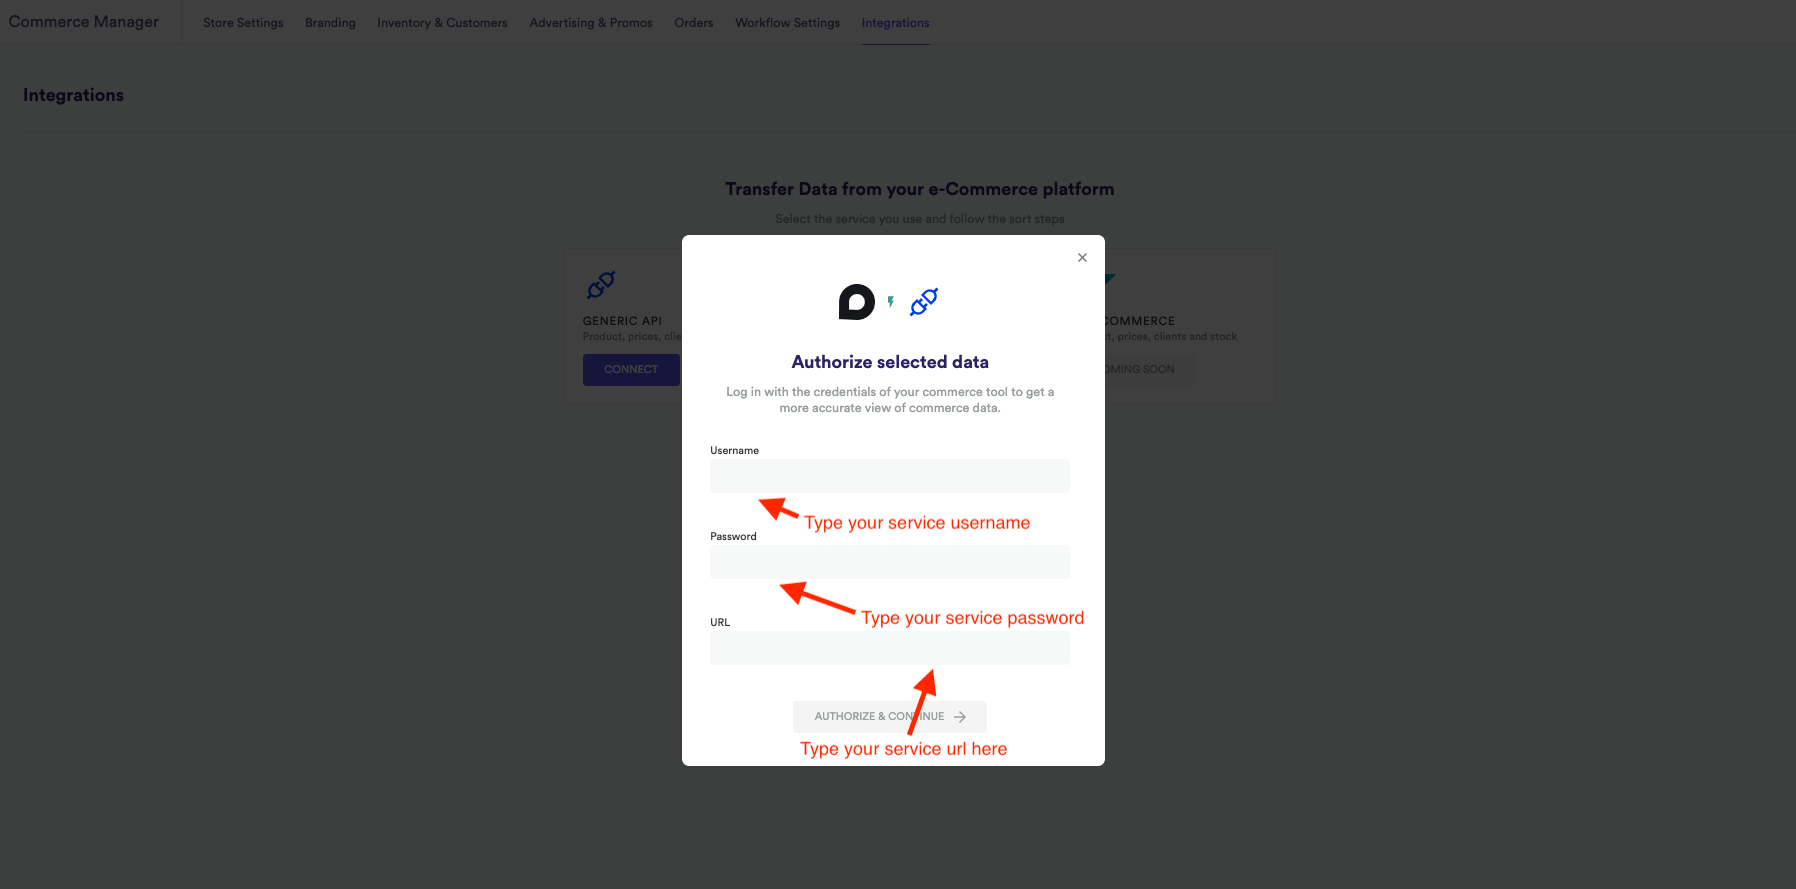
In this modal you need to type your service username , password and url all this is required to be able to access the information you want to import
Once you write the required information the Authorize & Continuebutton will be activated
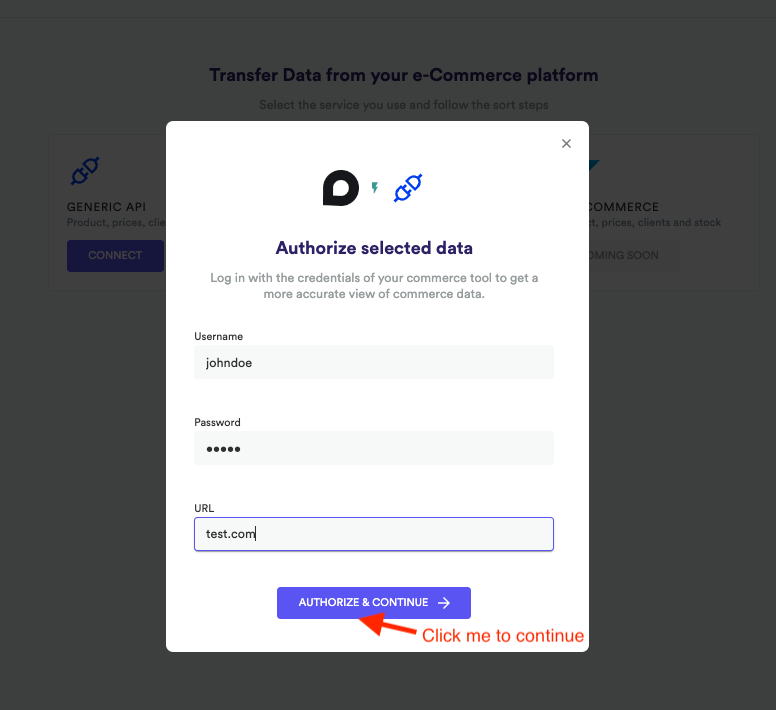
Once you click on the Authorize & Continue button, a new modal will appear.
JSON Path selector
In this modal you will need to provide a JSON type file with an example of how the response of you service will look like
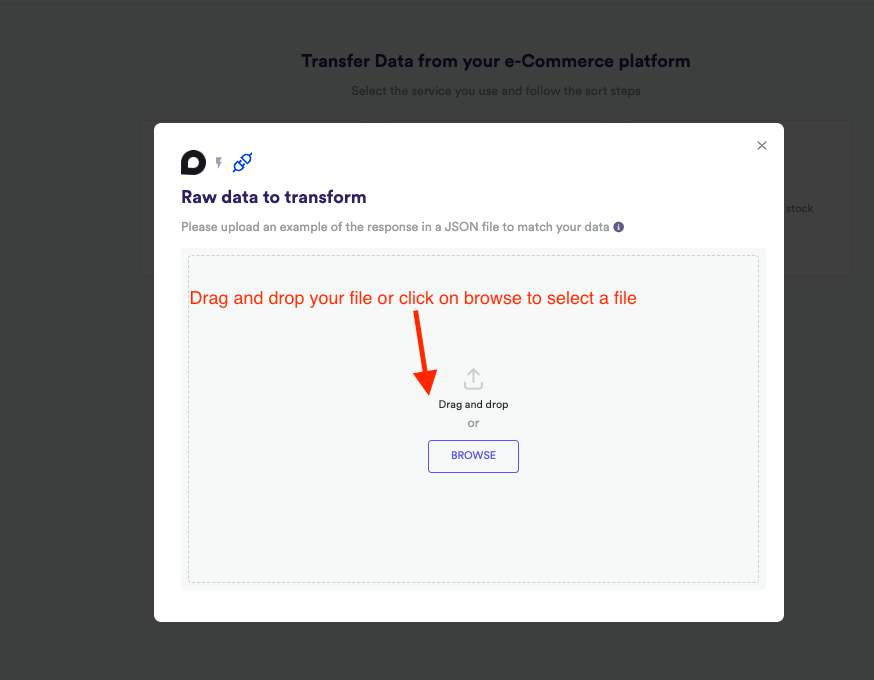
This modal allows you to either drag and drop the file you want to upload or use a file selector from you system by clicking on the BROWSE button
When you select a file the modal will change and show you the name of the file you selected
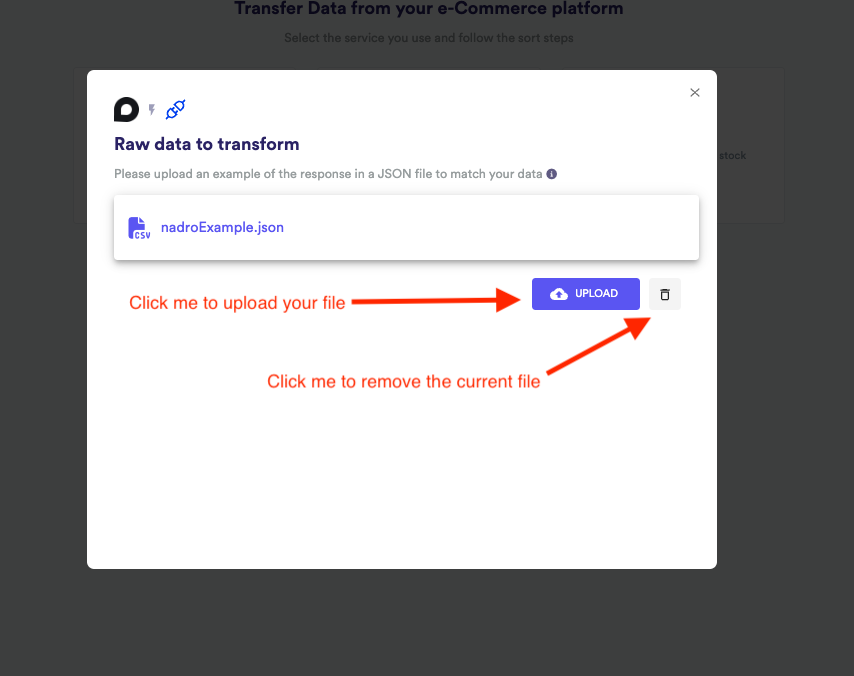
In here you can either upload the file you selected by clicking on UPLOAD button or erase the selected file and go to the previous state to select another file by clicking on the button with the Trash can icon
Once you have the desire file listed click on the UPLOAD button to continue to the next step, which selecting the path our system should follow to obtain the items from the url response
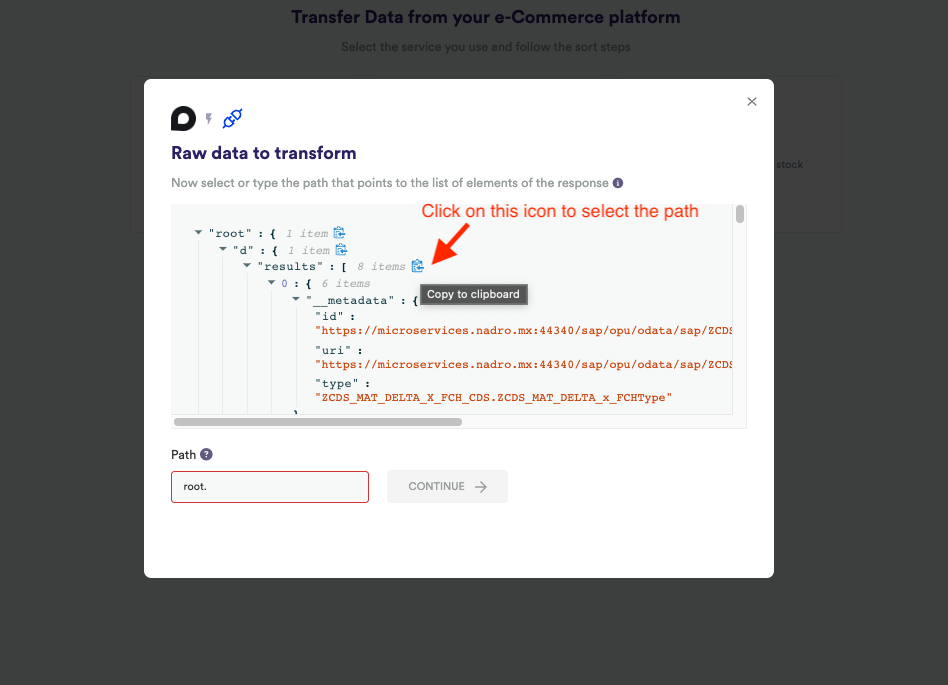
You can select the path by clicking on the blue that will appear next to each of the lines once you select the desire path you will see it inside the Path input and the continue button will be activated
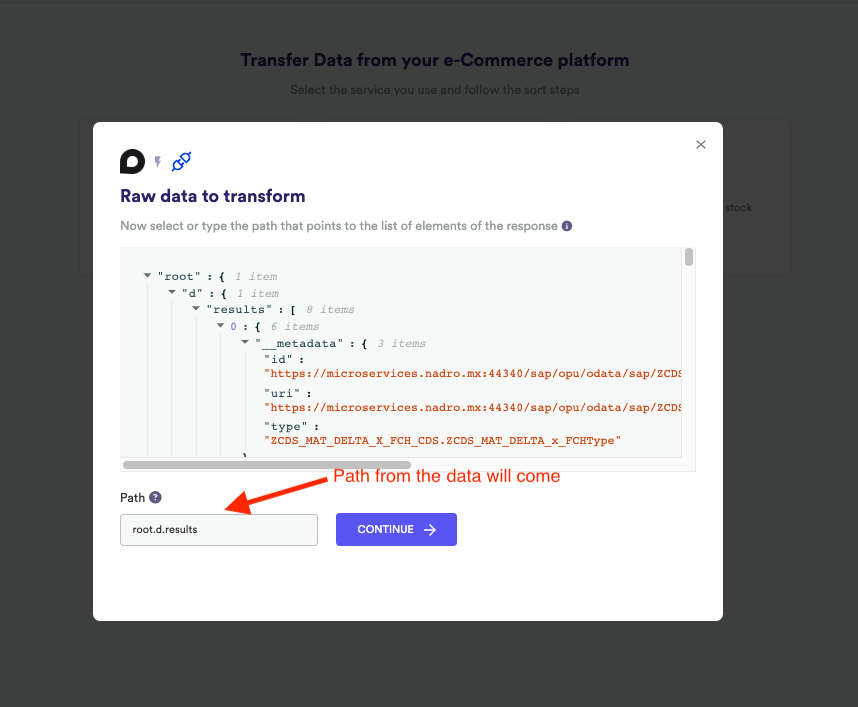
Once you select the correct path click on the continue button.
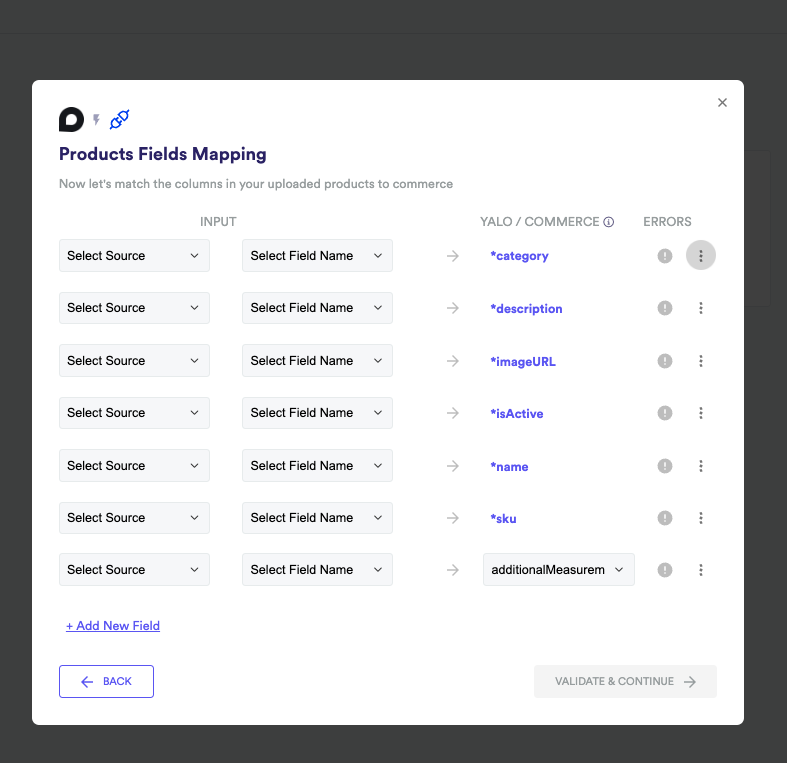
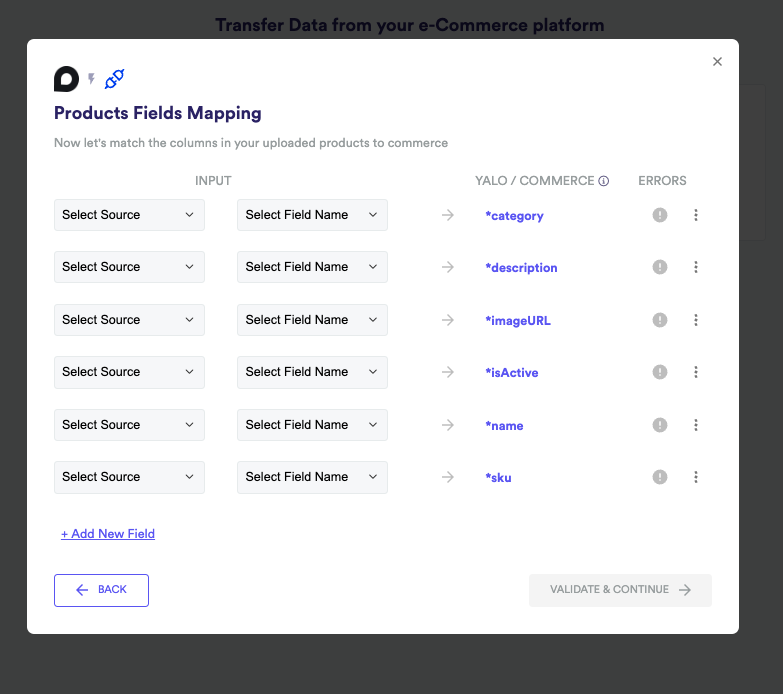
Fields Mapping
Now you will be directed to another model in which you will need to map the fields from your service to the commerce field
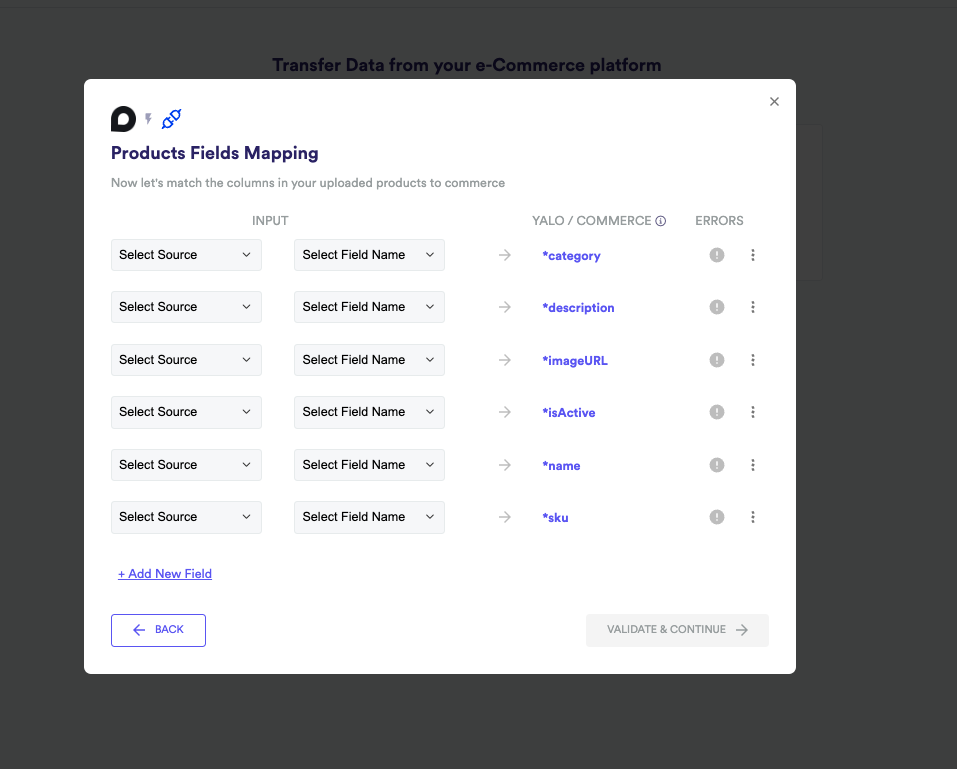
In the YALO/COMMERCE column all the fields that have an asterisks * are required
For this you will have two type of inputs available select source and calculated field you can select either of those in the first dropdown by default the field will say Select Source
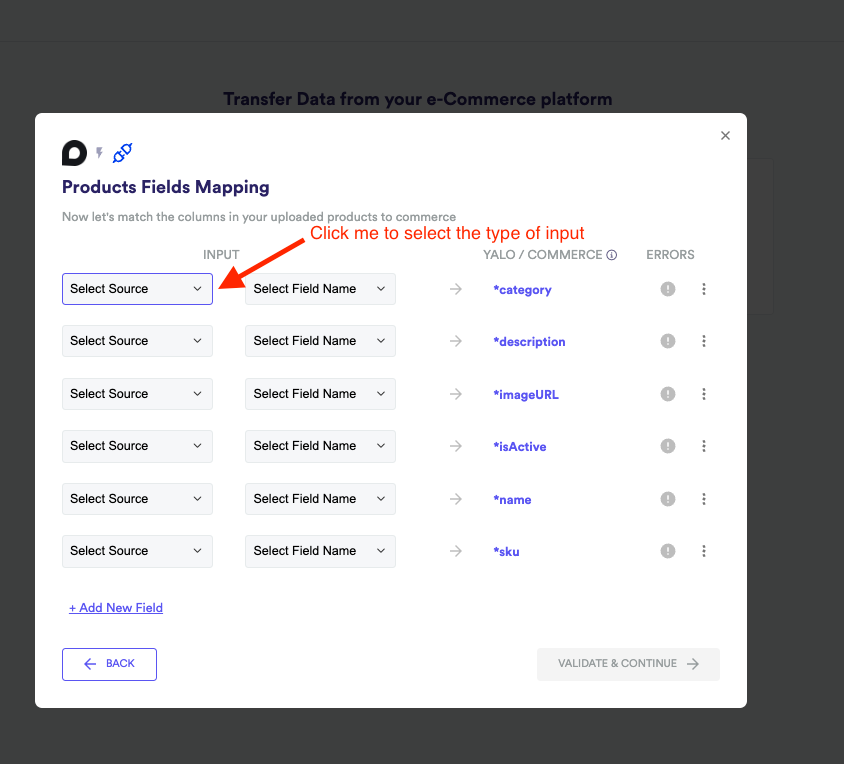
Once you click on it a dropdown of options will be show
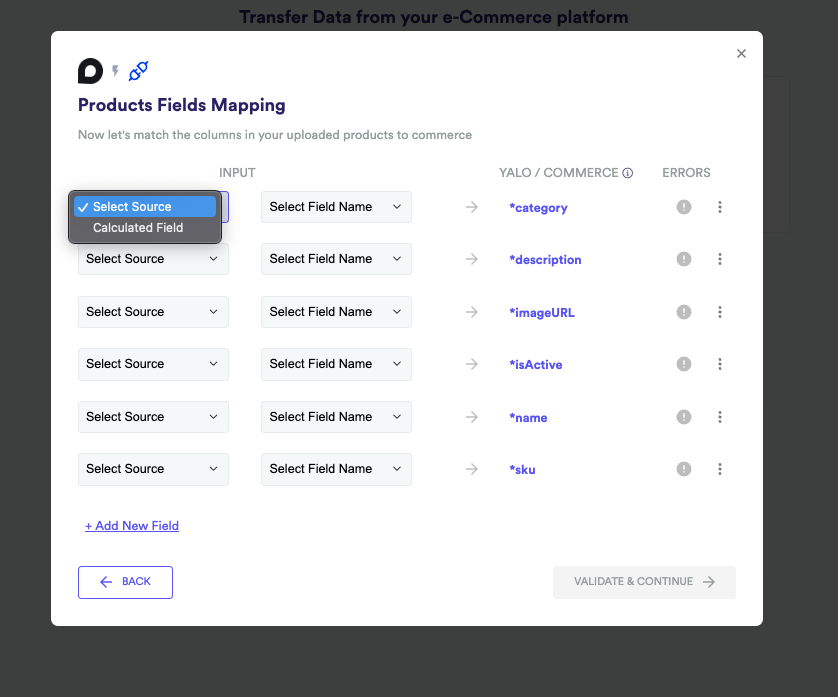
Select Source
With this type of input you will just need to select the field from you system that will match a commerce field.
To do this just click on the selector Select Field Name this will render a list of options fields from your system
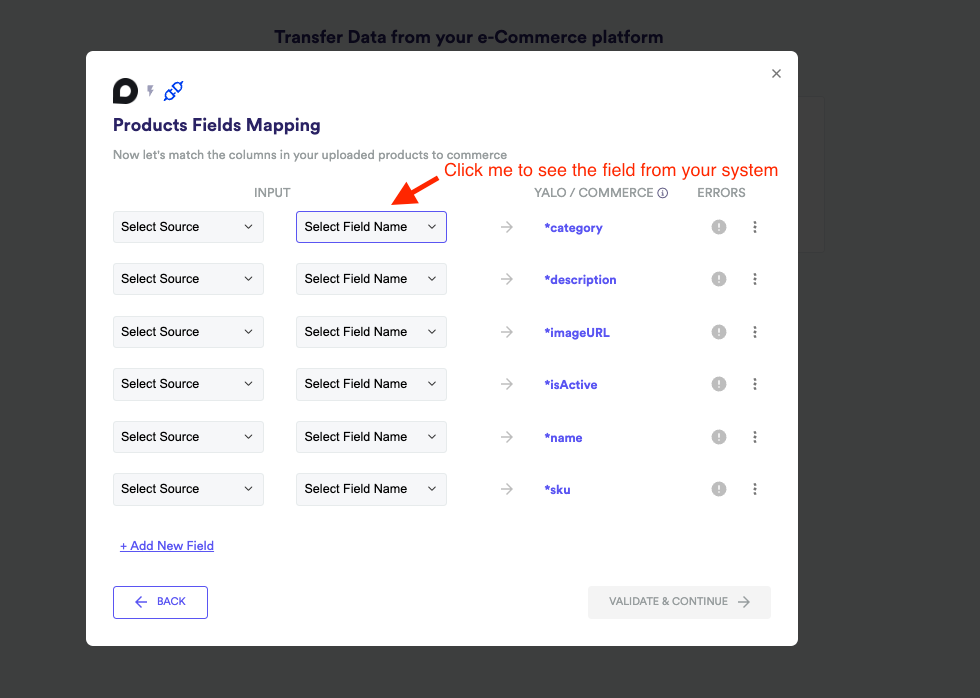
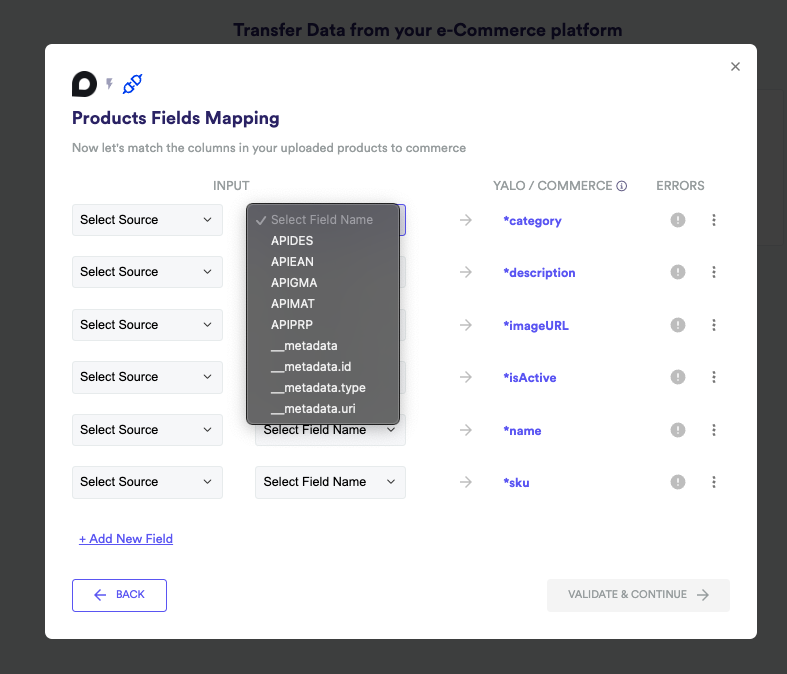
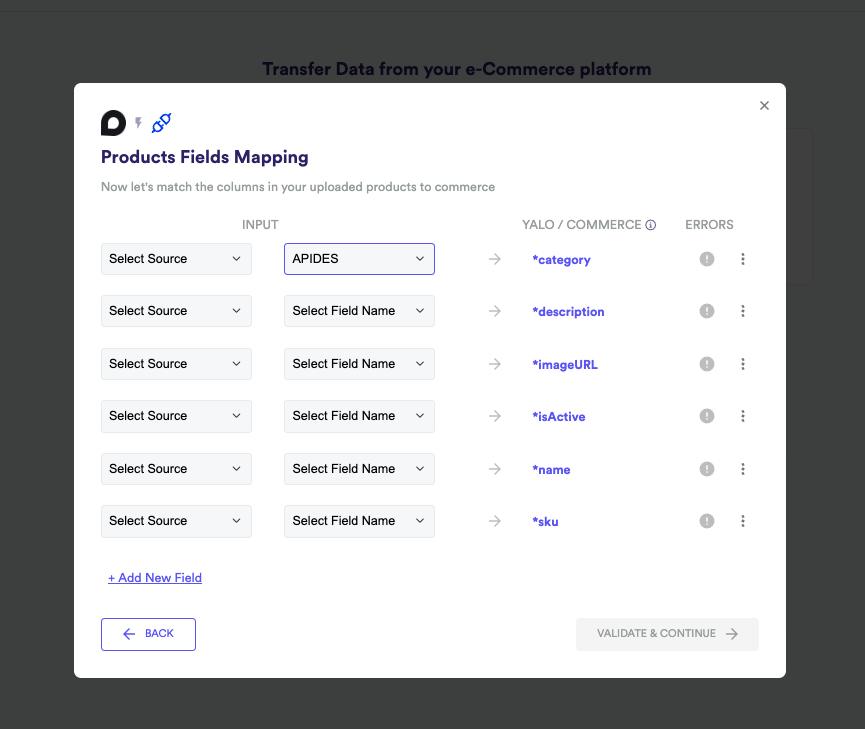
Once the field is selected, the name of it will replace the previous label Select Field Name
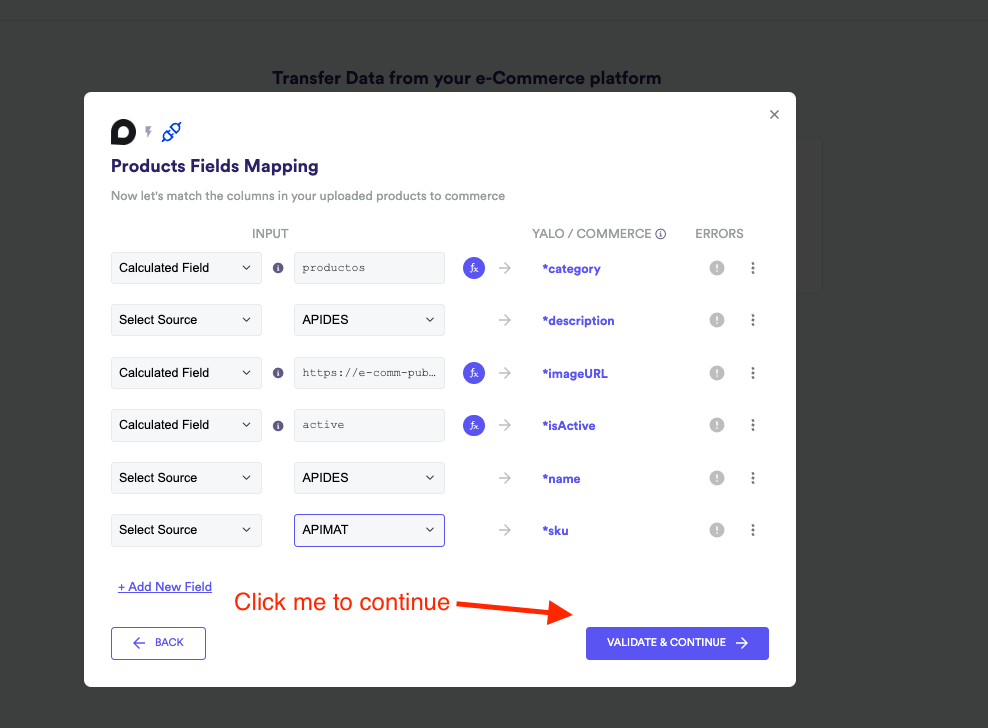
Calculated Field
The difference between this type of input and the select source one is that in calculated field you could either have constant values, formulas or string with formulas on it.
Selecting this type of input will render another input the Open formula input
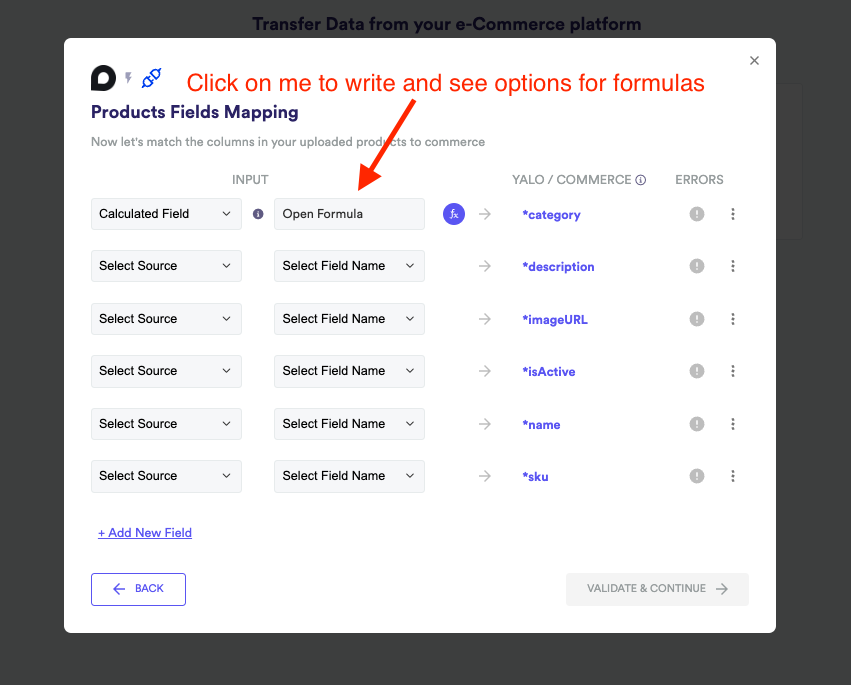
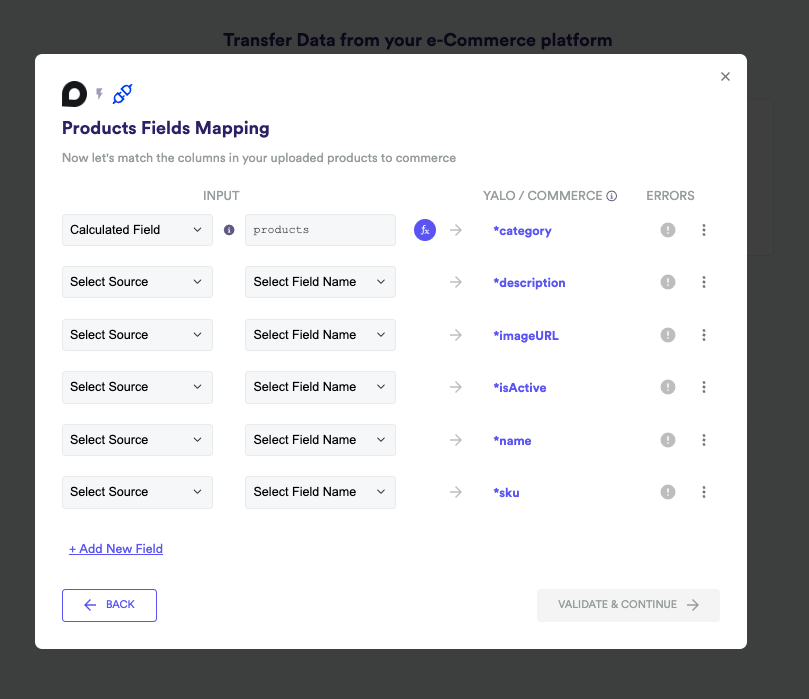
Click on the Open formula input will open a different input that will show you the formulas we have and some examples of how you can use them,once you are happy with your input/formula click on the DONE button

Once you click on DONE you’ll see the value you wrote in the input
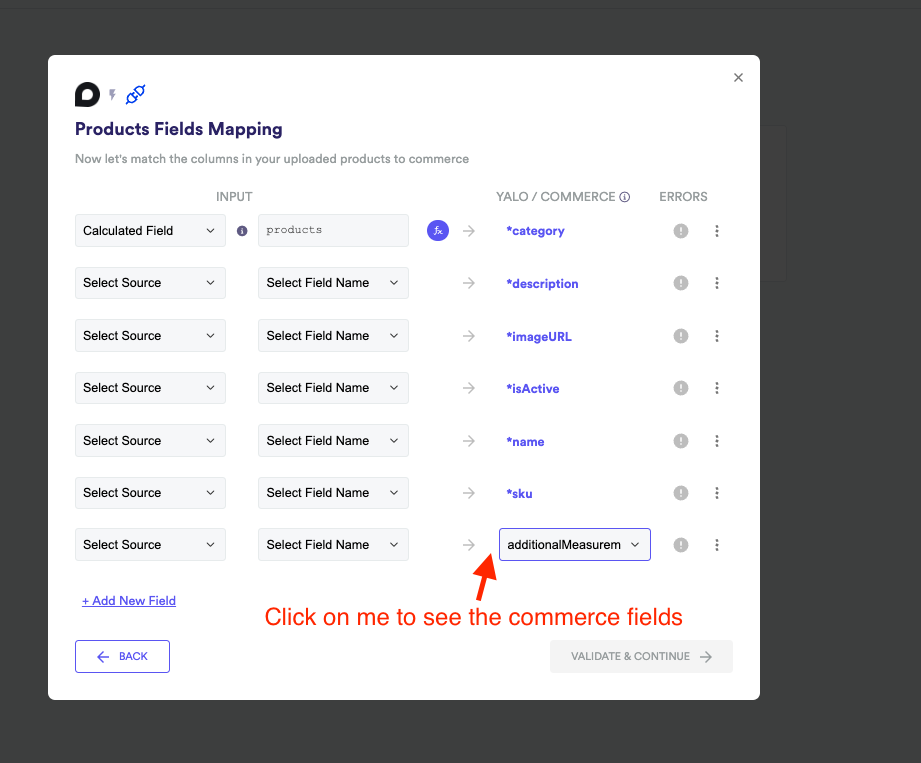
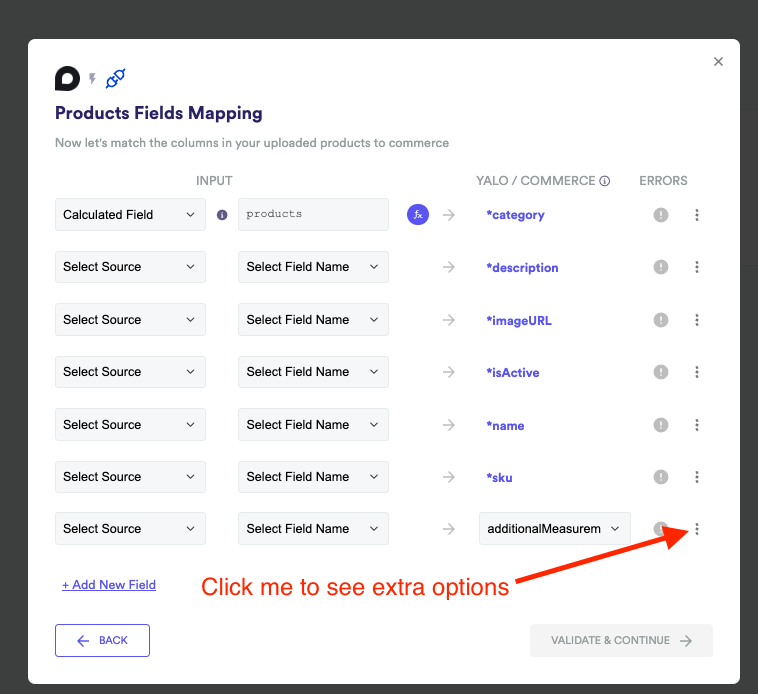
If your system has more fields you can as many as you want by clicking on Add New Field
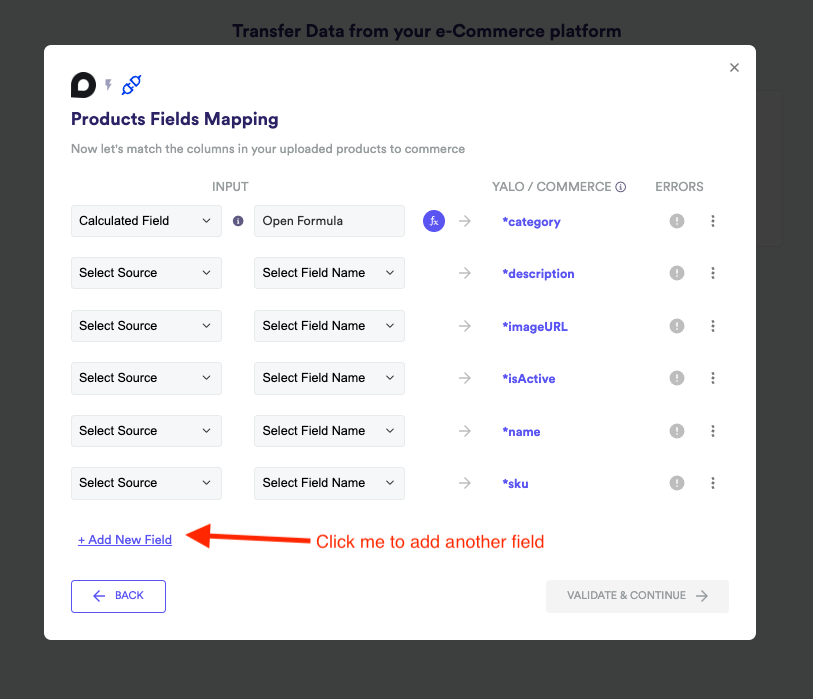
If you clicked on it another field will be render, you can select the type of input as previously mentioned and also you can select the YALO/COMMERCE field that should be mapped

If you click on the three dots icon you will see extra options that you can execute

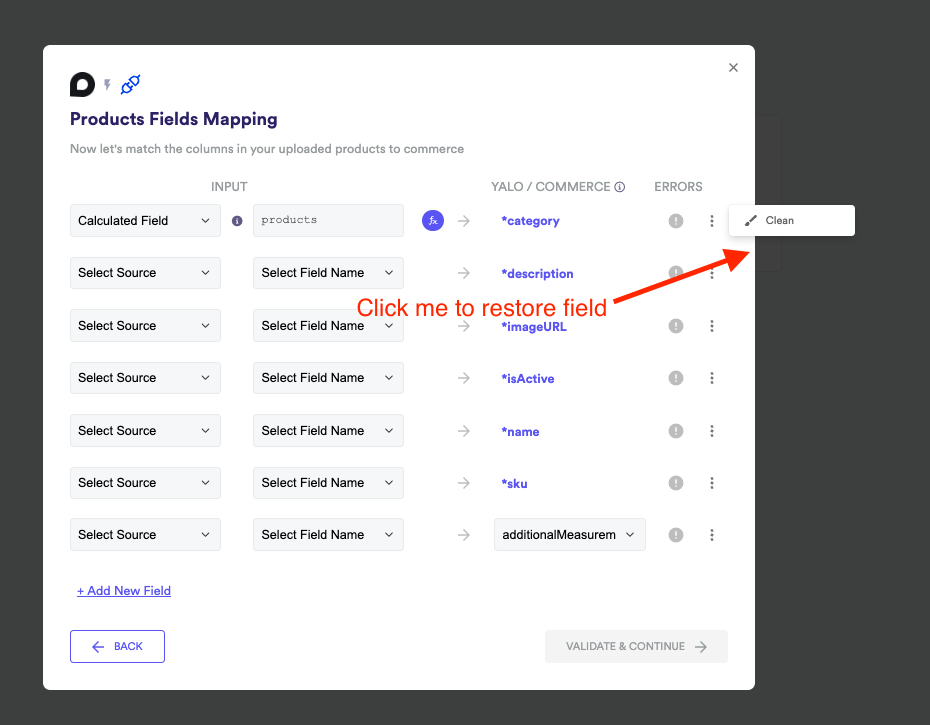
Clean action
With this action you can restore all the information from the field to its initial state
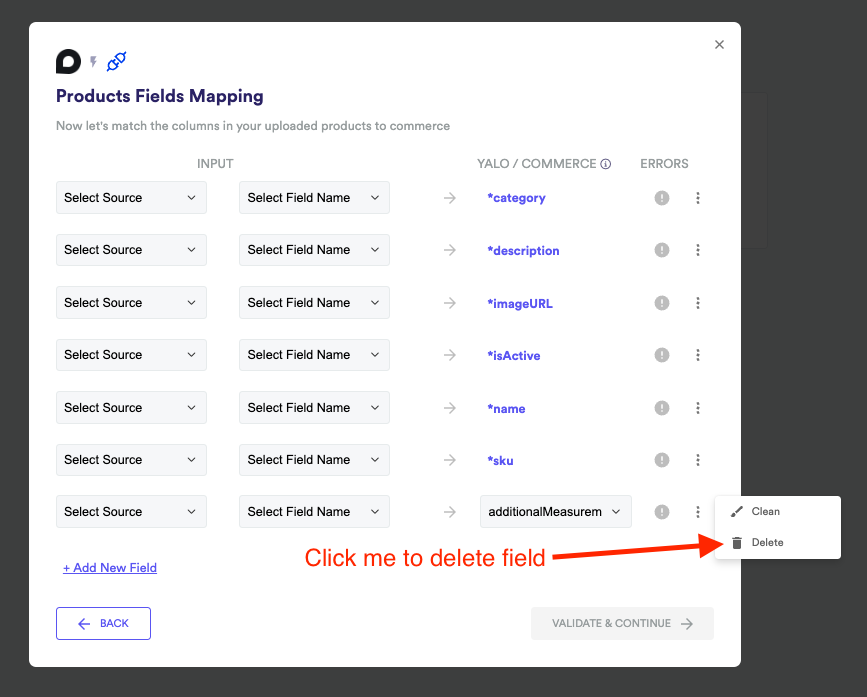
Delete Action
With this action you can delete a field
Once you filled all the required fields the Validate & Continue button will activate
Preview
Once you click on Validate & Continue you the preview modal will appear, this modal will show you how the fields you map previously will look like
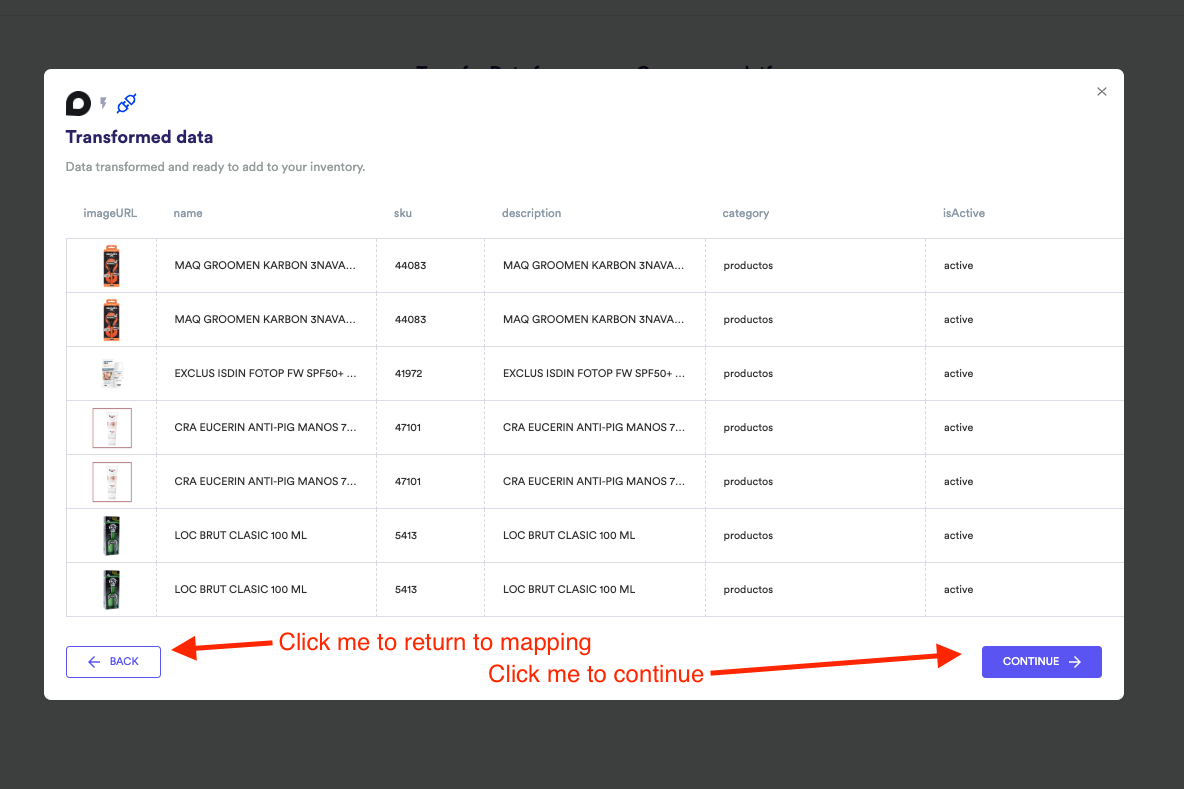
If you are happy with the information you see click on CONTINUE if not click on BACK and you will be redirected to the previous modal
Data Replication frequency Modal
Once you click on continue the Data Replication frequency modal will appear, in this modal you can select how frequently the integration system will fetch data from your system, the two options are Daily and Hourly
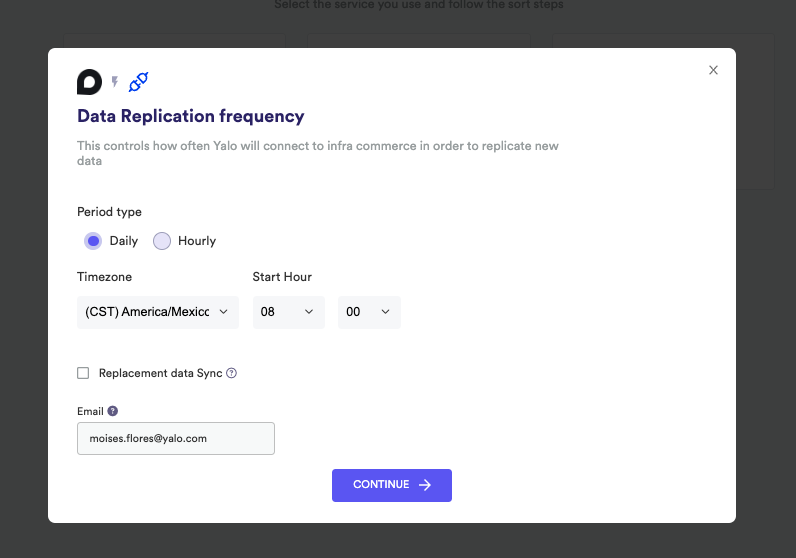
Daily Sync
This type of sync will be executed once a day in the hour and minute you selected according to the timezone of your preference
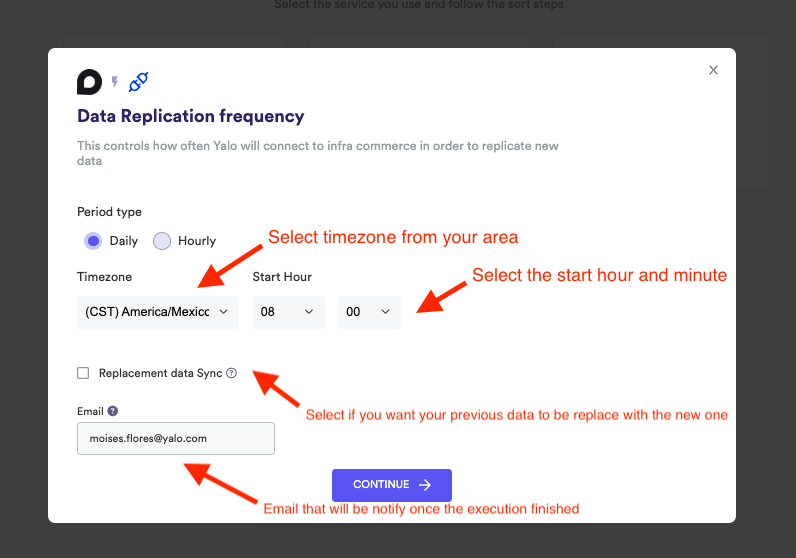
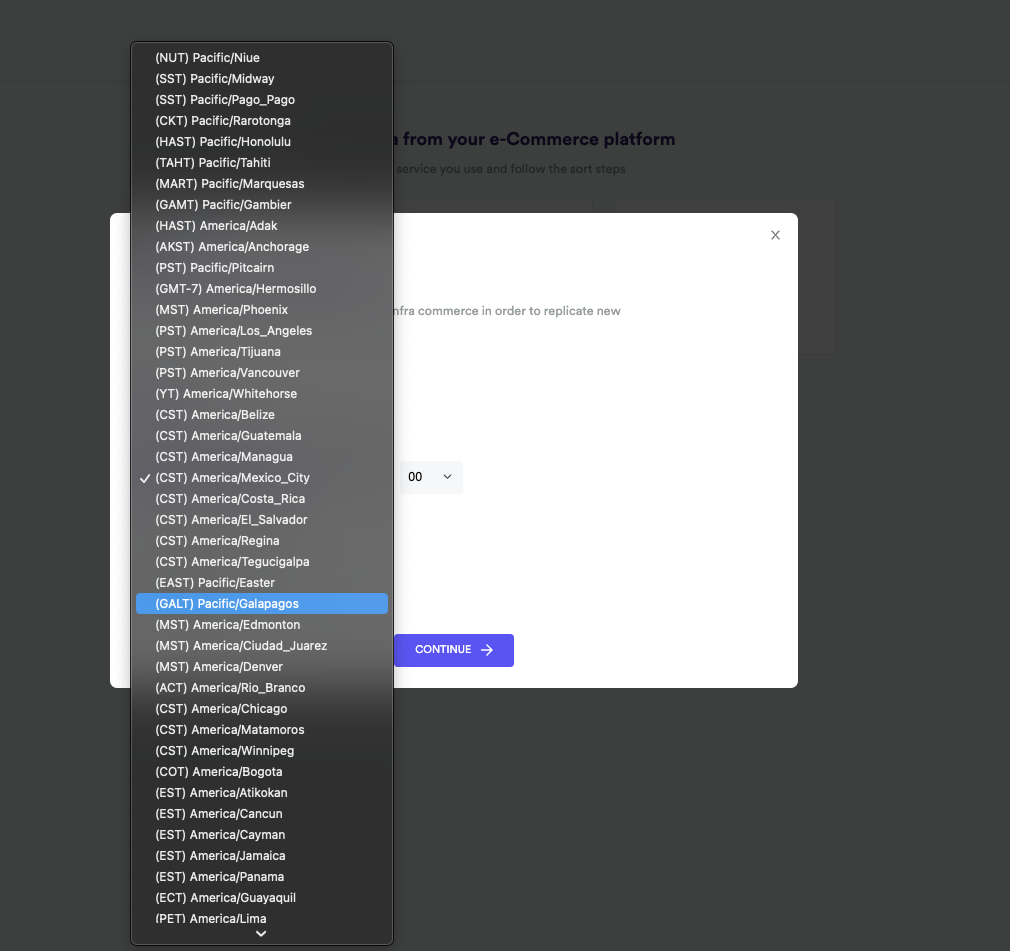
If you want change timezone just click on the selector and a list of timezones will appear
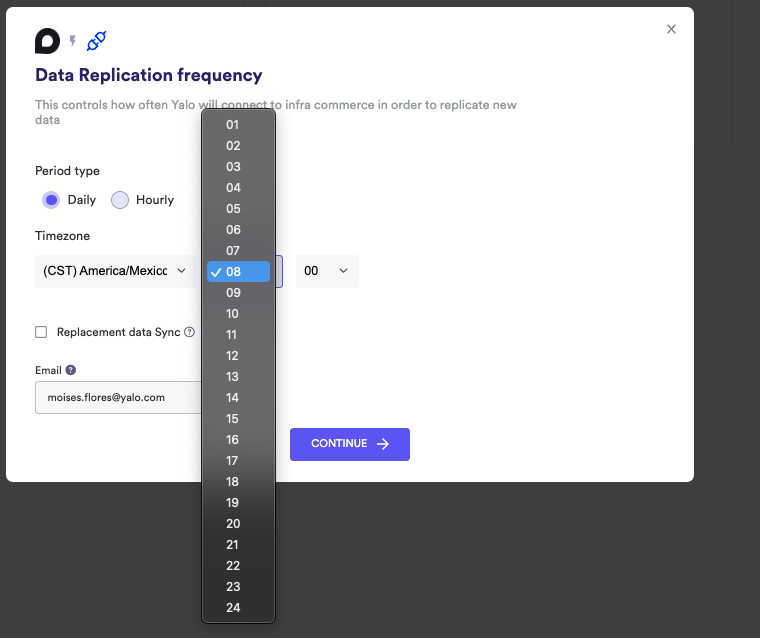
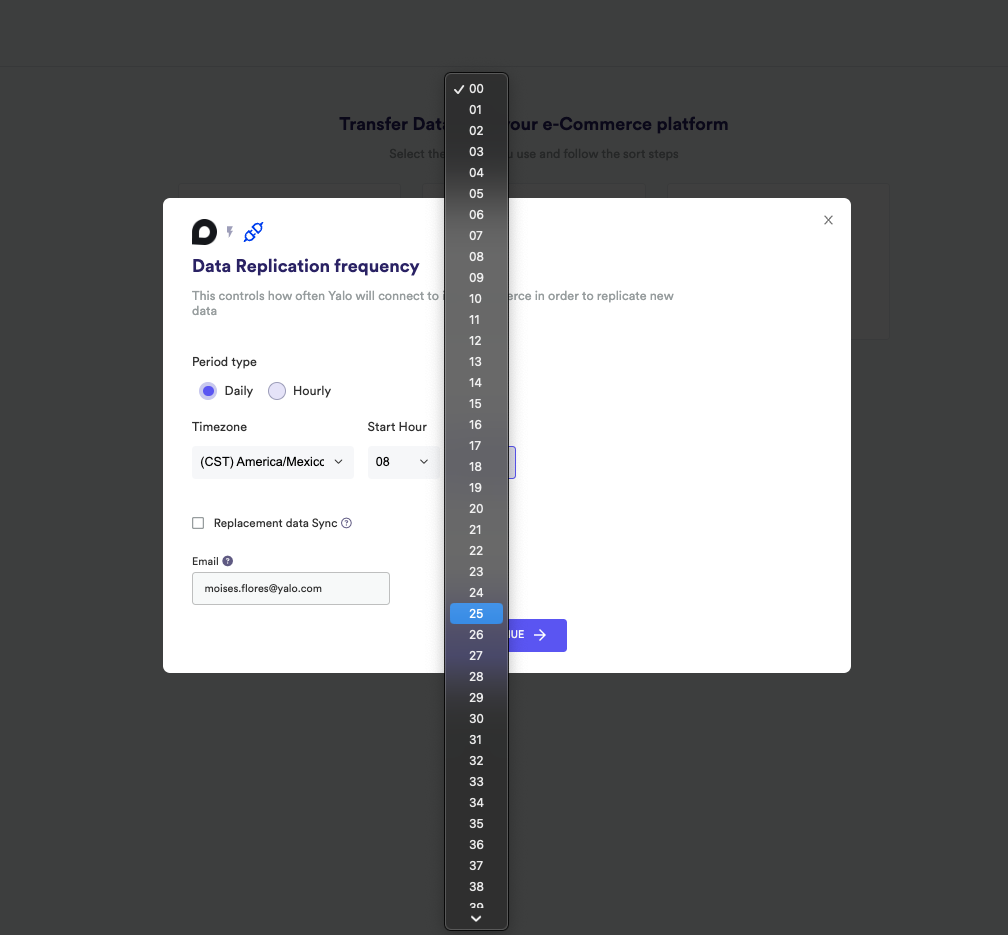
If you want to change the hour or minute from the start hour you click on the according selector and a list of hours or minutes will be shown
Replacement Data Sync
Selecting this checkbox will tell the integrations system to override all your previous information with new one every time there is an execution/fetch of data
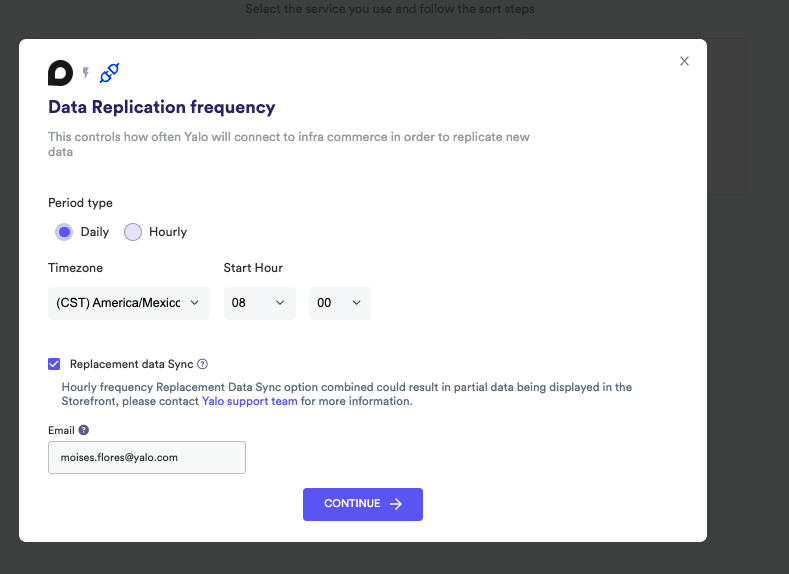
Email
The email you type in this input will be the one that receives notification every time and execution has finished and will get the results of it
Hourly sync
Similar to Daily type you can select the start hour, timezone, email to notify and if you want to replace all the previous data, but the difference is that you can select on which days and execution/fetch of data will be done and in which interval of hours
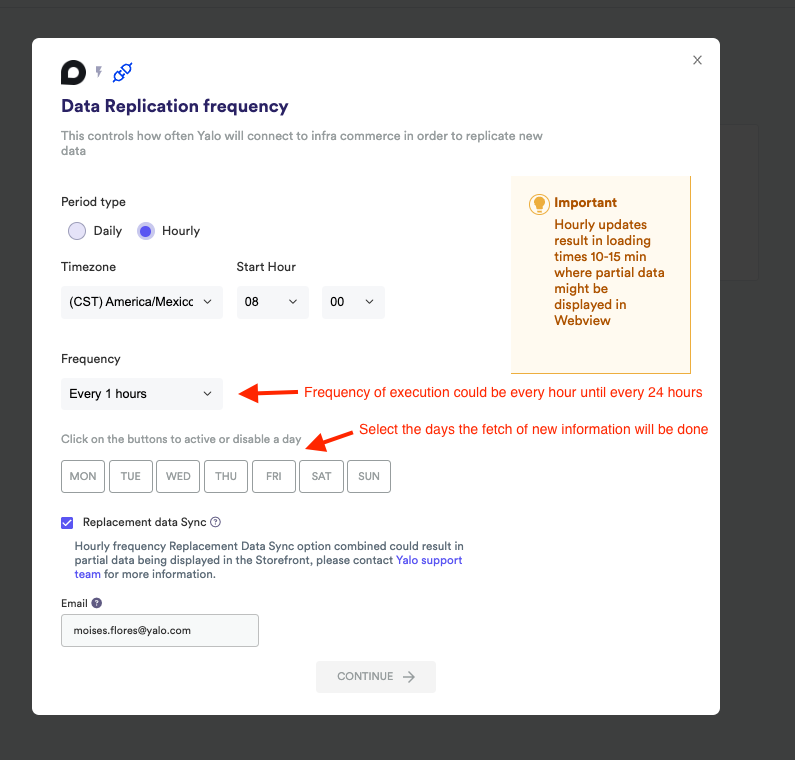
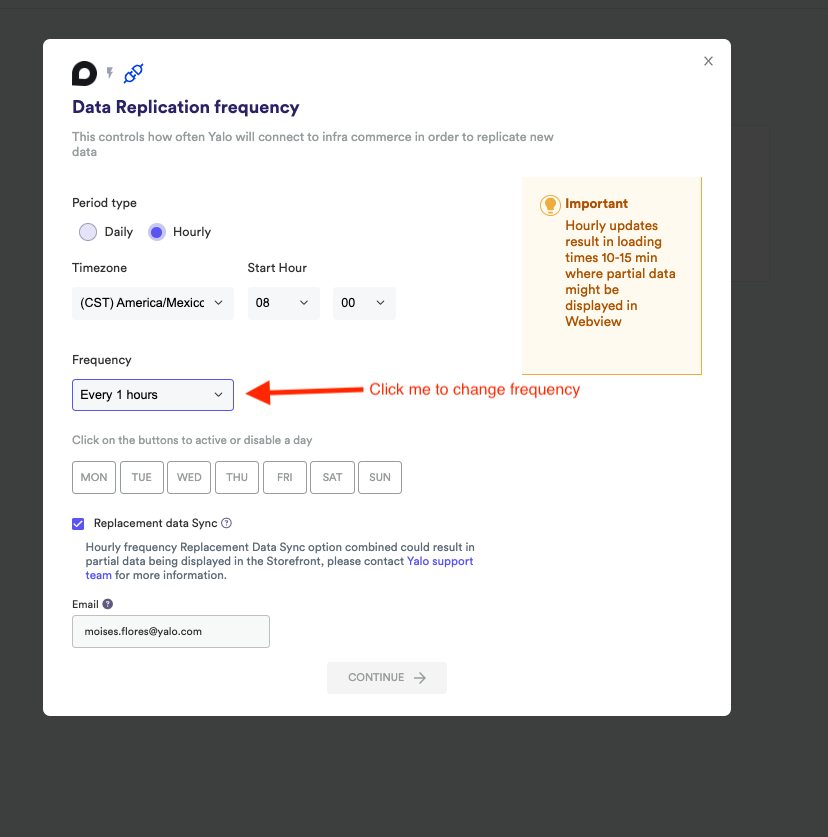
Frequency
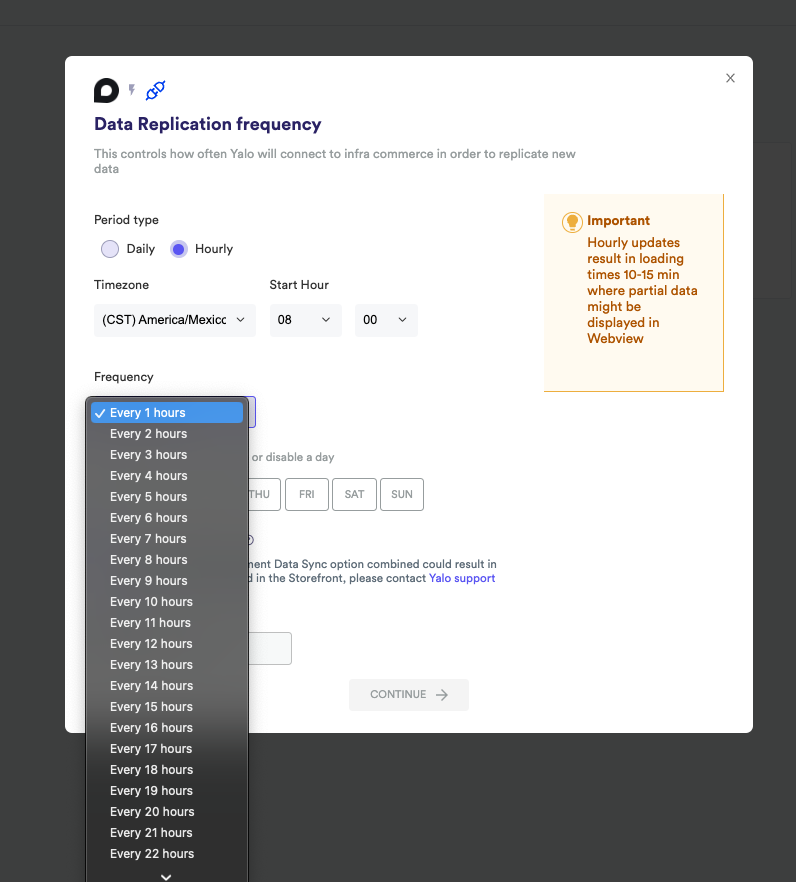
This information will tell our system in which interval of hours a fetch of data will be done could be every 1 hour, 2, 3 until every 24 hours
You can change it by clicking on the frequency selector which will display a list of options
Days of execution
In the Hourly sync you can select the especific days you want to pull information from you system into commerce just click on the desire days
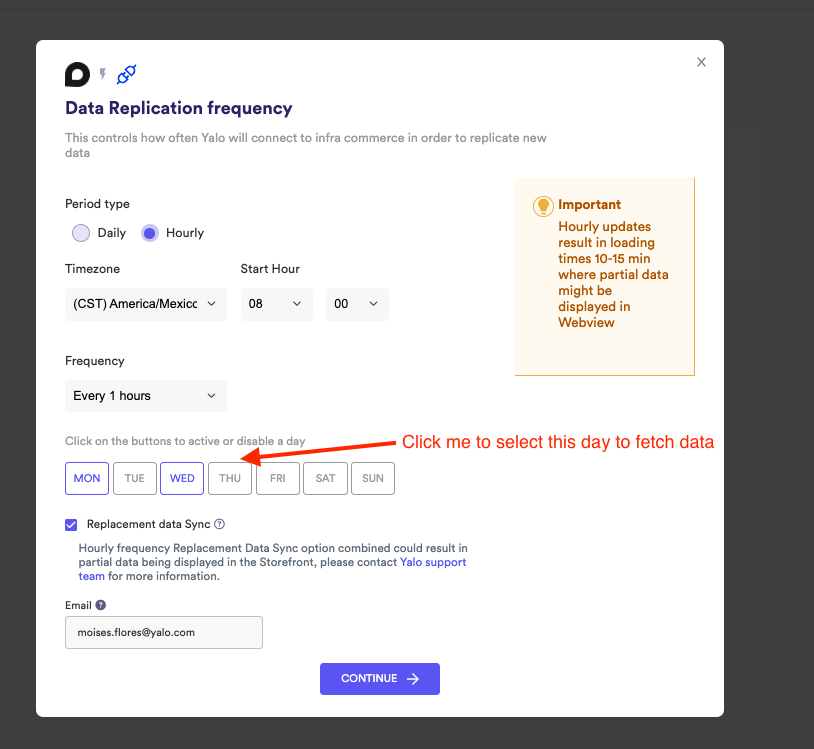
Once you filed all this data the CONTINUE button will be activated
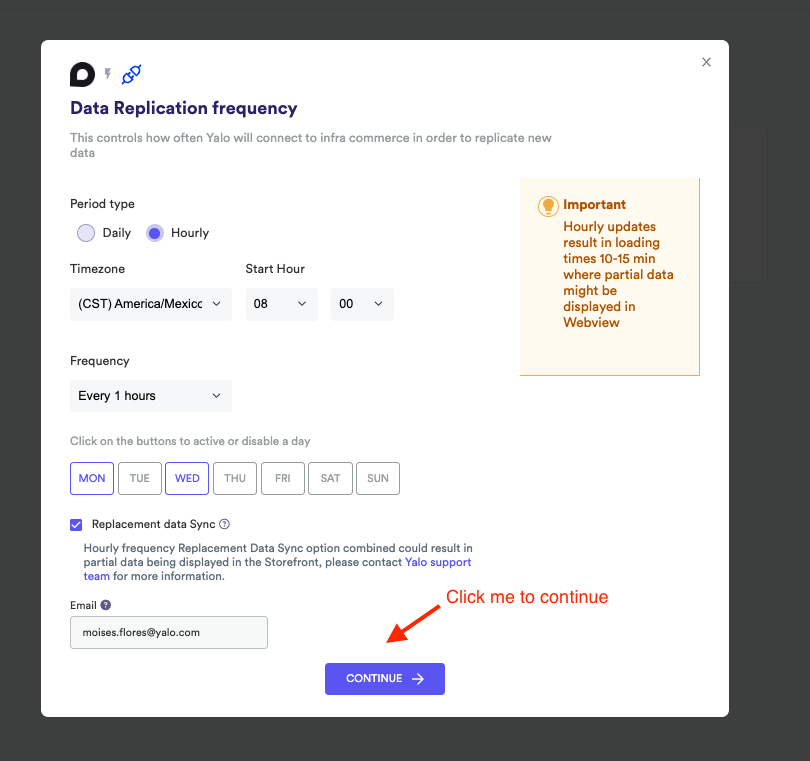
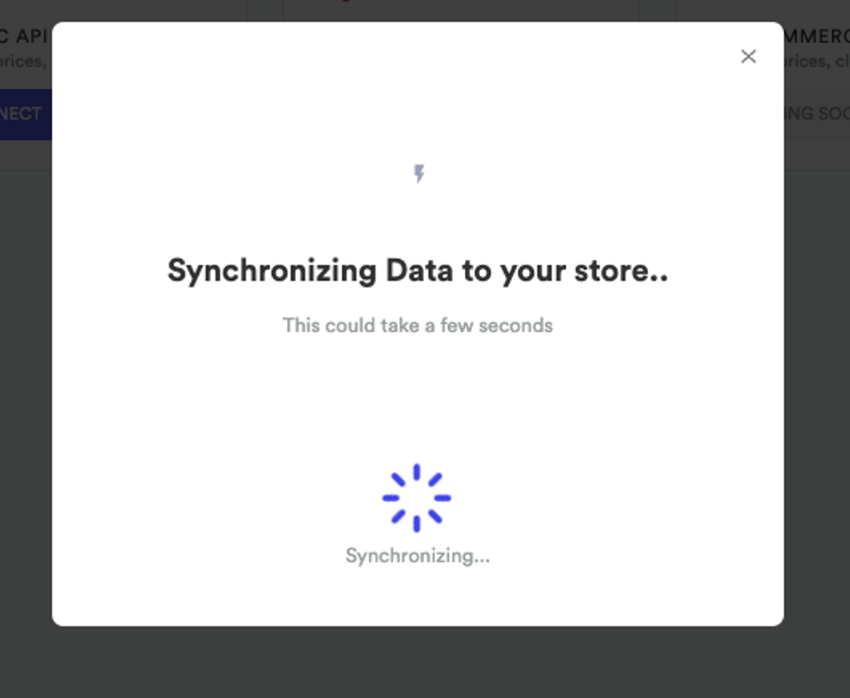
Once you clicked on continue you will see a loader will your information is store in the integrations system
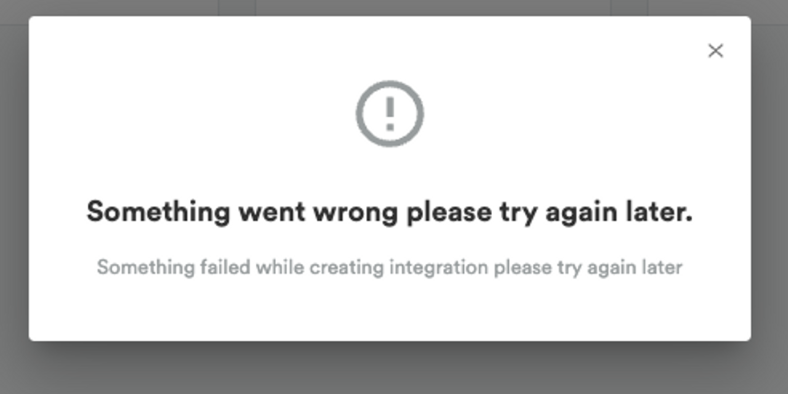
If everything is successful you’ll see this modal
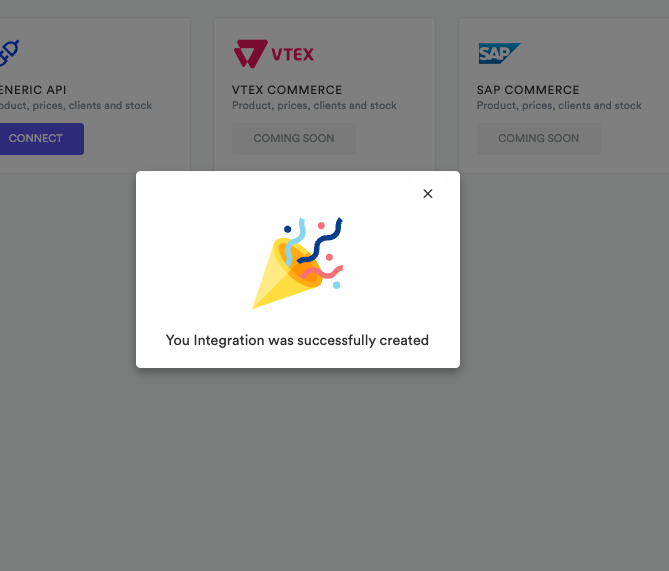
In the other hand if something fails you’ll see this one
Accessing to integrations through Inventory & Customer tab
When you create a store and go to Inventory & Customer tab you will see the next screen
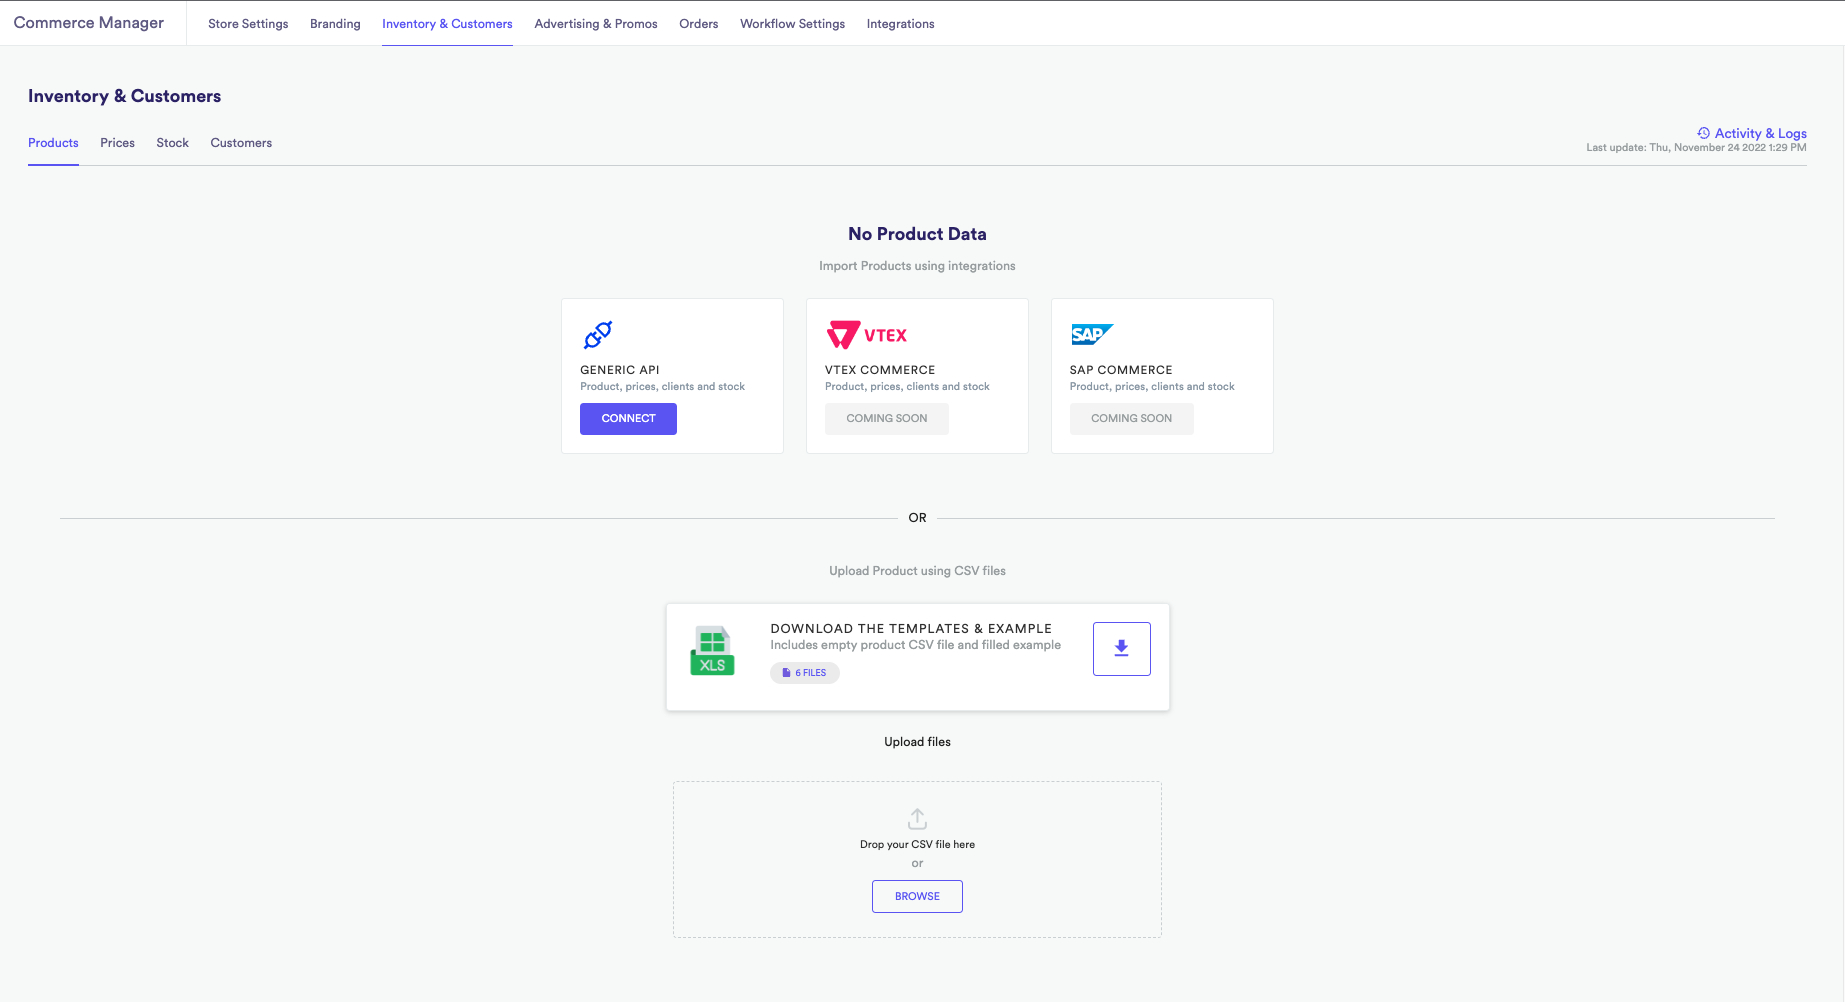
In this screen you will be allow to upload a csv as usual by either clicking on the BROWSE button or just drag and drop the file you want to the corresponding area, if you don’t know how the csv should look just click on the download icon from DOWNLOAD THE TEMPLATE & EXAMPLE area.
Also you can access to the integrations by click on the CONNECT button
The main difference from this tab and integrations tab is that you will not be required to select an entity, you’ll be directed to the authentication modal to continue jsut follow the process describe here.

Updated over 1 year ago